
V-Com Partition Commander 6.04 serial key or number

V-Com Partition Commander 6.04 serial key or number
Storage Executive Software

New Feature: Flex Capacity
- Allows you to adjust the capacity of your drive, to enable easy tuning to match your application and workload needs

Manage Your SSD
- Sanitize (erase) to restore factory settings
- Reset the drive encryption password
- Generate Micron-specific SMART data reports
- Report drive status, model, capacity, firmware version, temperature, and remaining life

Monitor Drive Health
- View system-level details for all drives in the system
- Display drive temperature (supported drives only)
- Check firmware status

Get the Latest Firmware
- See when new firmware versions become available
- Update with the click of a button (Internet access required)

Command-Line Interface
- Robust CLI allows access to all management features
- Configure overprovisioning, see status of all drives in system, manage SMART settings, update FW, and more

Meet the demands of your performance-critical cloud and enterprise workloads with the speed, performance and capacity of our flagship performer, the Micron 9300 SSD.


Optimize your business-critical virtualized workloads the easy way — with the industry-leading performance, reliability, capacity and infrastructure value of the TAA compliant Micron 5200 series of SATA SSDs.

Meet the demands of your enterprise IT and cloud service applications with Micron 5100 SSD's high performance and capacity, coupled with enterprise-class reliability.


SSDs are revolutionizing IIoT. Micron’s industrial SSDs deliver optimal performance, high capacities, increased reliability and industrial temperature options in small form factors.

Download Storage Executive
1. fio - Flexible I/O tester rev. 3.23
1.1. Overview and history
Fio was originally written to save me the hassle of writing special test case programs when I wanted to test a specific workload, either for performance reasons or to find/reproduce a bug. The process of writing such a test app can be tiresome, especially if you have to do it often. Hence I needed a tool that would be able to simulate a given I/O workload without resorting to writing a tailored test case again and again.
A test work load is difficult to define, though. There can be any number of processes or threads involved, and they can each be using their own way of generating I/O. You could have someone dirtying large amounts of memory in an memory mapped file, or maybe several threads issuing reads using asynchronous I/O. fio needed to be flexible enough to simulate both of these cases, and many more.
Fio spawns a number of threads or processes doing a particular type of I/O action as specified by the user. fio takes a number of global parameters, each inherited by the thread unless otherwise parameters given to them overriding that setting is given. The typical use of fio is to write a job file matching the I/O load one wants to simulate.
1.2. Source
Fio resides in a git repo, the canonical place is:
git://git.kernel.dk/fio.git
When inside a corporate firewall, git:// URL sometimes does not work. If git:// does not work, use the http protocol instead:
Snapshots are frequently generated and include the git meta data as well. Other tarballs are archives of official fio releases. Snapshots can download from:
There are also two official mirrors. Both of these are automatically synced with the main repository, when changes are pushed. If the main repo is down for some reason, either one of these is safe to use as a backup:
or
1.4. Author
Fio was written by Jens Axboe <axboe@kernel.dk> to enable flexible testing of the Linux I/O subsystem and schedulers. He got tired of writing specific test applications to simulate a given workload, and found that the existing I/O benchmark/test tools out there weren’t flexible enough to do what he wanted.
Jens Axboe <axboe@kernel.dk> 20060905
1.6. Building
Just type:
Note that GNU make is required. On BSDs it’s available from devel/gmake within ports directory; on Solaris it’s in the SUNWgmake package. On platforms where GNU make isn’t the default, type instead of .
Configure will print the enabled options. Note that on Linux based platforms, the libaio development packages must be installed to use the libaio engine. Depending on distro, it is usually called libaio-devel or libaio-dev.
For gfio, gtk 2.18 (or newer), associated glib threads, and cairo are required to be installed. gfio isn’t built automatically and can be enabled with a option to configure.
To build fio with a cross-compiler:
Configure will attempt to determine the target platform automatically.
It’s possible to build fio for ESX as well, use the switch to configure.
1.6.1. Windows
On Windows, Cygwin (https://www.cygwin.com/) is required in order to build fio. To create an MSI installer package install WiX from https://wixtoolset.org and run from the directory.
How to compile fio on 64-bit Windows:
- Install Cygwin (http://www.cygwin.com/). Install make and all packages starting with mingw64-x86_64. Ensure mingw64-x86_64-zlib are installed if you wish to enable fio’s log compression functionality.
- Open the Cygwin Terminal.
- Go to the fio directory (source files).
- Run .
To build fio for 32-bit Windows, ensure the -i686 versions of the previously mentioned -x86_64 packages are installed and run before . To build an fio that supports versions of Windows below Windows 7/Windows Server 2008 R2 also add to the end of the configure line that you run before doing .
It’s recommended that once built or installed, fio be run in a Command Prompt or other ‘native’ console such as console2, since there are known to be display and signal issues when running it under a Cygwin shell (see https://github.com/mintty/mintty/issues/56 and https://github.com/mintty/mintty/wiki/Tips#inputoutput-interaction-with-alien-programs for details).
1.6.2. Documentation
Fio uses Sphinx to generate documentation from the reStructuredText files. To build HTML formatted documentation run and direct your browser to . To build manual page run and then . To see what other output formats are supported run .
1.7. Platforms
Fio works on (at least) Linux, Solaris, AIX, HP-UX, OSX, NetBSD, OpenBSD, Windows, FreeBSD, and DragonFly. Some features and/or options may only be available on some of the platforms, typically because those features only apply to that platform (like the solarisaio engine, or the splice engine on Linux).
Some features are not available on FreeBSD/Solaris even if they could be implemented, I’d be happy to take patches for that. An example of that is disk utility statistics and (I think) huge page support, support for that does exist in FreeBSD/Solaris.
Fio uses pthread mutexes for signalling and locking and some platforms do not support process shared pthread mutexes. As a result, on such platforms only threads are supported. This could be fixed with sysv ipc locking or other locking alternatives.
Other *BSD platforms are untested, but fio should work there almost out of the box. Since I don’t do test runs or even compiles on those platforms, your mileage may vary. Sending me patches for other platforms is greatly appreciated. There’s a lot of value in having the same test/benchmark tool available on all platforms.
Note that POSIX aio is not enabled by default on AIX. Messages like these:
indicate one needs to enable POSIX aio. Run the following commands as root:
POSIX aio should work now. To make the change permanent:
1.8. Running fio
Running fio is normally the easiest part - you just give it the job file (or job files) as parameters:
and it will start doing what the jobfile tells it to do. You can give more than one job file on the command line, fio will serialize the running of those files. Internally that is the same as using the parameter described in the parameter section.
If the job file contains only one job, you may as well just give the parameters on the command line. The command line parameters are identical to the job parameters, with a few extra that control global parameters. For example, for the job file parameter , the mirror command line option would be or . You can also use the command line for giving more than one job entry. For each option that fio sees, it will start a new job with that name. Command line entries following a entry will apply to that job, until there are no more entries or a new entry is seen. This is similar to the job file options, where each option applies to the current job until a new [] job entry is seen.
fio does not need to run as root, except if the files or devices specified in the job section requires that. Some other options may also be restricted, such as memory locking, I/O scheduler switching, and decreasing the nice value.
If jobfile is specified as , the job file will be read from standard input.
1.9. How fio works
The first step in getting fio to simulate a desired I/O workload, is writing a job file describing that specific setup. A job file may contain any number of threads and/or files – the typical contents of the job file is a global section defining shared parameters, and one or more job sections describing the jobs involved. When run, fio parses this file and sets everything up as described. If we break down a job from top to bottom, it contains the following basic parameters:
I/O type
Defines the I/O pattern issued to the file(s). We may only be reading sequentially from this file(s), or we may be writing randomly. Or even mixing reads and writes, sequentially or randomly. Should we be doing buffered I/O, or direct/raw I/O?
Block size
In how large chunks are we issuing I/O? This may be a single value, or it may describe a range of block sizes.
I/O size
How much data are we going to be reading/writing.
I/O engine
How do we issue I/O? We could be memory mapping the file, we could be using regular read/write, we could be using splice, async I/O, or even SG (SCSI generic sg).
I/O depth
If the I/O engine is async, how large a queuing depth do we want to maintain?
Target file/device
How many files are we spreading the workload over.
Threads, processes and job synchronization
How many threads or processes should we spread this workload over.
The above are the basic parameters defined for a workload, in addition there’s a multitude of parameters that modify other aspects of how this job behaves.
1.10. Command line options
- 
Enable verbose tracing type of various fio actions. May be for all types or individual types separated by a comma (e.g. will enable file and memory debugging). Currently, additional logging is available for:
- process
- Dump info related to processes.
- file
- Dump info related to file actions.
- io
- Dump info related to I/O queuing.
- mem
- Dump info related to memory allocations.
- blktrace
- Dump info related to blktrace setup.
- verify
- Dump info related to I/O verification.
- all
- Enable all debug options.
- random
- Dump info related to random offset generation.
- parse
- Dump info related to option matching and parsing.
- diskutil
- Dump info related to disk utilization updates.
- job:x
- Dump info only related to job number x.
- mutex
- Dump info only related to mutex up/down ops.
- profile
- Dump info related to profile extensions.
- time
- Dump info related to internal time keeping.
- net
- Dump info related to networking connections.
- rate
- Dump info related to I/O rate switching.
- compress
- Dump info related to log compress/decompress.
- steadystate
- Dump info related to steadystate detection.
- helperthread
- Dump info related to the helper thread.
- zbd
- Dump info related to support for zoned block devices.
- ? or help
- Show available debug options.
- 
Parse options only, don’t start any I/O.
- 
Merge blktraces only, don’t start any I/O.
- 
Write output to file filename.
- 
Set the reporting format to normal, terse, json, or json+. Multiple formats can be selected, separated by a comma. terse is a CSV based format. json+ is like json, except it adds a full dump of the latency buckets.
- 
Generate aggregate bandwidth logs.
- 
Print statistics in a terse, semicolon-delimited format.
- 
Print statistics in selected mode AND terse, semicolon-delimited format. Deprecated, use instead to select multiple formats.
- 
Set terse version output format (default 3, or 2 or 4 or 5).
- 
Print version information and exit.
- 
Print a summary of the command line options and exit.
- 
Perform test and validation of internal CPU clock.
- 
Test the speed of the built-in checksumming functions. If no argument is given, all of them are tested. Alternatively, a comma separated list can be passed, in which case the given ones are tested.
- 
Print help information for command. May be for all commands.
- 
List all commands defined by ioengine, or print help for command defined by ioengine. If no ioengine is given, list all available ioengines.
- 
Convert jobfile to a set of command-line options.
- 
Turn on safety read-only checks, preventing writes and trims. The option is an extra safety guard to prevent users from accidentally starting a write or trim workload when that is not desired. Fio will only modify the device under test if rw=write/randwrite/rw/randrw/trim/randtrim/trimwrite is given. This safety net can be used as an extra precaution.
- 
Specifies when real-time ETA estimate should be printed. when may be always, never or auto. auto is the default, it prints ETA when requested if the output is a TTY. always disregards the output type, and prints ETA when requested. never never prints ETA.
- 
By default, fio requests client ETA status roughly every second. With this option, the interval is configurable. Fio imposes a minimum allowed time to avoid flooding the console, less than 250 msec is not supported.
- 
Force a new line for every time period passed. When the unit is omitted, the value is interpreted in seconds.
- 
Force a full status dump of cumulative (from job start) values at time intervals. This option does not provide per-period measurements. So values such as bandwidth are running averages. When the time unit is omitted, time is interpreted in seconds. Note that using this option with will yield output that technically isn’t valid json, since the output will be collated sets of valid json. It will need to be split into valid sets of json after the run.
- 
Only run specified section name in job file. Multiple sections can be specified. The option allows one to combine related jobs into one file. E.g. one job file could define light, moderate, and heavy sections. Tell fio to run only the “heavy” section by giving command line option. One can also specify the “write” operations in one section and “verify” operation in another section. The option only applies to job sections. The reserved global section is always parsed and used.
- 
Allocate additional internal smalloc pools of size kb in KiB. The option increases shared memory set aside for use by fio. If running large jobs with randommap enabled, fio can run out of memory. Smalloc is an internal allocator for shared structures from a fixed size memory pool and can grow to 16 pools. The pool size defaults to 16MiB.
NOTE: While running backing store files are visible in .
- 
All fio parser warnings are fatal, causing fio to exit with an error.
- 
Set the maximum number of threads/processes to support to nr. NOTE: On Linux, it may be necessary to increase the shared-memory limit () if fio runs into errors while creating jobs.
- 
Start a backend server, with args specifying what to listen to. See Client/Server section.
- 
Background a fio server, writing the pid to the given pidfile file.
- 
Instead of running the jobs locally, send and run them on the given hostname or set of hostnames. See Client/Server section.
- 
Tell fio server to load this local file.
- 
Report CPU idleness. option is one of the following:
- calibrate
- Run unit work calibration only and exit.
- system
- Show aggregate system idleness and unit work.
- percpu
- As system but also show per CPU idleness.
- 
Inflate and output compressed log.
- 
Execute trigger command when file exists.
- 
Execute trigger at this time.
- 
Set this command as local trigger.
- 
Set this command as remote trigger.
- 
Use the directory specified by path for generated state files instead of the current working directory.
Any parameters following the options will be assumed to be job files, unless they match a job file parameter. Multiple job files can be listed and each job file will be regarded as a separate group. Fio will execution between each group.
1.11. Job file format
As previously described, fio accepts one or more job files describing what it is supposed to do. The job file format is the classic ini file, where the names enclosed in [] brackets define the job name. You are free to use any ASCII name you want, except global which has special meaning. Following the job name is a sequence of zero or more parameters, one per line, that define the behavior of the job. If the first character in a line is a ‘;’ or a ‘#’, the entire line is discarded as a comment.
A global section sets defaults for the jobs described in that file. A job may override a global section parameter, and a job file may even have several global sections if so desired. A job is only affected by a global section residing above it.
The option also lists all options. If used with a command argument, will detail the given command.
See the examples/ directory for inspiration on how to write job files. Note the copyright and license requirements currently apply to examples/ files.
So let’s look at a really simple job file that defines two processes, each randomly reading from a 128MiB file:
As you can see, the job file sections themselves are empty as all the described parameters are shared. As no option is given, fio makes up a filename for each of the jobs as it sees fit. On the command line, this job would look as follows:
Let’s look at an example that has a number of processes writing randomly to files:
Here we have no global section, as we only have one job defined anyway. We want to use async I/O here, with a depth of 4 for each file. We also increased the buffer size used to 32KiB and define numjobs to 4 to fork 4 identical jobs. The result is 4 processes each randomly writing to their own 64MiB file. Instead of using the above job file, you could have given the parameters on the command line. For this case, you would specify:
When fio is utilized as a basis of any reasonably large test suite, it might be desirable to share a set of standardized settings across multiple job files. Instead of copy/pasting such settings, any section may pull in an external file with include filename directive, as in the following example:
Settings pulled into a section apply to that section only (except global section). Include directives may be nested in that any included file may contain further include directive(s). Include files may not contain [] sections.
1.11.1. Environment variables
Fio also supports environment variable expansion in job files. Any sub-string of the form as part of an option value (in other words, on the right of the ‘=’), will be expanded to the value of the environment variable called VARNAME. If no such environment variable is defined, or VARNAME is the empty string, the empty string will be substituted.
As an example, let’s look at a sample fio invocation and job file:
This will expand to the following equivalent job file at runtime:
Fio ships with a few example job files, you can also look there for inspiration.
1.11.2. Reserved keywords
Additionally, fio has a set of reserved keywords that will be replaced internally with the appropriate value. Those keywords are:
$pagesize
The architecture page size of the running system.
$mb_memory
Megabytes of total memory in the system.
$ncpus
Number of online available CPUs.
These can be used on the command line or in the job file, and will be automatically substituted with the current system values when the job is run. Simple math is also supported on these keywords, so you can perform actions like:
and get that properly expanded to 8 times the size of memory in the machine.
1.12. Job file parameters
This section describes in details each parameter associated with a job. Some parameters take an option of a given type, such as an integer or a string. Anywhere a numeric value is required, an arithmetic expression may be used, provided it is surrounded by parentheses. Supported operators are:
- addition (+)
- subtraction (-)
- multiplication (*)
- division (/)
- modulus (%)
- exponentiation (^)
For time values in expressions, units are microseconds by default. This is different than for time values not in expressions (not enclosed in parentheses). The following types are used:
1.12.1. Parameter types
- str
- String: A sequence of alphanumeric characters.
- time
- Integer with possible time suffix. Without a unit value is interpreted as seconds unless otherwise specified. Accepts a suffix of ‘d’ for days, ‘h’ for hours, ‘m’ for minutes, ‘s’ for seconds, ‘ms’ (or ‘msec’) for milliseconds and ‘us’ (or ‘usec’) for microseconds. For example, use 10m for 10 minutes.
- int
Integer. A whole number value, which may contain an integer prefix and an integer suffix:
[integer prefix] number [integer suffix]
The optional integer prefix specifies the number’s base. The default is decimal. 0x specifies hexadecimal.
The optional integer suffix specifies the number’s units, and includes an optional unit prefix and an optional unit. For quantities of data, the default unit is bytes. For quantities of time, the default unit is seconds unless otherwise specified.
With =1000, fio follows international standards for unit prefixes. To specify power-of-10 decimal values defined in the International System of Units (SI):
- K – means kilo (K) or 1000
- M – means mega (M) or 1000**2
- G – means giga (G) or 1000**3
- T – means tera (T) or 1000**4
- P – means peta (P) or 1000**5
To specify power-of-2 binary values defined in IEC 80000-13:
- Ki – means kibi (Ki) or 1024
- Mi – means mebi (Mi) or 1024**2
- Gi – means gibi (Gi) or 1024**3
- Ti – means tebi (Ti) or 1024**4
- Pi – means pebi (Pi) or 1024**5
With =1024 (the default), the unit prefixes are opposite from those specified in the SI and IEC 80000-13 standards to provide compatibility with old scripts. For example, 4k means 4096.
For quantities of data, an optional unit of ‘B’ may be included (e.g., ‘kB’ is the same as ‘k’).
The integer suffix is not case sensitive (e.g., m/mi mean mebi/mega, not milli). ‘b’ and ‘B’ both mean byte, not bit.
Examples with =1000:
- 4 KiB: 4096, 4096b, 4096B, 4ki, 4kib, 4kiB, 4Ki, 4KiB
- 1 MiB: 1048576, 1mi, 1024ki
- 1 MB: 1000000, 1m, 1000k
- 1 TiB: 1099511627776, 1ti, 1024gi, 1048576mi
- 1 TB: 1000000000, 1t, 1000m, 1000000k
Examples with =1024 (default):
- 4 KiB: 4096, 4096b, 4096B, 4k, 4kb, 4kB, 4K, 4KB
- 1 MiB: 1048576, 1m, 1024k
- 1 MB: 1000000, 1mi, 1000ki
- 1 TiB: 1099511627776, 1t, 1024g, 1048576m
- 1 TB: 1000000000, 1ti, 1000mi, 1000000ki
To specify times (units are not case sensitive):
- D – means days
- H – means hours
- M – means minutes
- s – or sec means seconds (default)
- ms – or msec means milliseconds
- us – or usec means microseconds
If the option accepts an upper and lower range, use a colon ‘:’ or minus ‘-‘ to separate such values. See irange. If the lower value specified happens to be larger than the upper value the two values are swapped.
- bool
- Boolean. Usually parsed as an integer, however only defined for true and false (1 and 0).
- irange
- Integer range with suffix. Allows value range to be given, such as 1024-4096. A colon may also be used as the separator, e.g. 1k:4k. If the option allows two sets of ranges, they can be specified with a ‘,’ or ‘/’ delimiter: 1k-4k/8k-32k. Also see int.
- float_list
- A list of floating point numbers, separated by a ‘:’ character.
With the above in mind, here follows the complete list of fio job parameters.
1.12.2. Units
- 
Select the interpretation of unit prefixes in input parameters.
- 1000
Inputs comply with IEC 80000-13 and the International System of Units (SI). Use:
- power-of-2 values with IEC prefixes (e.g., KiB)
- power-of-10 values with SI prefixes (e.g., kB)
- 1024
Compatibility mode (default). To avoid breaking old scripts:
- power-of-2 values with SI prefixes
- power-of-10 values with IEC prefixes
See for more details on input parameters.
Outputs always use correct prefixes. Most outputs include both side-by-side, like:
bw=2383.3kB/s(2327.4KiB/s)If only one value is reported, then kb_base selects the one to use:
1000 – SI prefixes
1024 – IEC prefixes
- 
Base unit for reporting. Allowed values are:
- 0
- Use auto-detection (default).
- 8
- Byte based.
- 1
- Bit based.
1.12.3. Job description
- 
ASCII name of the job. This may be used to override the name printed by fio for this job. Otherwise the job name is used. On the command line this parameter has the special purpose of also signaling the start of a new job.
- 
Text description of the job. Doesn’t do anything except dump this text description when this job is run. It’s not parsed.
- 
Run the specified number of iterations of this job. Used to repeat the same workload a given number of times. Defaults to 1.
- 
Create the specified number of clones of this job. Each clone of job is spawned as an independent thread or process. May be used to setup a larger number of threads/processes doing the same thing. Each thread is reported separately; to see statistics for all clones as a whole, use in conjunction with . See . Default: 1.
1.12.5. Target file/device
- 
Prefix filenames with this directory. Used to place files in a different location than . You can specify a number of directories by separating the names with a ‘:’ character. These directories will be assigned equally distributed to job clones created by as long as they are using generated filenames. If specific filename(s) are set fio will use the first listed directory, and thereby matching the filename semantic (which generates a file for each clone if not specified, but lets all clones use the same file if set).
See the option for information on how to escape “” characters within the directory path itself.
Note: To control the directory fio will use for internal state files use .
- 
Fio normally makes up a filename based on the job name, thread number, and file number (see ). If you want to share files between threads in a job or several jobs with fixed file paths, specify a filename for each of them to override the default. If the ioengine is file based, you can specify a number of files by separating the names with a ‘:’ colon. So if you wanted a job to open and as the two working files, you would use . This also means that whenever this option is specified, is ignored. The size of regular files specified by this option will be divided by number of files unless an explicit size is specified by .
Each colon in the wanted path must be escaped with a character. For instance, if the path is then you would use and if the path is then you would use .
On Windows, disk devices are accessed as for the first device, for the second etc. Note: Windows and FreeBSD prevent write access to areas of the disk containing in-use data (e.g. filesystems).
The filename “-” is a reserved name, meaning stdin or stdout. Which of the two depends on the read/write direction set.
- 
If sharing multiple files between jobs, it is usually necessary to have fio generate the exact names that you want. By default, fio will name a file based on the default file format specification of . With this option, that can be customized. Fio will recognize and replace the following keywords in this string:
- $jobname
- The name of the worker thread or process.
- $jobnum
- The incremental number of the worker thread or process.
- $filenum
- The incremental number of the file for that worker thread or process.
To have dependent jobs share a set of files, this option can be set to have fio generate filenames that are shared between the two. For instance, if is specified, file number 4 for any job will be named . The default of will be used if no other format specifier is given.
If you specify a path then the directories will be created up to the main directory for the file. So for example if you specify then the directories a/b/c will be created before the file setup part of the job. If you specify then the path will be relative that directory, otherwise it is treated as the absolute path.
- 
To avoid collisions between networked clients, fio defaults to prefixing any generated filenames (with a directory specified) with the source of the client connecting. To disable this behavior, set this option to 0.
- 
Recursively open any files below directory str.
- 
Fio defaults to not locking any files before it does I/O to them. If a file or file descriptor is shared, fio can serialize I/O to that file to make the end result consistent. This is usual for emulating real workloads that share files. The lock modes are:
- none
- No locking. The default.
- exclusive
- Only one thread or process may do I/O at a time, excluding all others.
- readwrite
- Read-write locking on the file. Many readers may access the file at the same time, but writes get exclusive access.
- 
Number of files to use for this job. Defaults to 1. The size of files will be divided by this unless explicit size is specified by . Files are created for each thread separately, and each file will have a file number within its name by default, as explained in section.
- 
Number of files to keep open at the same time. Defaults to the same as , can be set smaller to limit the number simultaneous opens.
- 
Defines how fio decides which file from a job to service next. The following types are defined:
- random
- Choose a file at random.
- roundrobin
- Round robin over opened files. This is the default.
- sequential
- Finish one file before moving on to the next. Multiple files can still be open depending on .
- zipf
- Use a Zipf distribution to decide what file to access.
- pareto
- Use a Pareto distribution to decide what file to access.
- normal
- Use a Gaussian (normal) distribution to decide what file to access.
- gauss
- Alias for normal.
For random, roundrobin, and sequential, a postfix can be appended to tell fio how many I/Os to issue before switching to a new file. For example, specifying would cause fio to issue 8 I/Os before selecting a new file at random. For the non-uniform distributions, a floating point postfix can be given to influence how the distribution is skewed. See for a description of how that would work.
- 
Attempt to switch the device hosting the file to the specified I/O scheduler before running.
- 
If true, serialize the file creation for the jobs. This may be handy to avoid interleaving of data files, which may greatly depend on the filesystem used and even the number of processors in the system. Default: true.
- 
fsync(2) the data file after creation. This is the default.
- 
If true, don’t pre-create files but allow the job’s open() to create a file when it’s time to do I/O. Default: false – pre-create all necessary files when the job starts.
- 
If true, fio will only run the setup phase of the job. If files need to be laid out or updated on disk, only that will be done – the actual job contents are not executed. Default: false.
- 
If true, fio is permitted to create files as part of its workload. If this option is false, then fio will error out if the files it needs to use don’t already exist. Default: true.
- 
If this isn’t set, fio will abort jobs that are destructive (e.g. that write) to what appears to be a mounted device or partition. This should help catch creating inadvertently destructive tests, not realizing that the test will destroy data on the mounted file system. Note that some platforms don’t allow writing against a mounted device regardless of this option. Default: false.
- 
If this is given, files will be pre-read into memory before starting the given I/O operation. This will also clear the flag, since it is pointless to pre-read and then drop the cache. This will only work for I/O engines that are seek-able, since they allow you to read the same data multiple times. Thus it will not work on non-seekable I/O engines (e.g. network, splice). Default: false.
- 
Unlink the job files when done. Not the default, as repeated runs of that job would then waste time recreating the file set again and again. Default: false.
- 
Unlink job files after each iteration or loop. Default: false.
- 
Accepted values are:
- none
- The , , :option zonecapacity and option:zoneskip parameters are ignored.
- strided
- I/O happens in a single zone until bytes have been transferred. After that number of bytes has been transferred processing of the next zone starts. :option zonecapacity is ignored.
- zbd
- Zoned block device mode. I/O happens sequentially in each zone, even if random I/O has been selected. Random I/O happens across all zones instead of being restricted to a single zone. The parameter is ignored. and must be identical.
- 
Size of a single zone. See also and .
- 
For =strided, this is the number of bytes to transfer before skipping bytes. If this parameter is smaller than then only a fraction of each zone with bytes will be accessed. If this parameter is larger than then each zone will be accessed multiple times before skipping to the next zone.
For =zbd, this is the size of a single zone. The parameter is ignored in this mode.
- 
For =zbd, this defines the capacity of a single zone, which is the accessible area starting from the zone start address. This parameter only applies when using =zbd in combination with regular block devices. If not specified it defaults to the zone size. If the target device is a zoned block device, the zone capacity is obtained from the device information and this option is ignored.
- 
For =strided, the number of bytes to skip after bytes of data have been transferred. This parameter must be zero for =zbd.
- 
This parameter applies to =zbd only.
Zoned block devices are block devices that consist of multiple zones. Each zone has a type, e.g. conventional or sequential. A conventional zone can be written at any offset that is a multiple of the block size. Sequential zones must be written sequentially. The position at which a write must occur is called the write pointer. A zoned block device can be either drive managed, host managed or host aware. For host managed devices the host must ensure that writes happen sequentially. Fio recognizes host managed devices and serializes writes to sequential zones for these devices.
If a read occurs in a sequential zone beyond the write pointer then the zoned block device will complete the read without reading any data from the storage medium. Since such reads lead to unrealistically high bandwidth and IOPS numbers fio only reads beyond the write pointer if explicitly told to do so. Default: false.
- 
When running a random write test across an entire drive many more zones will be open than in a typical application workload. Hence this command line option that allows to limit the number of open zones. The number of open zones is defined as the number of zones to which write commands are issued.
- 
A number between zero and one that indicates the ratio of logical blocks with data to the total number of logical blocks in the test above which zones should be reset periodically.
- 
A number between zero and one that indicates how often a zone reset should be issued if the zone reset threshold has been exceeded. A zone reset is submitted after each (1 / zone_reset_frequency) write requests. This and the previous parameter can be used to simulate garbage collection activity.
1.12.6. I/O type
- 
If value is true, use non-buffered I/O. This is usually O_DIRECT. Note that OpenBSD and ZFS on Solaris don’t support direct I/O. On Windows the synchronous ioengines don’t support direct I/O. Default: false.
- 
If value is true, attempt to use atomic direct I/O. Atomic writes are guaranteed to be stable once acknowledged by the operating system. Only Linux supports O_ATOMIC right now.
- 
If value is true, use buffered I/O. This is the opposite of the option. Defaults to true.
- 
Type of I/O pattern. Accepted values are:
- read
- Sequential reads.
- write
- Sequential writes.
- trim
- Sequential trims (Linux block devices and SCSI character devices only).
- randread
- Random reads.
- randwrite
- Random writes.
- randtrim
- Random trims (Linux block devices and SCSI character devices only).
- rw,readwrite
- Sequential mixed reads and writes.
- randrw
- Random mixed reads and writes.
- trimwrite
- Sequential trim+write sequences. Blocks will be trimmed first, then the same blocks will be written to.
Fio defaults to read if the option is not specified. For the mixed I/O types, the default is to split them 50/50. For certain types of I/O the result may still be skewed a bit, since the speed may be different.
It is possible to specify the number of I/Os to do before getting a new offset by appending to the end of the string given. For a random read, it would look like for passing in an offset modifier with a value of 8. If the suffix is used with a sequential I/O pattern, then the <nr> value specified will be added to the generated offset for each I/O turning sequential I/O into sequential I/O with holes. For instance, using will skip 4k for every write. Also see the option.
- 
If an offset modifier is given by appending a number to the line, then this option controls how that number modifies the I/O offset being generated. Accepted values are:
- sequential
- Generate sequential offset.
- identical
- Generate the same offset.
is only useful for random I/O, where fio would normally generate a new random offset for every I/O. If you append e.g. 8 to randread, you would get a new random offset for every 8 I/Os. The result would be a seek for only every 8 I/Os, instead of for every I/O. Use to specify that. As sequential I/O is already sequential, setting for that would not result in any differences. behaves in a similar fashion, except it sends the same offset 8 number of times before generating a new offset.
- 
Fio normally reports statistics on a per data direction basis, meaning that reads, writes, and trims are accounted and reported separately. If this option is set fio sums the results and report them as “mixed” instead.
- 
Certification Objective 6.04-Setting Up and Managing Disk Quotas
Quotas are used to limit a user's or a group of users' ability to consume disk space. This prevents a small group of users from monopolizing disk capacity and potentially interfering with other users or the entire system. Disk quotas are commonly used by Internet Service Providers (ISPs), by Web hosting companies, on FTP sites, and on corporate file servers to ensure continued availability of their systems.
Without quotas, one or more users can upload files on an FTP server and occupy all free space on a partition. Once the affected partition is full, other users are effectively denied upload access to the disk. This is also a reason to mount different filesystem directories on different partitions. For example, if you only had partitions for your root (/) directory and swap space, someone uploading to your computer could fill up all of the space in your root directory (/). Without at least a little free space in the root directory (/), your system could become unstable or even crash.
You have two ways to set quotas for users. You can limit users by inodes or by kilobyte-sized disk blocks. Every Linux file requires an inode. Therefore, you can limit users by the number of files or by absolute space. You can set up different quotas for different filesystems. For example, you can set different quotas for users on the /home and /tmp directories if they are mounted on their own partitions.
Limits on disk blocks restrict the amount of disk space available to a user on your system. Older versions of Red Hat Linux included LinuxConf, which included a graphical tool to configure quotas. As of this writing, Red Hat no longer has a graphical quota configuration tool. Today, you can configure quotas on RHEL only through the command line interface.
| On the Job | Learn to focus on command line tools. Red Hat used to make LinuxConf available as a graphical and console tool for a number of system administration functions, including quotas. While Red Hat may eventually create another GUI quota manager, don't count on it. |
Quota Settings in the Kernel
By default, the Linux kernel as configured by Red Hat supports quotas. However, if you install and compile a new kernel from a remote source, you should make sure that this feature is active. The basic kernel configuration is stored in the /boot directory. For the default RHEL system, you'll find the configuration in the config-versionumber file. If you've configured a custom kernel file, you'll find it listed under a different name.
To verify that quotas are enabled in the default kernel, run the following command (the shell substitutes the actual version number of the kernel for `uname -r`):
# grep CONFIG_QUOTA /boot/config-`uname -r`There are two possible results. The following means quota support is enabled:
CONFIG_QUOTA=yAlternatively, if you see either of the following, quota support is not enabled:
CONFIG_QUOTA=n CONFIG_QUOTACTL=nCONFIG_QUOTA enables limits on usage; CONFIG_QUOTACTL is associated with disk quota manipulation.
If you have a custom or upgraded kernel, use either the make menuconfig, makegconfig, or make xconfig command to make sure support is enabled for quotas. The quota support option is located in the filesystem section. All you need to do is turn on quota support and then rebuild and install your new kernel. I'll describe this process in more detail in Chapter 8.
The Quota Package
The quota RPM package is installed by default. You can find out more about RPMs such as quota with the following command:
# rpm -qi quotaAssuming you haven't removed the quota RPM, you'll see the following description of the package, which tells you that it includes a number of tools:
The quota package contains system administration tools for monitoring and limit- ing user and or group disk usage per filesystem.You can find out more about these tools by reviewing a list of associated files. You can find a list of files installed through the quota RPM with the following command:
# rpm -ql quotaAs you can see for yourself, the quota package includes the following commands:
/sbin/quotaon /fs Enables quotas for the specified filesystem.
/sbin/quotaoff /fs Disables quota tracking.
/usr/sbin/edquota name Edits the quota settings for the specified username. Can also be used to set defaults or to copy quota settings from one user to another.
/usr/bin/quota Allows users to see their current resource consumption and limits.
/usr/sbin/repquota Generates a report of disk consumption by all users for a quota-enabled filesystem.
/sbin/quotacheck Scans a filesystem for quota usage. Initializes the quota databases.
I've included the entire path to each command for your reference. But as discussed earlier in this book, I recommend that you normally work as the root user during the Red Hat exams. As the noted directories are all part of the root user's PATH, you don't need to specify the full path to each command. (You can verify the directories in your path with the echo $PATH command.)
The next step is to ensure the quotas are active and checked when Linux boots on your system.
sysinit Quota Handling
The /etc/rc.sysinit script noted in Chapter 3 initializes Linux system services during the boot process. This script includes commands that start quota services. Specifically, this script runs both the quotacheck (to ensure that disk consumption usage records are accurate) and quotaon (to enable quotas on all filesystems indicated in /etc/ fstab) commands. You don't have to run these commands manually.
Quota Activation in /etc/fstab
As described in Chapter 4, the file /etc/fstab tells Linux which filesystems to mount during the boot process. The options column of this file configures how Linux mounts a directory. You can include quota settings in /etc/fstab for users and/or groups.
| On the Job | Before you edit a key configuration file such as /etc/fstab, it's a good idea to back it up and save it to any boot or rescue disks that you may have. If your changes lead to a catastrophic failure, you can boot your system from a rescue disk and then restore the original configuration file. |
Here is a sample /etc/fstab before editing:
Device Mount point Filesys Options dump Fsck LABEL=/ / ext3 defaults 1 1 LABEL=/boot /boot ext3 defaults 1 2 /dev/sdb1 /home ext3 defaults 1 2 devpts /dev/pts devpts gid=5,mode=620 0 0 tmpfs /dev/shm proc tmpfs 0 0 proc /proc proc defaults 0 0 sysfs /sys proc sysfs 0 0 /dev/sda3 swap swap defaults 0 0In this configuration, it may make sense to enable quotas on the root (/) and /home directory filesystems. You can tell Linux to start tracking user quotas by adding the keyword usrquota under the options column. Similarly, you can tell Linux to start tracking group quotas with the grpquota option. Use vi or your favorite text editor to update /etc/fstab.
In this example, I add both user and group quotas to the /home directory filesystem:
/dev/sdb1 /home ext3 exec,dev,suid,rw,usrquota,grpquota 1 2If you edit the /etc/fstab file by hand, you'll need to ensure that the line you are editing does not wrap to the next line. If it does, the format for your /etc/fstab will be invalid and the boot process may be affected.
If you don't have a separate /home directory partition, you can apply the quota settings to the top-level root directory (/) partition.
| On the Job | You can test changes to /etc/fstab by rebooting your computer or remounting a filesystem. For example, if you've just added usrquota and grpquota entries as shown to the /home directory filesystem, you can test it with the mount -o remount /home command. Check the result in the /etc/mtab file. |
Quota Management Commands
The next step is to create quota files. For user and group quotas, you'll need the aquota .user and aquota.group files in the selected filesystem before you can activate actual quotas. You no longer need to create those files manually; once you've remounted the desired directory, the appropriate quotacheck command creates them automatically. For the /home directory described earlier, you'd use the following commands:
# mount -o remount /home # quotacheck -cugm /homeThe options for quotacheck are
-c Performs a new scan.
-v Performs a verbose scan.
-u Scans for user quotas.
-g Scans for group quotas.
-m Remounts the scanned filesystem.
This will check the current quota information for all users, groups, and partitions. It stores this information in the appropriate quota partitions. Once the command is run, you should be able to find the aquota.user and aquota.group files in the configured directory.
Using edquota to Set Up Disk Quotas
To specify disk quotas, you need to run the edquota command. This edits the aquota .user or aquota.group file with the vi editor. In this example, pretend you have a user named nancy, and you want to restrict how much disk space she is allowed to use. You'd type the following command to edit nancy's quota records:
# edquota -u nancyThis command launches the vi editor and opens the quota information for user nancy, as shown in Figure 6-4.
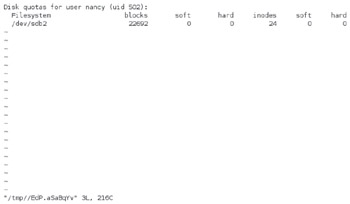
Figure 6-4: Quota information
On a standard command line terminal, the quota information is formatted strangely, with seven columns. (If you're running a command line terminal in the GUI, you can remove the line wrapping by increasing the width of the window; the terminals used to create Figures 6-4 through 6-7 include 90 columns.) The lines are wrapped. In this case, the filesystem with the quota is mounted on partition /dev/ sdb2. Soft and hard limits are included for both blocks and inodes. By default, soft and hard limits of 0 means that there are no limits for user nancy.
We can see that nancy is currently using 22,692 blocks and has 24 files (inodes) on this partition. Each block takes up 1KB of space; thus user nancy's files total approximately 22MB. In this example, we'll show you how to set a limit so that nancy does not take more than 100MB of space with her files.
First, it's important to understand the meaning of soft and hard limits.
Soft limit This is the maximum amount of space a user can have on that partition. If you have set a grace period, this will act as an alarm. The user will then be notified she is in quota violation. If you have set a grace period, you will also need to set a hard limit. A grace period is the number of days a user is allowed to be above the given quota. After the grace period is over, the user must get under the soft limit to continue.
Hard limit Hard limits are necessary only when you are using grace periods. If grace periods are enabled, this will be the absolute limit a user can use. Any attempt to consume resources beyond this limit will be denied. If you are not using grace periods, the soft limit is the maximum amount of available space for each user.
In this example, set an 100MB soft limit and a 120MB hard limit for the user. As shown in Figure 6-5, this is written as a number of 1KB blocks in the quota file.
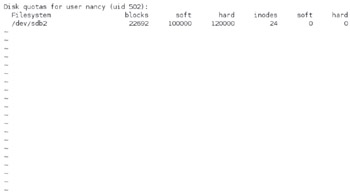
Figure 6-5: Quotas with hard and soft limits
Note that nancy's use of inodes is not limited. She is still able to use as many inodes (thus as many files) as she likes. To implement these quotas, these settings must be saved. In the default vi editor, the :wq command does this job nicely.
In addition, give user nancy a seven-day grace period. If and when she exceeds the soft limit, she has that amount of time to get back under the soft limit. To set the grace period for all users, run the edquota -t command. The result should look similar to what you see in Figure 6-6.
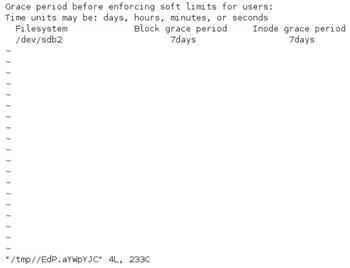
Figure 6-6: Quota grace period
Here, Linux has provided the default of seven days for both inodes and block usage. That is, a user may exceed the soft limit on either resource for up to seven days. After that, further requests by that user to use files will be denied. Our user nancy would have to delete files to get her total disk block consumption under 100MB before she could create new files or expand existing files. You can edit the grace period directly, using vi commands. To activate the new grace period, just save the file.
There is a quirk associated with quota grace periods. When you use edquota and specify the grace period, you cannot include a space between the number and the unit (for example, 7days, not 7 days). Fortunately, the quota system in RHEL 5 automatically fixes this problem.
| On the Job | In older versions of Red Hat distributions, a space between the quota number and the unit would lead to a quota error. In RHEL 5, that space is automatically removed when the appropriate quota setting is saved. |
The edquota command allows you to use an already configured user's quota as a template for new users. To use this feature, you need to run the command with the -p switch and configured_user arguments options:
# edquota -up nancy michael randy donnaThis command will not provide any output, but it will take the quota configuration settings of user nancy and apply them to michael, randy, and donna. You can include as many users as you want to edit or to which you want to apply templates.
You can also set up quotas on a per-group basis. To do this, simply run edquota with the -g group_name argument. Here, group_name would need to be a valid group as specified in the /etc/group file.
# edquota -g nancyThis opens the block and inode quota for group nancy, as shown in Figure 6-7.

Figure 6-7: Group quota
| On the Job | When testing quotas, there is one useful technique that creates a blank file of the desired size. For example, if you want to create a 100MB file named bigfile in the local directory, run the dd if=/dev/zero of=bigfile bs=1k count=100000 command. |
Automating Quota Settings
As an administrator, you'll want to maintain any quotas that you create. For that purpose, it's useful to run the aforementioned quotacheck command on a regular basis. As you'll see later in this chapter, it is easy to do through the cron system. A simple command in the right cron file automatically runs the quotacheck command on a regular basis. For example, the following command in the right cron file runs the quotacheck command at 2:00 A.M. every Saturday:
0 2 * * 6 /sbin/quotacheck -avugYou can also use the edquota command to apply quotas to all users on your system. For example, the following command applies the quotas that you've already set on user mj to all other real users on the system (the awk command was described briefly in Chapter 1):
edquota -p mj `awk -F: '$3 > 499 {print $1}' /etc/passwd'Note that this command lists the first column ($1) of /etc/passwd, which is the username. And in keeping with the UIDs for regular Red Hat users (from the third column, $3, of /etc/passwd), this is limited to users with UIDs of 500 or higher. You can add this type of command to the appropriate cron file as well, which makes sure that the quotas are applied to all existing and new users.
Quota Reports
As an administrator, it can be useful to see reports on who is using the most disk space. You can generate reports on users, groups, or everybody on every partition. To view a report showing quota information for all users, run the repquota -a command. You'll see a list of quotas for all users similar to that shown in Figure 6-8.
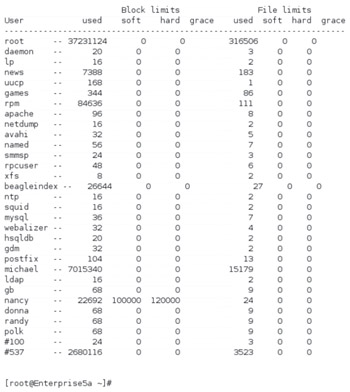
Figure 6-8: A quota report
If you have multiple filesystems with quotas, you can use the repquota command to isolate a specific filesystem. For example, if you wanted to view the quota report for the partition with the /home directory, run the following command:
# repquota -u /homeAlternatively, if you wanted to view quota information on user nancy, run the following quota command:
# quota -uv nancy Disk quotas for user nancy(uid 507): Filesystem blocks quota limit grace files quota limit grace /dev/hdd1 22692 100000 120000 24 0 0An individual user can check his own usage with the quota command, but only the administrative root user can examine the quotas for other users.
Quotas on NFS Directories
The Network File System (NFS) allows users to share files and directories on a network with Linux and Unix computers. Users across the network mount a shared NFS directory from a specific computer. Users are normally in a single database in an NFS setup. Disk quotas can be applied to these users in virtually the same way as they are to users on a regular Linux computer. For example, if you create a local user called nfsuser, and you translate all remote requests to this user, then you need to set up quota restrictions for nfsuser on the mounted partition. This will limit the disk consumption of all incoming NFS users. See Chapter 10 for more about NFS.
Exercise 6-3: Configuring Quotas
 |
In this exercise, you will set up user quotas for one user on your system. These quotas will allow a soft limit of 80MB and a hard limit of 100MB for each user. No limits are to be placed on the number of inodes. Assume the /home directory is mounted on a separate partition. (If /home is not mounted separately, apply the commands to the top-level root directory /.) The first couple of steps should be formalities, as quotas should be active and installed by default. However, it's a good habit to check. To set up quotas in this exercise, follow these steps:
Check your kernel configuration for the CONFIG_QUOTA variable, using the /boot/config-`uname -r` file. It should be set to "Y." If not, proceed to Chapter 8 for general instructions on how to revise your kernel.
Check to make sure that the quota package is installed. Install it from the RHEL 5 installation source if required.
Add quotas to /etc/fstab. Add the usrquota directive to the Options column for the partition with the /home directory. Make sure the info stays on one line in /etc/fstab.
Activate the quotas. You can unmount and remount the /home directory, reboot Linux, or use the following command:
# mount -o remount /homeUse the quotacheck -cum /home command to activate the user quota file in the /home directory.
Make sure this command worked. Look for the aquota.user file in the /home directory.
Now you're ready to set up quotas for a specific user. If necessary, look up usernames in /etc/passwd. Use the edquota -u username command to edit the quotas for the user of your choice.
Under the soft and hard columns, change the 0 to 80000 and 100000, respectively. Remember that these files are set up for 1KB blocks. Save the file.
Restore any previous settings that existed before this exercise.
|
What’s New in the V-Com Partition Commander 6.04 serial key or number?
Screen Shot

System Requirements for V-Com Partition Commander 6.04 serial key or number
- First, download the V-Com Partition Commander 6.04 serial key or number
-
You can download its setup from given links:

V-Com Partition Commander 6.04 serial key or number & Software

V-Com Partition Commander 6.04 serial key or number& for Laptop
