
Topaz DeNoise (for Adobe Photoshop) 4.1.0 serial key or number
 4.1.0 serial key or number")
Topaz DeNoise (for Adobe Photoshop) 4.1.0 serial key or number
Topaz A.I. Gigapixel 4.0 Latest File Code

Topaz A.I. Gigapixel 4.0 Cracked Patch Include Patch
The interface is customizable, as the user is able to hide or show different tool bars and panels (“Controls,” “Statistics,” “Shader Editor,” “Playlist” etc.). Even the menu bar can be hidden with just a few clicks. All in all, Topaz A.I. Gigapixel 4.0 Activation is a very useful piece of software that can help you capture frames from certain video files that you deem worthy. Cropping, scaling to a specific size, adjusting the contrast, brightness, hue and saturation are also features that you are able to benefit from in Topaz A.I. Gigapixel 4.0 Patch . The program enables you to import file formats such as AVI, MPEG, MOV, ASF and a few others, and there is also the possibility of capturing frames directly from video devices such as a DVD, DV camcorder, VCD and SVCD. A software application that enables any type of user to capture a video frame and turn it into a clean sharp picture with great ease.
Topaz A.I. Gigapixel 4.0 Patch. The program is essentially just a Web browser that displays Facebook and a couple of other links. You can give it your own personality, make it smart, sarcastic, anything you want really. Capture frame Enhance frame Noise reduction Reduction Frame Capture Enhance. With Elgato Topaz A.I. Gigapixel 4.0 Serial , you can record and stream your Xbox or PlayStation gameplay and share your journey with friends, fans and generations to come.

Topaz A.I. Gigapixel 4.0 Download 2019 Features
- 800GHz
- 256MB
- 1024×768
- DirectX
- Input video file formats avi, asf, wmv, mpeg, quicktime, realmedia.
- Input video device dvd video disc, dv camcorder or dv deck, vcd, svcd.
- Video control play normal/fast/slow, seek, step forward/backward.
- Enhance picture to resolution 1.0x, 1.5x, 2.0x and 2.5x.
- Noise reduction none, low, median, and high.
- Enhancing picture using neighboring frames 0, 2, 4, and 8.
- Motion smoothness minimum, small, median, and high.
- Advanced image sharpness without overshooting effect continuous adjustable
- Image adjustment contrast, brightness, hue, saturation.
- Capture mode quick capture, capture and enhance, auto-save, batch capture.
- Output option cropping, scale to a specific size
- Output image format bmp, jpeg, tif, png files, copy to clipboard (may need proper directx decoders)
Topaz A.I. Gigapixel 4.0 Patch
| Name | Specification |
|---|---|
| Category | Multimedia |
| Downloads | 4K |
| User Rating | 3.4 |
| Developer | Dreamwalker Software: |
| License | Serial Key |
| Language | Multi-language |
| Os | Windows Vista |
| Version | 4.1.1 |
| Updated | 10/18/2013 |
Topaz A.I. Gigapixel 4.0 Crack Video Preview
- Device support in XSplit Gamecaster is working again
- First completely uninstall the previous version with IObit Uninstaller
- Download and extract the files
- Install the installation file
- Disable the internet connection first
- Perform generate the key
- Done! Enjoy The Software
Opinions… Experiences… Humor… Issues… Dreams… People… Life
1. Canva

Enter a caption
Canva is by far the most popular free online design tool specifically made for bloggers.
You can produce professional looking Photoshop-quality graphic images, all with their free basic version.
Canva works with drag-and-drop functionality, making it easy to size and move images, add fonts, shapes and text boxes.
They have over 1 million preexisting images and graphics you can choose from, or you can upload your own images to use. With thousands of templates to start from and elements to use like free icons and fonts, it’s a blogger’s playground.
While Canva is often used for creating graphics to be shared on social media, you can customize your own dimensions if they don’t have a template in your preferred size.

From here you can choose a layout and start to build your graphic. You can also save your work to the cloud, which comes in handy if you’re working on a big graphic like an infographic or an incentive image for your content upgrade.
If you’re not familiar with using Canva, they offer a design school, which is a library of tutorials to help you master the features Canva has to offer.
If you want to choose from premium images, illustrations or charts, there is a small charge of $1 per item. You can also upgrade to Canva for Work, which is a subscription service, starting at $12.97/month or, if you pay annually, it’s only about $9.95/month.
2. PicMonkey
PicMonkey is another highly popular photo editing tool available online. The free Basic version offers plenty of editing options that can really make your image pop.
Some key differences that PicMonkey offers over Canva are:
- Image adjusting – sharpen an image or fix the exposure
- Custom effects – give your image a boost of color or soften your image
- Image touch ups – whiten teeth, fix blemishes or remove red eye
While PicMonkey also has “fun” filters such as whisker grow or spray tan available in the premium plan, the basic version has more than enough to touch up your photo and add text to it.
It’s easy to use, just upload your image and get to work. While there aren’t any social media templates you can use for your images, PicMonkey makes it incredibly easy to crop your photos to a specific size.
One thing that PicMonkey doesn’t have, that Canva does, is the option to save your work to the cloud. With PickMonkey you have to do your touch up and edits all at once, and then download the final image to your computer.
PicMonkey offers free tutorials on their blog to help you master all the features available.
If you want to upgrade to the Royal plan for more features, it’s $4.99/monthly or, if you pay annually, you end up only paying $3.33/month.
3. Picktochart
Picktochart allows you to easily make infographics, reports and presentations. Infographics are still a powerful way to present large amounts of information in an easy to digest way.
As explained by Social Media Today, “On average, it takes 50 seconds to read 200-250 words but only 1/10 of a second to process a visual scene.”
Visual marketing just makes sense and Picktochart can help you with that. Picktochart is easy to use, creates graphics that look professionally made, and even a non-designer can use it.
You can choose a template or create your own – psst…pick a template. Picktochart does all the work for you with laying out where the information and visual charts go.
All the tools you need are laid out on the side, making it easy to customize and change things around.
What’s nice about the simple intuitive interface Picktochart has, is how easy it is to create graphs or charts with your own data. Pick what type of graph or chart you want and double-click to enter your data.
Other highlights include the ability to add video to your infographic and upload your own images like a logo for branding purposes.
If you want more features like more templates to choose from, the Lite plan runs you $15/month while the Pro plan is $29/month.
4. Pixlr
Many bloggers aren’t in a position to buy expensive photo editing software, but Pixlr is a great Photoshop alternative.
It’s a free, robust online editing tool intended for non-designers, and has a lot of the same tools and features you would find in Photoshop.
Pixlr Editor offers:
- A series of selection tools like the marquee tool, lasso tool, and wand tool
- Editing tools like the paint bucket, clone stamp tool, and gradient tool
- Blending tools like the sharpen tool, blur tool or smudge tool
- And many more. If you’ve ever used Photoshop before, you’ll feel right at home.
One useful feature that’s available with Pixlr is the eyedropper tool. If you are creating text over your image, you can use the eyedropper tool to sample a color in your image to use for your text color, giving it a more consistent look.

If you find Pixlr Editor too advanced for you, they also offer Pixlr Express with fewer options to choose from.
Each tab opens up a series of editing tasks you can perform such as adding text to your image, a border around your image, or adding a vintage filter over your image.
If you want to do things like use your own fonts, or harness more of your system’s computing power, you can download or purchase Pixlr’s desktop version for as little as $1.99/month. It’s a native app on Windows and Mac, with a feature set similar to Pixlr Express.
5. Venngage
Venngage allows you to create infographics, reports, flyers and even social media postings. It’s an easy-to-use online data visualization tool that businesses and bloggers can use.
While it’s intended for businesses as a way to save costs on outsourcing graphic designers, it’s easy enough for bloggers and solopreneurs to pick up and use.
To start, Venngage categorizes their infographics as beginner, intermediate and advanced, depending on the complexity of the infographic.
Venngage uses a drag-and-drop toolbar to make it easy to swap icons or add new ones. A neat feature Venngage offers is pictograms.
These are icons that duplicate with different colors. You can then represent a fraction like, 2 out of 5 households don’t have TV’s, for example.

Venngage also makes it easy for you to organize your icons and text with a grid style background to help you align your icons and charts. It also auto saves your work while you’re designing which comes in handy when you’re working on in-depth projects.
With hundreds of professional looking templates, a huge collection of icons and pictograms, and a library of data-driven maps, graphs and charts, Venngage makes it easy to create a report or infographic in minutes.
To get complete access to all of their features, you can upgrade to a monthly plan of only $19 or, if you pay yearly, it drops to $16/month.
6. Adobe Photoshop
For as little as $9.99/month you can have access to the latest full version of Photoshop CC for your desktop. Made for professional graphic designers, Photoshop is your complete package for editing, sizing, optimizing, enhancing and designing nearly any graphic imaginable for your site and blog.
In Photoshop, you work in layers, making it easy to make changes quickly to only one aspect of your image – for example, a filter layer or text layer.
One new feature that the latest version of Photoshop offers is the ability to create artboards so you can work on multiple images at a time. This ensures all your images or image variations are contained in one file.
For example, when I branded my Pinterest board covers, I created an artboard for my Pinterest board cover template with guides for my text.
I then duplicated my artboard to make the rest of my Pinterest board covers, making it incredibly easy to copy and transfer text and images from one cover to the next.
If you don’t know how to use Photoshop, Adobe offers tutorials that walk you through learning the essentials to editing your first photo, and more.
If you’ve been using Photoshop for a bit and want to learn more features, check outthese tutorials where you can learn how to create a product mockup box or create fiery text.
It all starts with the perfect image
Finding the perfect image to edit can be a challenge. You can’t just copy an image you see on Google, or on someone else’s site. Most likely it’s copyrighted and you can’t use that image unless you have permission from the person who took the photo.
So, where can you find sharable images that are free to use? The best places are sites that have Creative Commons licensed images. These images are free to share and – depending on the specific Creative Commons license – you can often freely modify them for personal or commercial use.
The Creative Commons Zero license requires no attribution. Check out these sites for plenty of amazing free images:
Luminar 4 Review
This Luminar 4 review is for all levels of photographer here in 2020. Whether you’re picking up a camera for the first time or a seasoned pro, you should definitely keep reading.
The truth is, there’s never been post-processing software available to consumers that’s quite like this…
 | Luminar 4 Discount Order now to Save $10Use coupon code SHOTKIT at checkout! | Get Discount |
Skylum has turned the photography industry on its head with the release of Luminar 4. It’s no exaggeration to say that photo editing will never be the same again.
You probably have the same questions I did:
Does Luminar 4 improve on the limitations of Luminar 3? Is it worth the upgrade? Are the Artificial Intelligence features just gimmicks? Is it a budget-friendly Lightroom alternative? Is it worth waiting for Luminar AI?
I’ve spent a few weeks testing out the most eagerly anticipated image editing app of the year.
Read on to take a more in depth look at this intriguing new software…
Luminar 4 Review Summary
Powerful, feature-rich image editing and management solution with unique retouching tools unavailable elsewhere and a budget-friendly one-time price tag. Uses artificial intelligence to produce realistic, non-destructive edits to RAW and JPEG images on Mac and PC, including portrait enhancement, sky replacement and other content aware tools. Easy to learn and lots of fun.
What is Luminar?
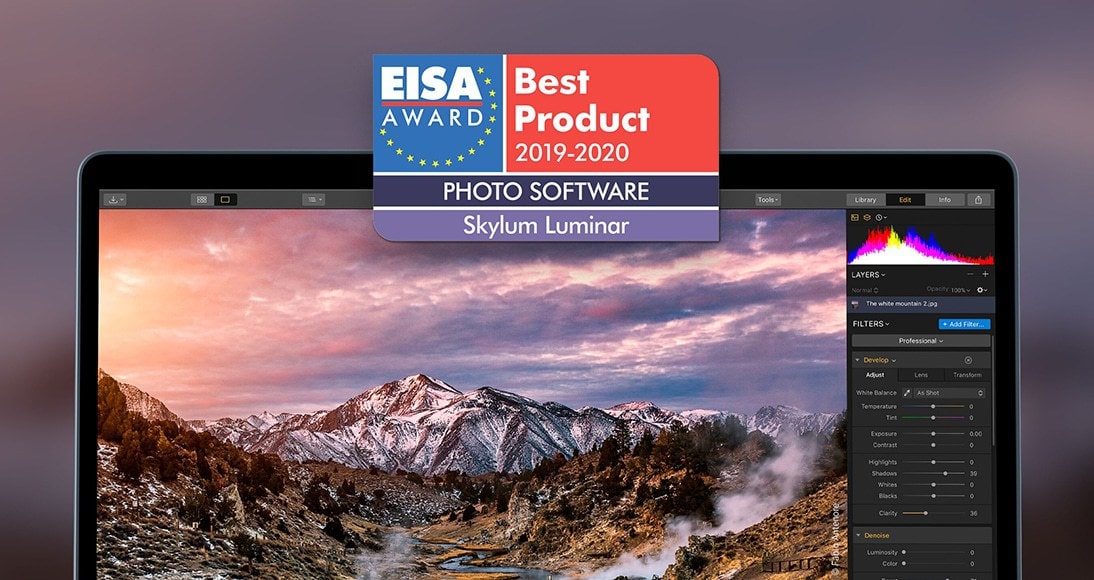
Skylum Luminar was awarded Best Photo Software of the year by EISA.
Luminar is a non-destructive image editing and photo management software for Mac & PC, designed to deliver professional results in less time than anything else currently available.
Luminar uses Artificial Intelligence (AI) powered tools to make complex editing simpler. You can let the software do all the work for you, or take full control of each edit yourself.
With this latest incarnation, Luminar 4 brings numerous feature upgrades, and can be used as a standalone image editing application OR as a plugin for Adobe Photoshop CC, Lightroom, Photoshop Elements and Apple Photos.
Luminar 4 can now be used in conjunction with industry-standard software such as Adobe Lightroom, bringing the power and convenience of the latest high-tech AI processing into an editing workspace many users will already be familiar with.
Luminar 4 is a one-off purchase (as opposed to a monthly subscription payment like the Adobe Creative Cloud), and will replace both Luminar 3 and Luminar Flex.
The cost includes ongoing feature and performance updates, as well as bug fixes and support.
Keep reading to find out more about the most recent 4.1 update, released in March.
New & Improved Features in Luminar 4
Many photographers reading this will have already used Luminar 3, and will simply want to know whether it’s worth upgrading to Luminar 4.In this review, I’ll start by reviewing the newest and most exciting features of Luminar 4. Then, I’ll include the existing features carried over from the previous versions, for those of you who are completely new to the software.
In Luminar 4, filters are now called “tools”, and have been organised into 6 tabs with icons which run down the right hand side of the edit pane.
These include: Layers, Canvas, Essentials, Creative, Portrait and Pro.
Each tool panel appears when clicked, and disappears when the next panel is clicked – something that helps to keep the workspace uncluttered.
Here are the tools you can expect to see in each panel:
(The ability to add multiple editing layers to each image)
- Crop Tool
- Erase Tool
- Lens & Geometry
- Light
- AI Structure
- Color
- Details Enhancer
- Denoise
- Landscape Enhancer
- AI Sky Replacement
- Sunrays
- Dramatic
- Matte Look
- Mystical
- Color Styles (LUT)
- Texture Overlay
- Glow
- Film Grain
- AI Skin Enhancer
- Portrait Enhancer
- High Key
- Orton Effect
- Advanced Contrast
- Advances Gradient
- Dodge & Bur
- Color Enhancer
- Photo Filter
- Split Toning
I must admit that I think Skylum could improve the organisation – it’s not immediately obvious what’s contained in each panel before clicking it, and a search bar for tool items would be useful.
Some general interface improvements have been made over Luminar 3, including larger fonts, increased spacing between elements, increased availability of basic tools, enlarged sliders and better optimized contrast of interface elements.
These are all small tweaks that have come about following feedback from users, which is nice to know that Skylum is listening.
Unfortunately, options for exporting photos are still sadly missing – you’re unable to create export presets, for example. Hopefully this will be added to a future update.
This is one of the most exciting additions to Luminar for many photographers, namely, the ability to easily open a photo in Luminar 4 direct from Lightroom (or Photoshop or Apple Photos).
Thankfully, the process is entirely seamless – from the Lightroom Library or Develop module, you simply right click an image, then select ‘Edit In > Luminar 4’.
You’re able to edit a version of your image with existing Lightroom adjustments, or without – for those more comfortable using Lightroom as their ‘base editor’, choosing ‘with Lightroom adjustments’ allows you to keep the edits.
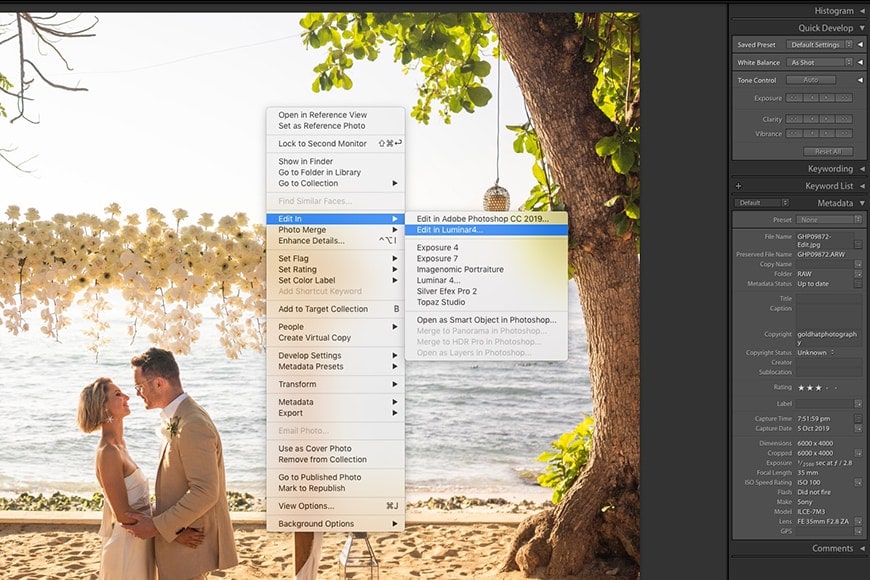
The ability to open Lightroom files in Luminar 4 in just a couple of clicks is great for workflow.
Once the image has been opened in Luminar 4, you are free to make whatever additional edits you like, including the use of any number of the powerful AI features reviewed below, then… and this is the best bit… save the file straight back into Lightroom with the new edits.
If you’re editing direct from a Lightroom Collection, the newly Luminar-processed file is placed in your file grid right before the original, making file organisation a piece of cake. There’s absolutely no disruption to your existing Lightroom workflow.
This mutual editing functionality is a clear indicator that Skylum is positioning Luminar as a complementary product to Lightroom, rather than as a replacement.
Those users who prefer to use Luminar 4 as their sole editor can carry on doing so, but for those of us who are tethered to the Adobe workflow for whatever reason, taking advantage of the power of Luminar is simple and effecient.
This being the headline feature of Luminar 4, and according to many users, worth the price of the software alone, I was expecting to be blown away.
Did it meet my expectations? Actually, it surpassed them!
Truth be told, I secretly wanted the AI Sky Replacement tool to be a gimmick. Learning how to replace a sky believably in Photoshop takes a lot of skill and patience…
Had this sub-$100 software really just replaced a professional retoucher?!
With this Photoshop alternative, one-click changes the sky in your photo. When I say one-click, I mean it – you just select one of the bundled skies… and that’s it. (You’re also able to add your own skies.)
Luminar 4’s black magic then pretty much instantly replaces not only the sky, but matches the horizon line with pin-point accuracy... and even re-colours and re-lights the rest of the image!
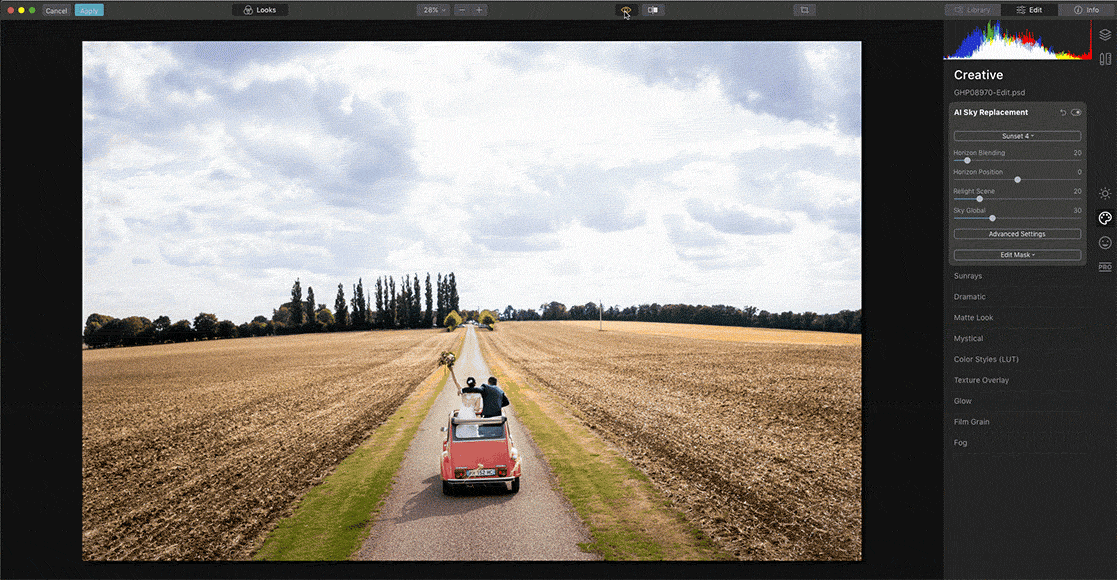
Realistically replacing the sky in an image takes one click – note how the scene is also re-lit to suit the new sky.
From there, you can use all the other tools to tweak to your heart’s content to create an image that’s completely and undeniably believable. Something no one would even consider was fake.
Every time I use this tool, it leaves my jaw on the floor – it’s like seeing a photo taken at the exact same position, but at different times of the day.
The AI Sky Replacement tool is so good that it actually makes me feel a little uncomfortable using it! I feel like I’m lying to viewers, as the results are so realistic. It’s like fake news… but for photography!
If you’re a real-estate photographer, this tool is a godsend. No more waiting around until the perfect time of day to take a house facade photo, or paying costly retouchers to insert fake skies into images.
This tool is perfect for travel photographers too – imagine having only a day to get a shot of the Eiffel Tower, then turning up to a boring, lifeless sky. One click in Luminar 4, and you get that amazing sunset photo you were aiming for, along with all the Instagram Likes :-)
The most incredible thing about AI Sky Replacement is how it masks all the foreground elements so perfectly – every gap in that Eiffel Tower’s myriad rungs would show the new sky behind it…
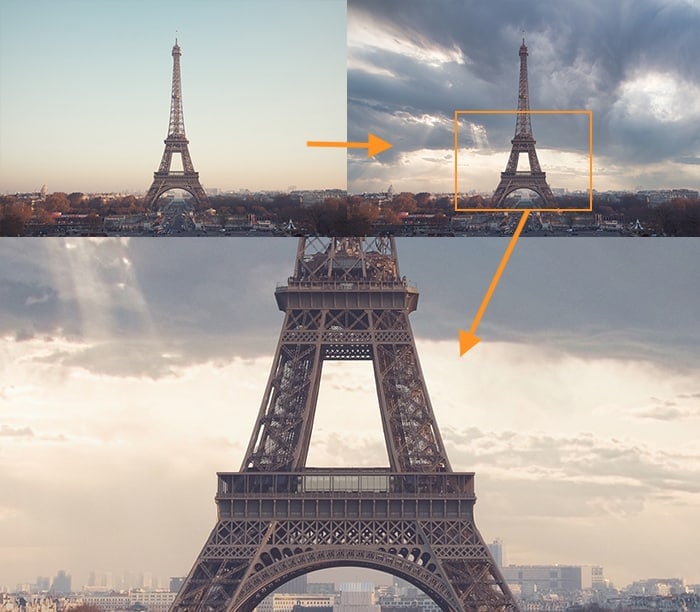
The accuracy of AI Sky Replacement is mind-blowing – this edit took 3 seconds | © Jad Limcaco.
Even for wedding photographers like myself, being able to replace a sky realistically would definitely add value to a client’s photo – just remember to choose something similar to the time of day you shot. You don’t want your clients scratching their heads trying to remember the fireball sunset, when in fact is was overcast!
Another impressive feature is the ability to sync the AI edits across several photos… with Luminar 4 adjusting each image individually – this is in contrast to Lightroom’s batch edit functionality, which ‘blindly’ adds the exact same edits to each image, regardless of its content.
Also, thanks to a ‘Relight Scene Technology’ feature in the Luminar 4.2 update, colours are now even more realistically retained from your original photo, with no unrealistic glows or casts on white objects.
In summary, Luminar 4’s Sky Replacement tool has exceeded all the hype, and is easily worth the price of the software alone.
It’s well-executed, and the type of tool that will have you re-editing all your existing photos!
As part of the recent Luminar 4.2 update, Skylum provides another industry first with this powerful, if somewhat unusual, addition to their award-winning image editing software.
Residing in the Creative tab, the new AI Augmented Sky tool lets your choose various creative elements to overlay on your photos.
These include objects such as birds in flight, the aurora borealis, a full moon, clouds, a space shuttle launch (?!) and more.
You can also upload your own, and Luminar does a mighty fine job in blending them seamlessly with the photograph’s sky.
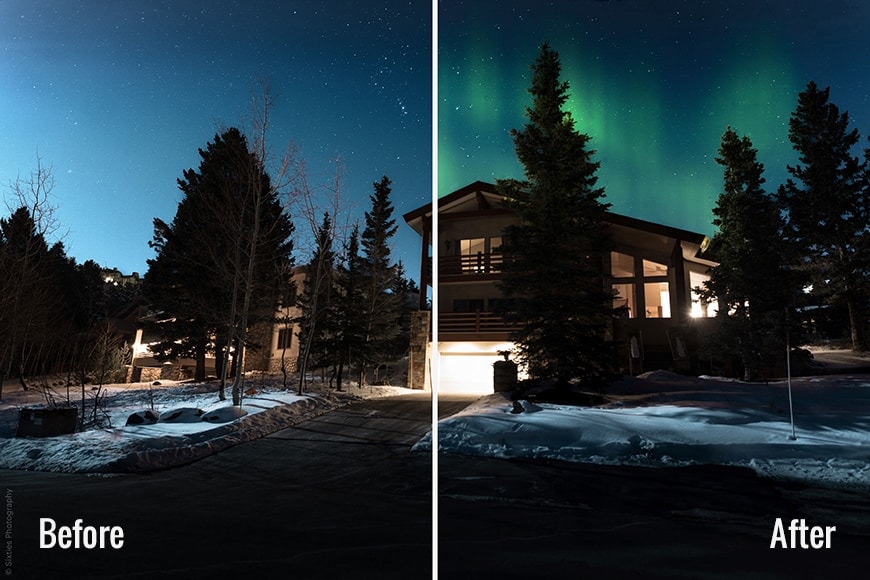
For some applications, Augmented Sky can create a realistic outcome.
Using various content-aware technologies, foreground objects are recognized and taken into account, making the object blend naturally with your existing scene.
Much like the ‘Sun Rays’ feature, you can drag the new element around the sky with it adjusting depending on its location, and still retain an element of realism.
Obviously, adding space shuttles to the background of a photo of the Shibuya crossing in Tokyo looks like something out of a Manga movie, but it’s nice to know there’s a lot of fun to be had with this tool!
“Whether you’re creating a realistic composite or creating an out-of-this-world experience, AI Augmented Sky opens up a creative powerhouse of opportunities”, says the Co-Founder of Skylum.
My favourite of the pre-installed ‘creative elements’ is definitely the aurora (northern lights), which can be added realistically to any night sky image, making something that’s definitely believable.
The birds in flight can also be used to great effect too…
While this tool may be a step too far for many photographers who prefer a minimal approach to their photo editing, it’s a free feature upgrade that can be ignored or used at your own judgement.
Luminar 4 continues to be a solid RAW image editor, and the bells and whistles such as AI Augmented Sky are a nice touch for those who want a little more creative freedom.
AI Skin Enhancer & Portrait Enhancer
While replacing skies in photos is something very few of us have even attempted, portrait retouching is definitely more commonplace among photographers.
The AI Skin Enhancer & Portrait Enhancer is designed to make tedious beauty retouching much easier, and much more accessible to photographers of any standard.
Even professional retouchers will use this to speed up their workflow – it’s that good.
There are numerous plugins and apps that are designed to do something similar to what Luminar 4 can accomplish with a photo of an individual’s face – thicken eyebrows, remove blemishes, smooth skin tones, sharpen eyes, relight features, etc.
However, and this is the big difference – Luminar 4 throws some AI wizardry into the mix to make the whole process incredibly fast, accurate, and above all, natural.
A regular portraiture app without AI would apply a skin smoothing filter, than require the user to mask in and out areas to achieve something realistic. With the new AI Skin Enhancer, all this is done for you… to, quite frankly, a mind-blowing extent.
(Since the most recent update, you can also take advantage of ‘Shine Removal Technology’ for those overly-lit portrait photos, and ‘Slim Face 2.0’, when you need to chisel down on the model’s face.)
It’s impressive to see how Luminar 4 attempts to to recognise the difference between freckles and skin imperfections, and deal with them both accordingly for a more natural result.
Up until now, only a human retoucher would’ve been able to do this.
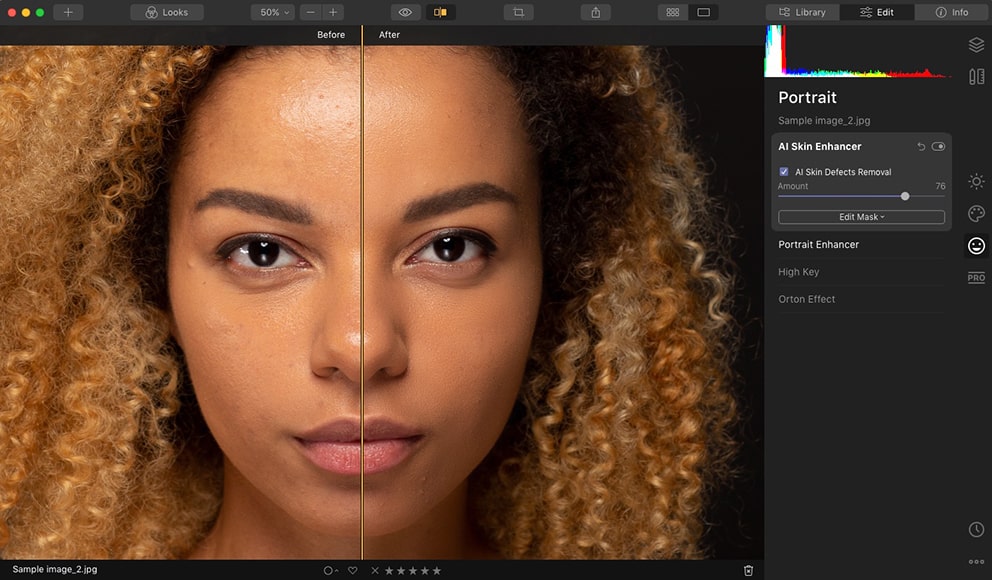
Luminar 4 favours natural-looking edits – here I boosted the default settings, but still the skin texture is retained.
Fun fact: Skylum used hundreds of thousands of photos from professional retouchers to supply the machine-learning algorithms with enough data to edit for every circumstance. Not a single stock photo was used. Mind = blown 🤯
As with all the ‘done-for-you’ AI features in Luminar 4, the user is still in complete control:.
Someone like me with little to no retouching experience can be completely satisfied with the one-click edit.
Similarly, a retoucher with more experience could then dial in their own adjustments, working on top of Luminar’s initial edits, as a ‘headstart’ to acheiveing the finalalised photo.
I can see this tool being enormously useful for anyone who needs to retouch faces, after a studio or environmental portrait session, whether the subject is male or female, and whatever their ethnicity – Luminar 4 has a realistic edit waiting for you.
Face Features Detection Network
Another helpful addition in the 4.2 update is something called the Face Features Detection Network – basically an intelligent face recognition tool that aids with portrait retouching.
The ‘network’ part of the name refers to an uncanny technology which is ‘trained’ to detect different faces, no matter what position, angle or tilt they might be in.
It even recognizes faces that are badly lit or partially hidden, as well as those with heavy makeup, from a variety of ethnicities, and any age.
Most impressive perhaps for wedding photographers, is Luminar’s ability to recognise all the faces in a group photograph, allowing you access to one-touch portrait enhancement.
This would enable you to, for example, adjust the brightness of just the faces of every person in a 20 person family group shot, and not affect any of the other elements of the photo – clearly a massive time saver, for anyone who’s ever attempted this with Lightroom or Photoshop.
If you’ve ever used the Clarity, Sharpen or Texture sliders in Lightroom, you’ll be already familiar with the look that AI Structure gives to photos.
However, as we’ve come to expect, Luminar 4’s AI technology takes this to the nth degree…
In a nut shell, AI Structure is a content-aware tool that detects objects that could do with some extra punch, and gives it to them.
The key feature of AI Structure is that it’s ‘human-aware’, meaning that the tool won’t affect skin tones – if you’ve ever cranked up the Clarity slider in Lr and cringed at how old and wrinkly the subject in your image becomes… this tool is the solution.
In fact, AI Structure is pretty much ‘everything-aware’ – thanks to thousands of retouched images fed into its database, it recognises water, buildings, trees… and applies the edits at different levels to preserve a natural look to the photo.
‘Natural edits’ is a constant theme in Luminar 4. Sure, you’re able to go crazy and crank sliders way up there, but if you stick with the one-click solution, you’re usually 99% of the way there.
During my review, there were no halos, noise, or any other artifact that appeared due to the edit – this was especially impressive with backlit photos, where typically, halos tend to creep in around foreground elements.
Being able to add contrast and clarity to background elements without affecting the foreground subject, all in one click of the mouse button, is a huge time saver, and makes me want to re-edit all my holiday photos!
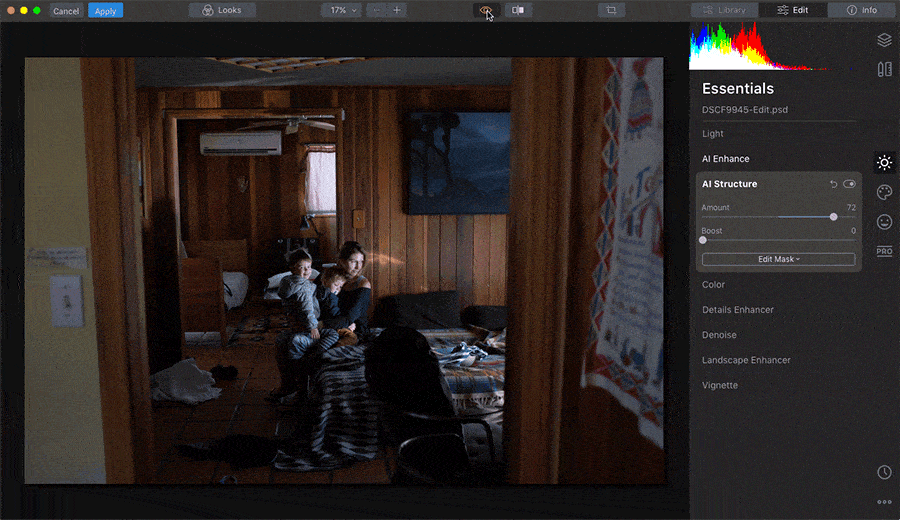
These edits took just 10 seconds – one click in AI Enhance to fix the exposure, then a tweak in AI Structure.
I enjoyed taking advantage of another Luminar tool ‘AI Enhance’, to provide a quick fix to the overall exposure of my photos, then tweaking them further with AI Structure to provide some punch, as in the image above.
Anyone adept with Lightroom could try and mask out areas by ading a gradient filter to a background or a radial filter to a foreground subject, but Luminar’s tool does it all for you.
The best feature? Edits can be batch applied to multiple photos, with each edit adjusting to suit the photo in question.
Personally, adding ‘punch’ to a client’s photos is an area where I like to be in complete control, so would usually stick to making 100% manual edits.
I also found that the tool didn’t take into account the ‘depth’ of the image as much as I was hoping.
That said, it’s been great fun re-editing all my holiday and family photos with this one-click tool, which saves a ton of time, especially since I can apply batch edits in one fell-swoop, with all of them adjusting depending on the contents of the photo.
This tool is designed to bring the warmth of golden hour sunlight to your photos.
Similar to playing around with Split Toning, it affects the highlights and shadows of your image, adding in a warm orange hue.
Luminar 4 uses its content-aware technology to identify people in the image, making them look warmer than background elements, and even attempts to add golden accents to their hair.
I found this feature realistic, but it depends heavily on the time of day your photo was actually shot, since the direction and presence of harsh shadows on the ground can be a bit of a giveaway.
I also found that the ‘golden’ effect was more dependant on the colours in your existing image – going from a cold grey image straight to something you’d call ‘shot at golden hour’ required a little more tweaking.
Core Features of Luminar
These are the features that were added in previous versions of Luminar that made it such a popular and powerful editing software, long before the release of Luminar 4.
Despite being existing features, their performance has been improved to match the power of the latest iteration.
I won’t go through all of the features as there are so many, but here are some of the key features which make Luminar unique:
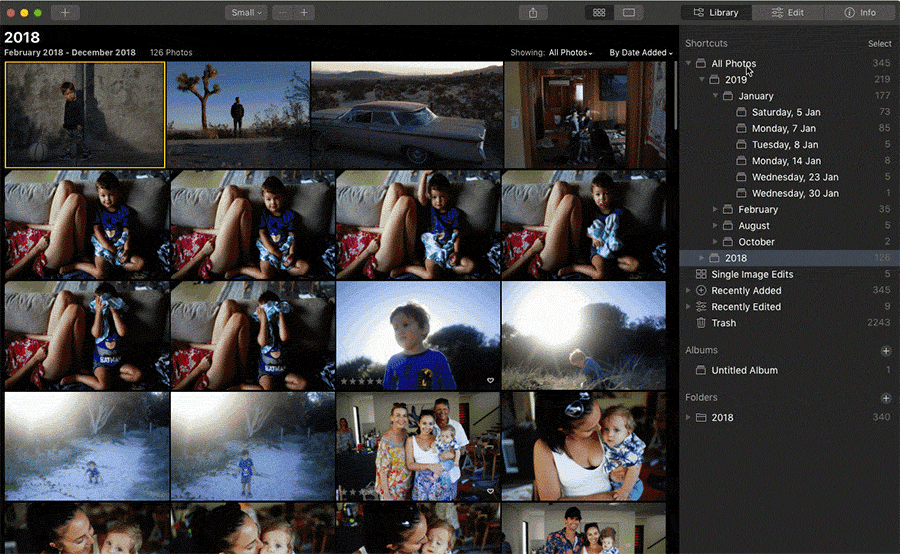
Luminar has two primary views: the Library view for browsing and navigating your photos, and the Edit view for enhancing them. They both exist on the right hand side of the screen, which makes navigation intuitive and fluid.
The Library side panel is most interesting for photographers who want to take advantage of image management features (DAM), most of which came with the release of ‘Luminar with Libraries’ in 2018, but has since been much streamlined.
Here you can do many of the actions that Lightroom users are used to, including flagging images as favourites, and rating, etc.
Switching between the Library and Edit modules is instantaneous – something that definitely can’t be said for Lightroom, which tends to lag most when switching between modules.
Switching between Library & Edit modules in Luminr and adding ratings is quick and simple.
When you activate Luminar 4, the library scans your hard drive and updates itself to match the exact hierarchy of your hard drive.
This can take some time depending on the size of your drive and the number of photos stored, but only needs to be performed once.
Luminar’s file management system is much more intuitive than that of Lightroom, which only displays folders that have had their contents manually imported – a source of much confusion for beginners.
The process of being able to drag and drop an image onto the Luminar application icon, and have it load up ready for immediate editing is great for workflow – this is in contrast to the clunky import process of Lightroom, which forces its own folder hierarchy on you.
While many users reported crashes at the import stage in previous versions of Luminar, I didn’t have any such problems with V4.
There’s also a virtual organization system called ‘Albums’, that allows you to organize your images into groups without changing where your files sit on your hard drive.
This is a really neat feature, particularly if you have your images all over the place on your computer, and provides the best of both worlds – mirrored and virtual file management.
Here are the 3 main ways to organise and access your images via the new Luminar library:
1. Shortcuts
You can quickly access your library with a series of convenient shortcuts, including: All Photos, Quick Edits, Favorites, Recently Added, Recently Edited, On This Day, Lost Edits, and Trash.
I particularly like the inclusion of ‘Recently Edited’, which allows you to quickly return to the last images you were working on – a big time saver.
The titles that aren’t perhaps self-explanatory are ‘Quick Edits’, which contains all images that were opened as single files (instead of being added within a folder), and ‘Lost Edits’, which appear when you have files that were moved and need to be reconnected.
2. Folders
If you’re used to working with folders, start here. It’s all pretty straightforward: add folders containing your images, and any changes you make to your folders (on your hard drive) will be reflected within Luminar.
This is great if you don’t want to keep two different structures in your head, since you may not always be in an editing program when you’re rearranging with your images.
Any new images that appear in your hard drive folders are automatically added to your Luminar Folders, so you really don’t have to import anything that you’re not bringing from outside.
When editing images in Photoshop (without going through Lightroom), you’d normally have to re-import the PSD to Lightroom later. However, with Luminar constantly scanning your folders for new images, this can all happen automatically… which is great for your workflow.
If you outgrow the drive you’re working on or you need to move your photos to a new machine, Luminar makes the process simple – just move the folder with Luminar closed, restart Luminar, and then choose the Find Folder option to find everything automatically.
3. Albums
If you’d rather not affect the organization on your hard drive, you can organize your images inside Luminar using albums – sort of like how playlists organise your music.
You can create an album based on who took the photos, where they were taken, what project they were taken for, etc… all while leaving your hard drive untouched.
Like a Lightroom Collection, if you delete a photo from an album, the actual photo remains untouched – it’s only the album that changes.
Luminar comes with several “Looks” (i.e. presets) for one-click adjustments. It also allows you to download new presets, share them, or even create your own – much like a Lightroom preset.
At the time of writing, you can get a bonus pack of ‘Inspiration Looks’ for free when purchasing Luminar 4 – check here to see if they’re still available.
If you don’t like the distraction of Looks sitting at the bottom of your main editing window, you can turn off the Luminar Looks filmstrip.
I found that turning them off provided a slight performance boost to Luminar too.
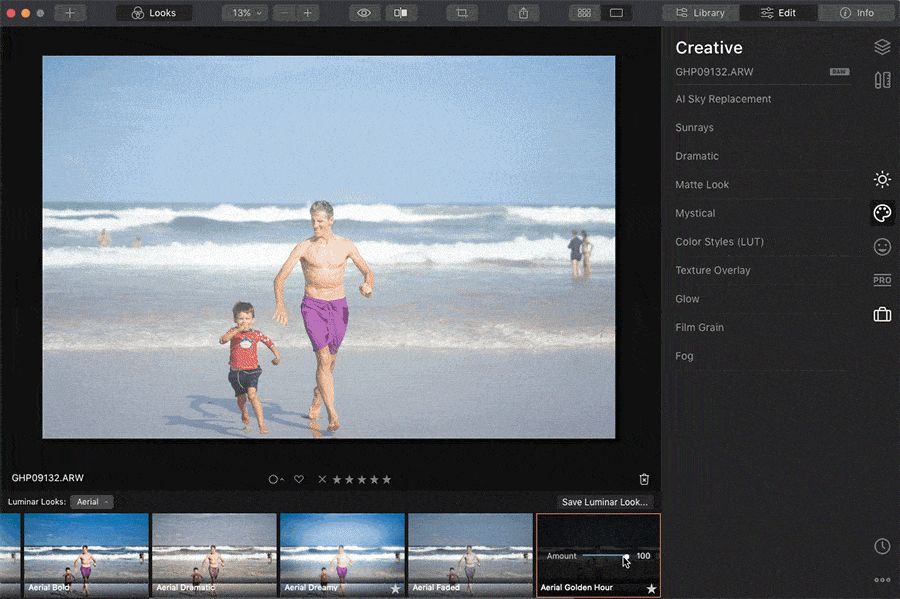
The ability to adjust the strength of each Look is unique to Luminar.
For any photographer short of time who just needs a one-click solution for their dull RAW images, the Looks can be a fun and useful feature.
Being able to quickly toggle the ‘strength’ of each Look is unique to Luminar too – Lightroom doesn’t offer the ability to do something similar with Presets, at lest not without a 3rd party plugin.
In practice, I found using Looks to be a little ‘laggy’ – as you can see in the image above, there’s a slight delay when adjusting the strength.
(For reference, the file was a 24.8MB RAW, and my computer is a 2015 Macbook Pro i7 with 16GB RAM. I was running a CPU intensive screen recording software at the same time, so this could have contributed to the lack of snappiness.
This handy feature allows you to stack your image edits in adjustment layers, allowing you to make edits to each invididual layer, without affecting those above or below.
Similar to ON1 Photo RAW and a few other editing apps out there, layers bring the core feature of Photoshop to Luminar, and adds fine-control for users who want to get more hands-on with their editing.
Everything that Lightroom offers is baked right in to Luminar, including the ability to mask with brushes, radials, gradients and even luminosity.
Luminosity masking is especially useful for landscape photographers who wish to mask their images based on brightness, for example, allowing you to make sky selections quickly… although with AI Sky Replace, it’s arguable as to whether this will even be needed!
While color grading with Look Up Tables (LUTs) isn’t a well-known technique, for those who like to use it, it’s hard to go without.
I’ve only been playing around with them since Luminar 2018 came out, and I have to say, I love the effects of some of the free LUTs.
You can even convert custom Lightroom presets into LUTs and load them into Luminar. Definitely a power-user feature, but nice to know it’s possible.
This was the feature that made many photographers purchase Luminar 3, and it’s just as impressive here in Luminar 4.
As its name implies, Sunrays allows you to add the sun and its rays into your photo, all the while customizing every aspect of it: length and number of sunrays, penetration, sun radius and sun warmth.
What makes it particularly unique though, is that the Sunrays filter senses the dark and light parts of your photo and adjusts accordingly, placing the sun behind objects and allowing the rays to shine out around them.
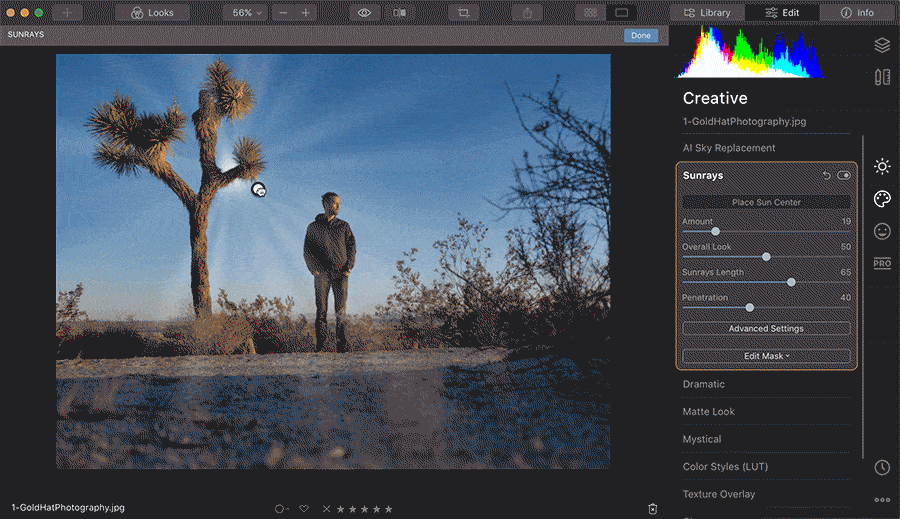
Note how the sunrays adjust depending on the foreground element… no matter how complex. (Image quality reduced for Web.)
That last sentence deserves repeating – this tool places the sun behind objects. Luminar’s black-magic AI strikes again….! 🤯
Photos are inanimate and two-dimensional – how on earth can a software calculate what objects in a 2D photo are in the foreground and the background… and make realistic adustments on the fly?!
This is another one of those tools that will leave your jaw on the floor each and every time you use it.
Anyone who’s ever tried to recreate the effect of sunrays in Photoshop will appreciate just what an enormous time-saver this tool can be.
This Luminar feature (which has always been a core feature of Lightroom), allows you to save considerable time by applying the same develop settings to multiple photos.
Simply edit one image, then switch to the Grid view (‘G’), select all images shot in similar conditions, then right click and choose Adjustments > Sync Adjustments, or press Shift + Command/Ctrl + S.
This is particularly helpful to those who should events, weddings, sports and other types of photography where a lot of images are shot in similar (lighting) conditions.
The versatile Batch Processing feature of Luminar 4 contains many options that you can conveniently apply to a large set of images.
There are lots of ways to dodge and burn in Photoshop, but none of them are as quick and easy as Luminar’s excellent Dodge and Burn tool.
All you have to do is paint over the area you want to dodge (lighten) or burn (darken), then adjust the amount.
If you’re a fan of this old school technique and like a quick workflow, you’ll be hard-pressed to find a better way to go about it.
I also particularly like how the nomenclature is ‘lighten’ and ‘darken’ when using the tool – perfect for beginners.
Made popular by The Lord of the Rings movies, the Orton effect blurs some areas of an image while keeping others in focus to give an other-worldly effect
It took me a while to see its appeal, but I’m now a fan of it and find it fun to use a small element of it in some of my landscape work to ‘soften’ any existing edits.
I do find it a bit odd, however, that this tool is found under the ‘Portrait’ tab.
If you’re a landscape photographer, you’re well acquainted with images that have an over or underexposed sky or foreground.The Adjustable Gradient (aka Top and Bottom Lighting) filter allows you to adjust the exposure for each separately – priceless if you only have single exposures from a shoot, or neglected to use a camera filter.
It’s quicker and easier than the many other ways of getting the same effect, and can be fine tuned when you need more control.
You can see in the video above how the adjustable gradient is applied well automatically by Luminar, when it recognises the horizon line in my image – when the video loads, it’ll show the appropriate section of the review.
Skylum has chosen to label many of its tools based on the effect that they give, rather than hiding them under technical terms – a good example of this is with the excellent Landscape Enhancer tool menu.
Instead of having to tweak multiple texture, clarity or sharpening settings or use complicated masks, you’ll find things like ‘Dehaze’, ‘Golden Hour’, and ‘Foliage Enhancer’, making adjustments obvious before you’ve even made them.
If you want to fine tune Luminar’s edits, there’s always the option of manually editing the mask, but in practice, the AI does a great job of getting it right the majority of the time.
Luminar 4 Speed & Performance
One issue that’s been improved since Luminar 3 but not completely resolved, is that Luminar 4 requires a lot of processing power.
To keep things realistic to the average user, I chose to test my copy of Luminar 4 on an older model (2015) 13″ Macbook Pro 3.1 GHz i7 with 16GB RAM, and found things a little slow, especially when using the CPU intensive Looks.
By comparison, Lightroom Classic is no speed demon either, but certainly still felt a bit snappier.
When switching to a 2017 13″ Macbook Pro 2.4 GHz Core i5, both Lightroom and Luminar 4 functioned much better – make of that what you will.
According to Skylum, the recommended tech requirements of Luminar 4 are as follows:
Windows:
- Intel® Core™ i7 7th generation or better, AMD Ryzen™ 7 2nd generation or better
- Discrete GPU with 4GB+ of RAM
- 16+ GB of RAM
- SSD as primary drive
- Calibrated monitor with at least 1920×1200 resolution
Mac:
- Intel® Core™ i7 CPU with 4+ cores or better
- 16+ GB of RAM
- Discrete GPU with 4GB+ of RAM
- SSD as primary drive
One thing’s for sure – despite the massive influx of capital since Adobe’s intriduction of its Creative Cloud subscription plan, Adobe still hasn’t really been able to make Lightroom faster.
Skylum on the other hand, has a clearly defined road map of updates, and a history of listening to its users and making numerous feature updates and fixes throughout the year… all free of charge, and included in the one-off fee to purchase Luminar 4.
Since Luminar 4 has been built from the ground up (rather than the multiple band-aid solutions applied to an already aging Lightroom), we can assume that the main hindrance in performance to be the actual computer you are using.
You can also check below in the ‘Updates’ section for speed/stability improvements Skylum released with the latest version of Luminar 4.2.
Luminar vs Lightroom
With the release of Luminar 4 and its ability to be used as a plugin to Adobe and Apple editing software, it’s apparent that Skylum intends for Luminar to be used in conjunction with Lightroom – not as a replacement.
I can see many Lightroom users choosing to purchase Luminar 4 to use alongside their main workhorse image editor – this is the scenario I have chosen, with both apps installed on my computer, working in unison.
Photographers who are used to Lightroom editing and file management can perform the main bulk of their work within Lr, then with a quick ‘Edit in Luminar 4’ menu command, take advantage of Luminar’s powerful AI tools to finish off the image.
Those who aren’t existing Lightroom users, or perhaps have had enough of the Adobe Creative Cloud subscription model, may choose to use Luminar 4 as their sole editing application.
Luminar 4 includes pretty much every editing tool that exists in Lightroom Classic, and adds on several AI-powered tools that create edits that are simply impossible in Lr.
As for metadata (captions, keywords, etc), that’s coming along in a 2020 update, so anyone who relies heavily on keywording will need to stick with Lightroom for now.
Despite having Digital Asset Management (DAM) capabilities built in to the Luminar Library, cataloging images is still Lightroom’s forte.
That said, many photographers will still prefer Luminar’s intuitive approach to mirroring the computer’s existing folder hierarchy.
(After all, it’s rather confusing every time Lightroom asks you whether you want to Copy, Move or Add a file.)
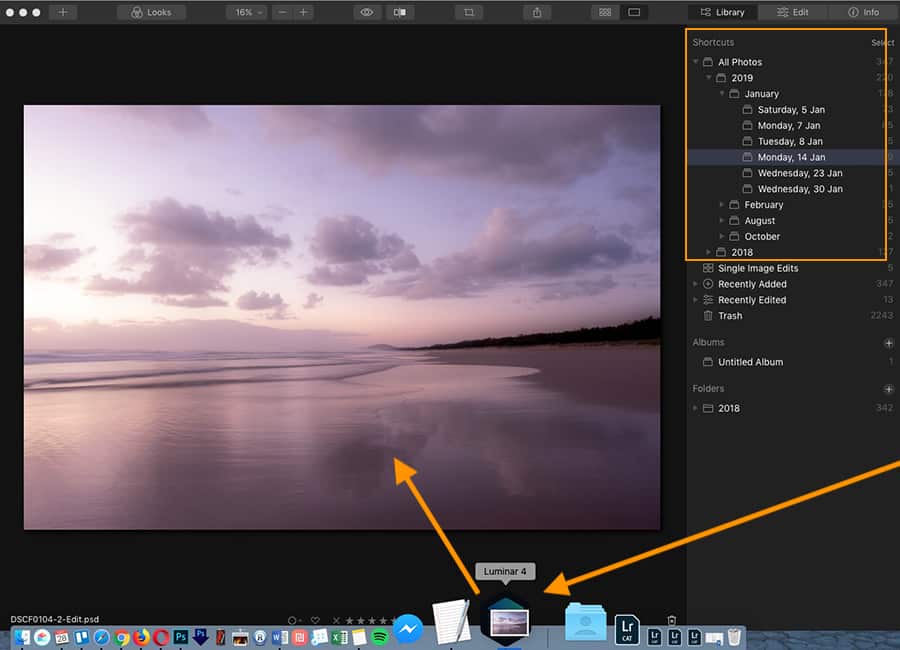
It’s intuitive and refreshing to start editing an image just by dragging it onto the Luminar app icon, and have the Library folder hierarchy mirror the change.
However, many users ingrained in the Lightroom workflow may still prefer it for organising and managing huge libraries of files.
The use of Smart Previews in Lightroom for example, allows much faster handling of large quantities of files, not to mention the ability to work remotely on your photos, even when away from your main hard drive.
The mobile/tablet editing functionality of Lightroom CC is another big advantage of Lightroom over Luminar, (and over most other image editing software in 2020), but it’s not important for every photographer.
One small file management issue we found while testing Luminar 4 was when opening an image via external editing.
In Lightroom, when you open an image via an external editor like Photoshop, you can perform the edits, then save the completed file in the same location as the pre-edited version. It’ll also appear adjacent to the pre-edit in the Lightroom film strip.
With Luminar on the other hand, when using third party plugins like Aurora HDR, the edited images don’t appear next to the image(s) that were exported – you have to manually choose where to put them, and that means remembering the exact folder you took them from, which can be annoying.
Now it’s time to tackle the elphant in the room – the difference between Lightroom and Luminar’s pricing.
Price really is Luminar’s big drawcard over Lightroom. For those of us deciding on just one image-editing application to edit and manage all our precious memories, Luminar 4 is definitely the best financial choice – the one-time fee is a steal for all it offers.
Luminar has no subscription fee and an affordable pricetag, and is currently on sale here, (with a bonus 1 year SmugMug subscription to boot).
All updates, including fnew features and bug fixes throughout 2020 will be free, until, I’m assuming, there’s a version 5.
Adobe on the other hand will never get rid of its subscription model, and choosing to halt your Creative Cloud plan mid-subscription renders Lightroom largely useless – you’re basically locked in to making payments forever.
You need to pay each month for a Creative Cloud subscription to use Adobe Lightroom.
For some professionals (myself included), paying each month to use Lightroom is a necessary evil…
However, thanks to the low price of Luminar 4, we can afford to pay for both apps, and use them in unison, which is precisely what I’m doing.
I didn’t want to break it down to cost alone, but the accessible price point of Luminar 4 is a key reason for users to choose Luminar over Lightroom, if you’re trying to decide one over the other.
How much does Luminar 4 Cost?
Whichever way you look at it, the current Luminar 4 price is very reasonable:
New Luminar 4 customers: $89/€89/£81
Upgrade from Luminar 3: $69/€69/£64
(Included in the price is a bonus pack of ‘Inspiration Looks’, worth around $50.)
Although not heavily publicised, Skylum offers a 30-day money back guarantee.
This means that you can experiment with Luminar 4 on your own photos for almost a month, before deciding whether you want to keep it forever.
Remember to use coupon code SHOTKIT to save $10.
Click here to see the latest Luminar 4 prices >>
Luminar 4.2 Update Details
Released in March 2020, the headline feature of the 4.2 update is definitely the AI Augmented Sky feature, allowing you to seamlessly add various creative elements to your photos.
In addition to this, Face Features Detection Network, Relight Scene Technology, Shine Removal Technology and Slim Face 2.0 are all powerful new additions to an already impressive editor.
You should notice increased speed of each tool due to improvements made to the ML Cache system.
Here are all the latest fixes and improvements for Luminar 4.2:
Both Mac & Windows users:
- Resolved an issue where some vertical images were being stretched horizontally.
- The Dark Circles Removal technology in AI Portrait Enhancer is more accurate.
- Eliminated color fringing that occurred in some images when using the Lens Distortion technology and the Free Transform tool.
- Improved performance when using the Lens & Geometry, Erase, and Sky Enhancer tools.
Windows users:
- Improved performance when loading Looks.
- Solved crashed related to issues when filling masks or loading images with different color profiles.
- Improved compatibility for EXIF data for .CR3 files.
- Improved gallery previews when changing thumbnail size.
- Resolved creation date variance between Gallery View and in Info tab.
- Improved History panel display.
- Additional stability and performance improvements related to tools.
MacOS users
- Resolved occasional crashes when backing up a catalog file
- Improved access for third-party PSD plugins and Aurora HDR
- Fixed an issue that prevented the sliders in the Split Toning tool not to move
- Restored Undo/Redo menu commands from within the Luminar plugin
- Improved stability for the Light tool and Curves
- The DCP profile menu is reactivated in the Light tool for macOS 10.12 and 10.13.
Luminar 4.1 Update Details

The atmospheric haze tool released in Luminar 4.1 brings additional character to daytime images.
Released in January 2020, the highly anticipated Luminar 4.1 update includes various feature additions and improvements to make workflow easier, and to allow for more control in its machine-learning editing tools.
The most exciting new features include:
- Atmospheric Haze – usually seen during the day, natural-looking haze can be added with one click to images,
- Erase tool -using an all-new technology for precise object removal. Removing unwanted pixels is easier than ever, even with complicated backgrounds or complex gradients.
- Portrait Enhancer – can now be used on even more images, including those with smaller faces like groups or environmental portraits.
- Adjustments Amount slider – tone down an adjustment with even more control, helping you blend all the editing tools with the original image.
- Adobe Photoshop 2020 Support – allows you to use Luminar 4.1 as a plugin or as a Smart Filter with Smart Objects.
Here are all the latest fixes and improvements for Luminar 4.1:
Both Mac & Windows users:
Support for two new Crop Aspect Ratios: 21:9 and 9:21. These are well suited for extra wide-screen computer displays, and digital cinema uses.
Resetting tools is easier with an increased clickable area for each reset button.
The History tool is easier to use thanks to a redesigned interface with larger text.
The Histogram is more compact, with an improved contrast ratio. This makes it easier to use when editing your photos. If you don’t see the Histogram when editing, you can activate it with the View menu.
Improved Catalog migration from Luminar 3 to Luminar 4.
Windows users:
Improved stability when switching between images in the Filmstrip.
Improved performance in Gallery View when viewing previews.
Improved performance while viewing Luminar Looks and switching between image folders.
Faster generation of Luminar Looks previews in the Looks panel.
The ability for re-editing a Smart Object in Photoshop 2020.
Improved stability when exiting Erase or Clone & Stamp tools.
Improvements to memory management when switching between edited photos.
You can now Cancel the Export module while it is running.
MacOS users:
Improved performance for blending modes and layers.
Resolved Smugmug login issues.
The tooltip of the sidebar correctly shows based on mouse hovering.
Better handling of displays when a second monitor is connected or a projector is attached. Note, Luminar can only run on a single monitor setup or with screen mirroring.
Hold down the Option key while dragging the Whites and Blacks sliders to preview white or black point clipping.
Skylum has also fixed 53 bugs that could lead to crashes or unexpected results, and made 17 improvements to memory management, user experience and stability to make Luminar even better.
How to Update Luminar
- Mac – Launch Luminar 4 > Top Menu Bar > Luminar 4 > Check for updates.
- Windows – Launch Luminar 4 > Top Menu Bar > Help > Check for updates.
If you’re using using Luminar as a plugin for Photoshop, Lightroom Classic, or Photoshop Elements, you’ll need to rerun the plugin installer to get the latest updates.
Frequently Asked Questions
What is Skylum luminar?
Skylum Luminar is a powerful yet affordable image editing software for Windows and Mac. It features professional-grade features accessible to photographers of all levels.
Does Luminar 4 replace Luminar 3?
Yes – Luminar 4 is a newer version of Luminar 3. Luminar 3 was an update of the original Luminar 2018 software.
Does Luminar process RAW files?
Yes – Luminar processes both RAW and JPEG files.
Can Luminar replace Lightroom?
Yes it can, and many photographers actually prefer Luminar over Lightroom for several reasons, including ease of use, the presence of specialist editing features, and most notably, the absence of a monthly subscription fee.
What is the difference between Luminar and Aurora?
Luminar is designed as an all-round image editor, whereas Aurora is designed to be an HDR image editing software. Both are produced by Skylum.
Is Luminar non destructive?
Yes – it is a non destructive RAW image editing software.
Is Luminar better than Photoshop?
While some of their features do overlap, Skylum Luminar and Adobe Photoshop are dissimilar in many ways. One is not ‘better’ than the other – they are meant for different usages.
Luminar 4 Review | Conclusion

The one-click editing power of the new Luminar is truly impressive.
I’ve had mixed feeling writing this Luminar 4 review.
On the one hand, I really didn’t want to like it. Using Artificial Intelligence to edit my photos felt in some way… like cheating!
Adding in skies that didn’t exist in my original images… turning overcast days into golden hour… removing blemishes from skin with one-click… it all felt too easy.
After all, these are image editing skills that take years to master, and hours to execute… and even then, are arguably less convincing than when using Luminar’s AI tools!
Let’s face it: we’re losing to the robots! After giving in to my initial prejudices, I remembered that this kind of image retouching has been happening for years. It’s just never been this easy or accesible.
Skylum has ingeniously covered all bases with Luminar 4. Photographers have been given every editing tool that exists in popular apps like Lightroom, as well as enough image management features to keep most photographers happy.
For those of us entrenched in Adobe Lightroom or Apple Photos, we have the ability to keep using our favourite software, and use Luminar 4 in conjunction – taking the best of both worlds.
Missing features and niggling performance issues aside, we can be confident in Skylum’s historical commitment of continuous improvement.
Luminar 4 may be the latest and the greatest in the series, but it’s still a ‘V1’, according to CEO Alex Tsepko. (I’ll be updating this review as and when new features and improvements are rolled out.)
For now, my advice is to take advantage of the generous 30-day money-back guarantee, and download a copy of Luminar 4 to test out on your computer with your own photos.
As long as your computer meets the minimum requirements, I’m confident that you’ll enjoy Luminar 4, and find image editing a much more exciting task than ever before.
Whether used in conjunction or as a replacement to Lightroom, Luminar is an incredibly powerful piece of software that’s simple to use, and best of all, priced within the reach of all photographers.
| Luminar 4 Discount Order now to Save $10Use coupon code SHOTKIT at checkout! | Get Discount |
Disclaimer: All recommendations are impartial and based on user experience, with no bias to the products or the brand. The products in this post may contain affiliate links.
What’s New in the Topaz DeNoise (for Adobe Photoshop) 4.1.0 serial key or number?
Screen Shot

System Requirements for Topaz DeNoise (for Adobe Photoshop) 4.1.0 serial key or number
- First, download the Topaz DeNoise (for Adobe Photoshop) 4.1.0 serial key or number
-
You can download its setup from given links:

Topaz DeNoise (for Adobe Photoshop) 4.1.0 serial key or number & Serial Key Download

Topaz DeNoise (for Adobe Photoshop) 4.1.0 serial key or number& for Laptop
