
VMWare Esx Server v2.x serial key or number

VMWare Esx Server v2.x serial key or number
Ubuntu Documentation
| Candidate for Deletion |

VMware no longer offers this product
VMware Server is a proprietary virtualization software package made available for no cost from the VMware website. VMware Server allows you to run entire operating systems in a virtual machine, which run on top of Ubuntu. This guide provides instructions on installing, configuring and running VMware Server and VMware Server Console on Ubuntu. VMware server may be used on Desktop and Server editions of Ubuntu.
Ubuntu 11.04 (VMware Server 2.0.x)
http://ubuntuforums.org/showthread.php?p=10761345
Ubuntu 10.10 (VMware Server 2.0.x)
The same procedure as for Ubuntu 10.04 applies and works.
Ubuntu 10.04 (VMware Server 2.0.x)
The same procedure as for Ubuntu 9.10 applies and works.
Ubuntu 9.10 (VMWare Server 2.0.x)
Both vmware-server.2.0.1-156745 and vmware-server.2.0.2-203138 can be installed from scratch by using a script I built. For more details you can visit How to install VMware Server 2.0.x on Ubuntu 9.10 Karmic Koala.
Download VMware Server (2.0.1 or 2.0.2) – gz format, not rpm. For the 2.0.2 version you might need to wait a couple of hours until you will receive the license key. Whichever version you choose, keep the license key near.
Copy the script from here (copy, paste, save).
Run the script with super user rights either in the same folder where you have downloaded the server archive, or by providing it the path to that folder. The script will download the needed patch from my server. Make sure the folder where you have downloaded the server's archive doesn't contain spaces in its path name. You will reach to a point where a lot of warnings appear on your terminal. Do not worry unless the script exits. If it exits, it will give you a decent warning from which you should be able to tell what’s wrong. Also, the VSOCK module will not work (will fail to compile), giving you a hint that your kernel sources might not be the ones for your running kernel. This is not true, as the script takes care of this before doing the hard work. Anyway, VMware Server will work without it.
- When you are asked about adding users to the server, if you do not provide your own account, the user used for loging in the web console of the server will be root (maybe you should add yourself there).
- Provide the license key when asked about it.
If you experience problems with the script please write them in the post's comments so that I can offer assistance.
Ubuntu 9.04 (VMWare Server 2.0.1 Build 156745)
At Ubuntu Server installation do not choose the option Minimal Virtual Host as it includes virtualization parts that interfere with VMware Server. There is no package yet available. You can download it at http://www.vmware.com/go/getserver
- Get a serial number (displayed at the download page link received by email as part of the registration process)
- Download the tar.gz file to your home directory
- Install required packages
Download the required patch at http://ubuntuforums.org/attachment.php?attachmentid=94477&d=1227872015 and save in your home directory
- Unpack, apply patch and run vmware-install.pl
Follow the settings displayed at your screen and don't change default values if not necessary. Be sure to add your normal username as VMware Server administrator
- Enter the serial number when prompted
Vmware2 has a web interface. Browse with Firefox to http://localhost:8222.
- Log in with your normal username and password
Note: You can also access the web interface via SSL at https://localhost:8333. You will probably need to add this site to your SSL Exception sites on your browser.
Ubuntu 8.10 (VMWare Server 2.0.0 Build 122956)
There is no package yet available. You can download it at http://www.vmware.com/go/getserver
- Get a serial number (displayed at the download page link received by email as part of the registration process)
- Download the tar.gz file to your home directory
- Install required packages
Download the required patch at http://ubuntuforums.org/attachment.php?attachmentid=94477&d=1227872015 and save in your home directory
- Unpack, apply patch and run vmware-install.pl
Follow the settings displayed at your screen and don't change default values if not necessary. Be sure to add your normal username as VMware Server administrator
- Enter the serial number when prompted
Vmware2 has a web interface. Browse with Firefox to http://localhost:8222.
- Log in with your normal username and password
Note: You can also access the web interface via SSL at https://localhost:8333. You will probably need to add this site to your SSL Exception sites on your browser.
Ubuntu 8.04 (VMWare Server 2.0.0 Build 116503)
There is no package yet available. You can download it at http://www.vmware.com/go/getserver
- Get a serial number (displayed at the download page link received by email as part of the registration process)
- Download the tar.gz file
- Install the build package
- Unzip and run vmware-install.pl
Follow the settings displayed at your screen and don't change default values if not necessary. Be sure to add your normal username as VMware Server administrator
- Enter the serial number when prompted
Vmware2 has a web interface. Browse with Firefox to http://localhost:8222.
- Log in with your normal username and password
Note: You can also access the web interface via SSL at https://localhost:8333. You will probably need to add this site to your SSL Exception sites on your browser.
Ubuntu 8.04 (Vmware Server 1.0.6 Stable !)
Note: This will take care of uninstalling any old version of VMWare server you might have, while keeping the virtual machines and their settings intact.
- Prep ~. Install the needed tools.
- Download vmware server (be sure to obtain a serial number) Place it in a safe directory ( I use ~/src/VMWare) and extract.
- Select defaults.
- Enter your serial # during the installation.
- Post-install configuration. Last, before running vmware :
In addition, for 64 bit users only,
Ubuntu 7.10 (Gutsy Gibbon)
From Ubuntu packages
Get a free serial number by registering your product here.
- Add the following line to your /etc/apt/sources.list
- Install the vmware-server package
- Follow the instructions in the installer wizard
At least the 64-bit version of ubuntu-server 7.10 is affected by bug #112937. The fix provided by Walter in the bug report does the trick.
Ugly Source + Patch Method
Note: amd64 users will need to add ia32-libs. This can be found in Synaptic.
sudo apt-get install build-essential linux-headers-`uname -r` xinetd wget http://download3.vmware.com/software/vmserver/VMware-server-1.0.3-44356.tar.gz wget http://knihovny.cvut.cz/ftp/pub/vmware/vmware-any-any-update115.tar.gz tar -xzvf VMware-server-1.0.3-44356.tar.gz tar -xzvf vmware-any-any-update115.tar.gz cp vmware-any-any-update115/*.tar vmware-server-distrib/lib/modules/source/ cd vmware-server-distrib/ sudo mkdir -p /etc/vmware/ssl sudo touch /etc/vmware/ssl/rui.key sudo touch /etc/vmware/ssl/rui.crt sudo ./vmware-install.plUbuntu 7.04 (Feisty Fawn)
From Ubuntu packages
Get a serial number by registering (for free) at http://register.vmware.com/content/registration.html
Add the universe, multiverse, and commercial repositories to your Ubuntu 7.04 install Directions.
- Uninstall vmware-server if it is already installed according to the section in this document titled "Transitioning from a Source Install."
- Install the vmware-server package
Until bug #115295 is fixed, you might need to edit /etc/pam.d/vmware-authd to read as follows:
Start the remote access console by going to Applications > System Tools > VMWare Server Console in the menus (or run from the command line). From there you will be able to access vmware servers locally or remotely, and create/open VMware virtual machines. Login with your regular username and password.
For troubleshooting see the troubleshooting section in this document.
Installing VMware Tools inside your virtual machines can improve their performance. For information about speeding up your Ubuntu virtual machines see VMware/Tools
Installing from Source
These instructions have not been fully tested and are recommended for advanced users only.
Ubuntu 8.04 (Hardy Heron)
Run http://knihovny.cvut.cz/ftp/pub/vmware/vmware-any-any-update115.tar.gz after the initial install fails when compiling kernel modules.
AMD64 users may get this error
/usr/lib/vmware/bin/vmware: /usr/lib/vmware/lib/libgcc_s.so.1/libgcc_s.so.1: version `GCC_***' not foundInstall Getlibs and enter the following commands.
getlibs /usr/lib/vmware/bin/vmware sudo mv /usr/lib/vmware/lib/libgcc_s.so.1/libgcc_s.so.1 /usr/lib/vmware/lib/libgcc_s.so.1/libgcc_s.so.1-old sudo ln -s /usr/lib32/libgcc_s.so.1 /usr/lib/vmware/lib/libgcc_s.so.1/Ubuntu 7.04 (Feisty Fawn)
Run http://ftp.cvut.cz/vmware/vmware-any-any-update109.tar.gz after the install fails when compiling kernel modules. See Install VMWare Server To Ubuntu Feisty for other solutions. A more elegant solution here would be much appreciated, as the diff between the current kernel modules provided by vmware and the modules in that .tar.gz is substantial.
Ubuntu 6.06 LTS (Dapper Drake)
Ubuntu 6.10 (Edgy Eft)
Download the VMware Server Binary (.tar.gz) package for Linux from the VMware website. You will also need to register to receive the free-of-charge serial number which is required during installation.
Enable the software channel (see Repositories for instructions).
- (Optional) switch from 386 kernel to 686 kernel and reboot
- (Optional) If you using Edubuntu as your host OS then you might want to un-install
SchoolTool () Since it uses 119M in its idle state.
LTSP () So you can remove DHCPD
DHCPD () How many DHCP servers do you need ?
- Install the following packages:
- sudo aptitude install build-essential linux-headers-`uname -r` xinetd
The second package is the package for your currently-installed kernel; the part will automatically insert your kernel version for you. to install two required packages.
If you are using the server edition then you also need to install the following 3 X libraries and their dependencies.
- Once you have installed the required packages, you can now begin the VMware installer. Open a Terminal and type the following:
Replace with the path of the directory where you saved the archive, and replace with the version number of the package you downloaded. The VMware installer program will be started in the Terminal window.
Follow the on-screen instructions. You can leave most of the options as their defaults, by pressing the key and not typing anything after each question.
Ed/K/X/Ubuntu 7.04 (Feisty Fawn)
Download the VMware Server Binary (.tar.gz) package for Linux from the VMware website. Also, register to receive the free serial number which is required for registration.
- Install the following packages:
- Once you have installed the required packages, you can now begin the VMware installer. Open a Terminal and type the following:
Replace with the path of the directory where you saved the archive, and replace with the version number of the package you downloaded. The VMware installer program will be started in the Terminal window.
Follow the on-screen instructions. You can leave most of the options as their defaults, by pressing the key and not typing anything after each question. The configuration script will fail, but we'll use a workaround.
- Reconfigure step. Make VMware server use feisty's modules:
Uninstalling Source Installs
VMware Server installs with the web management console
$ sudo vmware-uninstall-mui.plVMware Server installs from source may be removed by running the following command:
$ sudo vmware-uninstall.plIf you experience problems during the uninstall, remove ~/.vmware and retry the steps above.
You may also wish to remove your virtual machines by removing /var/lib/vmware. It is also recommended that you remove
Transitioning from a Source Install
- Follow the directions in the "Uninstalling Source Installs" section of this document, but do not remove the /var/lib/vmware directory.
- Follow the directions in the "Installation and Quick Start" section.
- Move files from /var/lib/vmware to /var/lib/vmware-server and then remove the empty /var/lib/vmware directory.
- Reregister your existing virtual machines by running vmware-cmd -s register /var/lib/vmware-server/Virtual\ Machines/machinename/diskname.vmx
- Start any needed virtual machines using the management console. It is best to do this from the console instead of restarting because it will detect that you have moved the virtual machines and offer to regenerate the machine's unique identifiers, which you should decline to do.
VMware Server MUI Component Installation (Optional, Source Install Only)
If you would like VMware ESX-style web-access for configuration of your server, you can install the VMware MUI component, available from the VMware website. After having downloaded the package, open a Terminal and run the following commands:
cd <location> tar -zxvf VMware-mui-<xxx>.tar.gz sudo ./vmware-install.plReplace with the path of the directory where you saved the archive, and replace with the version number of the package you downloaded. An installer program will be run. Follow the installer's instructions. Once installation has completed, run the following commands in a Terminal:
sudo /etc/init.d/httpd.vmware start sudo /etc/init.d/httpd.vmware restart sudo /etc/init.d/httpd.vmware statusThe VMware MUI component should now be available at
http://localhost:8222/which should automatically redirect you to
https://localhost:8333/Next from the same or a separate client machine login to this page and chose the most appropriate install program from the selection labeled : Download VMware Server Console
Use Synaptic/Adept to remove the package.
Note: If you receive a "starting httpd.vmware:-ne failed" error at the end of running vmware-config-mui.pl you will need to run the following command. /bin/sh is a symlink to /bin/dash, however we need /bin/bash, not /bin/dash. Therefore we do this, and then run vmware-config-mui.pl again:
sudo ln -s -f /bin/bash /bin/sh sudo vmware-config-mui.plVMware Server Console Installation (Optional, Source Install Only)
By default, the VMware Server Console is installed on the same computer as VMware Server. However, it is possible to install the application on other computers and use it to access your VMware Server remotely. Installers are available for other operating systems, such as Windows. You can download the console package only from http://downloads.vmware.com/d/info/datacenter_downloads/vmware_server/1_0 and click one which version you require. Within the next page you can download the console only zip file.
To download the file:
wget http://download3.vmware.com/software/vmserver/VMware-server-linux-client-1.0.10-203137.zipIf installing the console on Ubuntu, open a Terminal and type the following commands:
cd <location> tar -zxvf VMware-server-console-<xxx>.tar.gz cd vmware-server-console-distrib/ sudo ./vmware-install.plReplace with the path of the directory where you saved the archive, and replace with the version number of the package you downloaded. After having run the installer, press , type and press Run to start the Server Console application.
If you are getting an error similar to the following when trying to run the console (probably hardy-specific):
/.../lib/vmware-server-console/bin/vmware-server-console: /.../lib/vmware-server-console/lib/libgcc_s.so.1/libgcc_s.so.1: version `GCC_3.4' not fou.2)Use the following command:
cd /usr/lib/vmware-server-console/lib/ && sudo mv libgcc_s.so.1 libgcc_s.so.1.org && sudo mv libpng12.so.0 libpng12.so.0.orgIf this fails, you may try copying the 'missing' file from /usr/lib/gcc/i486-linux-gnu/3.4.6/ and replacing the one distributed with the vmware server console. If you get similar error on libpng12.so.0, the file is placed in /usr/lib. You of course have to have the appropriate packages (gcc-3.4, libpng12) installed.
Running Other Operating Systems From Physical Partitions (Optional)
To run regular virtual machines from files, no additional setup is needed. However, to be able to run operating systems from physical partitions, your user needs to be part of the disk group.
- Never use this mode unless you have a boot loader such as GRUB installed. Reloading the currently running Ubuntu system from VMware will likely corrupt your partition, so always load different Operating Systems from VMWare.
Additional explanations
Error: When I try to install VMware Server, I get the following error message:
- A previous installation of a VMware product has been detected. If you installed it from the VMware website, please remove it by running vmware-uninstall.pl before proceeding. If it was installed through Ubuntu, you must purge (completely remove) the old package.
Solution: First of all, ensure that you "Completely Removed" vmware-player/vmware-server and all its modules. To ensure that, run the following command:
sudo aptitude purge vmware-server vmware-player vmware-tools-kernel-modulesIf you still keep getting the above error, run the following command: sudo rm -r /etc/vmware*Source: http://ubuntuforums.org/showthread.php?t=491854
- A previous installation of a VMware product has been detected. If you installed it from the VMware website, please remove it by running vmware-uninstall.pl before proceeding. If it was installed through Ubuntu, you must purge (completely remove) the old package.
Error: If you do not have an eth0 interface, you might be affected by bug #112492
Error: When I try to connect with the VMware Server Console, I get the following error message:
- Connection refused.
Solution: VMware should be listening on port 902. To test the connection, use telnet:
telnet <ip-of-vmware-server> 902- You should see something like the following:
If not, you might need to (re)install xinetd. Do this with:
- or (if it's already installed)
Then you can run vmware-config-network.pl or reinstall the vmware-server package to kick things into place.
- Connection refused.
Error: When I try to connect to a server using the VMWare Remote Console Plugin I get the following error message:
- An error occured while transferring data
Solution: The plugin does not honour exclusions in the system proxy settings. Bypass the proxy by pre-pending env https_proxy= http_proxy= to the command, i.e.:
env https_proxy= http_proxy= /home/user/.mozilla/firefox/qwerty.default/extensions/VMwareVMRC@vmware.com/plugins/vmware-vmrc -h "localhost:8333" -M "16"
- An error occured while transferring data
Error: When I try to start a VM, I get the following error message:
- Unable to connect to the MKS: You need execute access in order to connect with the VMware Server Console. Access denied for config file: /path/to/config/file.vmx.
Solution: The .vmx file needs to be executable. Make sure that you have permissions to create the file and to make it executable. The filesystem that the file resides on must not be mounted with the noexec flag.
- Unable to connect to the MKS: You need execute access in order to connect with the VMware Server Console. Access denied for config file: /path/to/config/file.vmx.
Error: When I enter the license key I get the following error message:
- /usr/lib/vmware/bin/vmware-vmx: error while loading shared libraries: libXtst.so.6 (or libXt.so.6): cannot open shared object file: No such file or directory Please enter your 20-character serial number.
Solution: sudo apt-get install libxtst6 libxt6
- /usr/lib/vmware/bin/vmware-vmx: error while loading shared libraries: libXtst.so.6 (or libXt.so.6): cannot open shared object file: No such file or directory Please enter your 20-character serial number.
Error: Bridged networking is not working when I use an unplugged ethX interface. The linux kernel shuts down the TCP/IP stack if the cable is unplugged.
Solution: Shut down the ethX interface and create a virtual tap interface to bridge on.
Error: Sometimes the bridged network is not working if configured on vmnet0.
Solution: Use vmware-config.pl to change the bridge to vmnet2.
Error: When running the install script from the 9.10 install instructions on 10.10, I get:
- nickg@aardvark:/data/downloads/temp/raducotescu-vmware-server-linux-2.6.3x-kernel-f271f27$ sudo ./vmware-server-2.0.x-kernel-2.6.3x-install.sh You have VMware Server archive: VMware-server-2.0.2-203138.x86_64.tar.gz Checking for needed packages on Ubuntu You do have the linux-headers-2.6.35-22-generic package... You do have the build-essential package... You do have the patch package... Extracting the contents of VMware-server-2.0.2-203138.x86_64.tar.gz Found .tar file for vmmon module Found .tar file for vsock module Found .tar file for vmnet module Found .tar file for vmci module Extracting .tar files in order to apply the patch... Untarring /data/downloads/temp/raducotescu-vmware-server-linux-2.6.3x-kernel-f271f27/vmware-server-distrib/lib/modules/source/vmmon.tar Untarring /data/downloads/temp/raducotescu-vmware-server-linux-2.6.3x-kernel-f271f27/vmware-server-distrib/lib/modules/source/vsock.tar Untarring /data/downloads/temp/raducotescu-vmware-server-linux-2.6.3x-kernel-f271f27/vmware-server-distrib/lib/modules/source/vmnet.tar Untarring /data/downloads/temp/raducotescu-vmware-server-linux-2.6.3x-kernel-f271f27/vmware-server-distrib/lib/modules/source/vmci.tar Testing patch... Applying patch... Preparing new tar file for vmmon module Preparing new tar file for vsock module Preparing new tar file for vmnet module Preparing new tar file for vmci module Checking that the compiling will succeed... Trying to compile vmmon module to see if it works Performing make in /data/downloads/temp/raducotescu-vmware-server-linux-2.6.3x-kernel-f271f27/vmware-server-distrib/lib/modules/source/vmmon-only Using 2.6.x kernel build system. In file included from /data/downloads/temp/raducotescu-vmware-server-linux-2.6.3x-kernel-f271f27/vmware-server-distrib/lib/modules/source/vmmon-only/linux/driver.c:20: /data/downloads/temp/raducotescu-vmware-server-linux-2.6.3x-kernel-f271f27/vmware-server-distrib/lib/modules/source/vmmon-only/./include/driver-config.h:35: fatal error: linux/autoconf.h: No such file or directory compilation terminated. make[2]: *** [/data/downloads/temp/raducotescu-vmware-server-linux-2.6.3x-kernel-f271f27/vmware-server-distrib/lib/modules/source/vmmon-only/linux/driver.o] Error 1 make[1]: *** [_module_/data/downloads/temp/raducotescu-vmware-server-linux-2.6.3x-kernel-f271f27/vmware-server-distrib/lib/modules/source/vmmon-only] Error 2 make: *** [vmmon.ko] Error 2 There is a problem compiling the vmmon module after it was patched. :(
Solution: ???
I was finally able to get rid of this problem using this patch version 1.5.0 with Ubuntu 10.10 kernal version 2.6.35-22.
This bug report indicates that the location of autoconf.h was changed between Lucid and Maverick. The source files need to be changed to reflect that.
I did a sudo ln -s /usr/src/linux-headers-2.6.35-22-generic/include/generated/autoconf.h /usr/src/linux-headers-2.6.35-22-generic/include/linux/autoconf.h first.
I then added the following section after echo "Applying patch..." ... if ... fi in the file vmware-server-2.0.x-kernel-2.6.3x-install.sh:
- nickg@aardvark:/data/downloads/temp/raducotescu-vmware-server-linux-2.6.3x-kernel-f271f27$ sudo ./vmware-server-2.0.x-kernel-2.6.3x-install.sh You have VMware Server archive: VMware-server-2.0.2-203138.x86_64.tar.gz Checking for needed packages on Ubuntu You do have the linux-headers-2.6.35-22-generic package... You do have the build-essential package... You do have the patch package... Extracting the contents of VMware-server-2.0.2-203138.x86_64.tar.gz Found .tar file for vmmon module Found .tar file for vsock module Found .tar file for vmnet module Found .tar file for vmci module Extracting .tar files in order to apply the patch... Untarring /data/downloads/temp/raducotescu-vmware-server-linux-2.6.3x-kernel-f271f27/vmware-server-distrib/lib/modules/source/vmmon.tar Untarring /data/downloads/temp/raducotescu-vmware-server-linux-2.6.3x-kernel-f271f27/vmware-server-distrib/lib/modules/source/vsock.tar Untarring /data/downloads/temp/raducotescu-vmware-server-linux-2.6.3x-kernel-f271f27/vmware-server-distrib/lib/modules/source/vmnet.tar Untarring /data/downloads/temp/raducotescu-vmware-server-linux-2.6.3x-kernel-f271f27/vmware-server-distrib/lib/modules/source/vmci.tar Testing patch... Applying patch... Preparing new tar file for vmmon module Preparing new tar file for vsock module Preparing new tar file for vmnet module Preparing new tar file for vmci module Checking that the compiling will succeed... Trying to compile vmmon module to see if it works Performing make in /data/downloads/temp/raducotescu-vmware-server-linux-2.6.3x-kernel-f271f27/vmware-server-distrib/lib/modules/source/vmmon-only Using 2.6.x kernel build system. In file included from /data/downloads/temp/raducotescu-vmware-server-linux-2.6.3x-kernel-f271f27/vmware-server-distrib/lib/modules/source/vmmon-only/linux/driver.c:20: /data/downloads/temp/raducotescu-vmware-server-linux-2.6.3x-kernel-f271f27/vmware-server-distrib/lib/modules/source/vmmon-only/./include/driver-config.h:35: fatal error: linux/autoconf.h: No such file or directory compilation terminated. make[2]: *** [/data/downloads/temp/raducotescu-vmware-server-linux-2.6.3x-kernel-f271f27/vmware-server-distrib/lib/modules/source/vmmon-only/linux/driver.o] Error 1 make[1]: *** [_module_/data/downloads/temp/raducotescu-vmware-server-linux-2.6.3x-kernel-f271f27/vmware-server-distrib/lib/modules/source/vmmon-only] Error 2 make: *** [vmmon.ko] Error 2 There is a problem compiling the vmmon module after it was patched. :(
CategoryVirtualizationCategoryObsolete
Virten.net
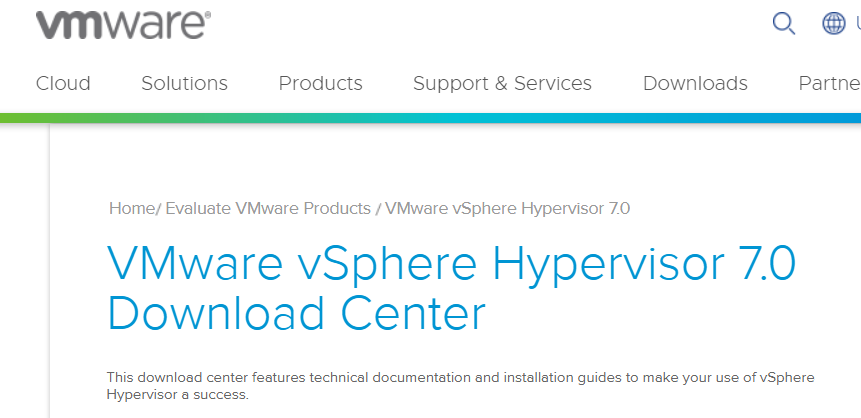
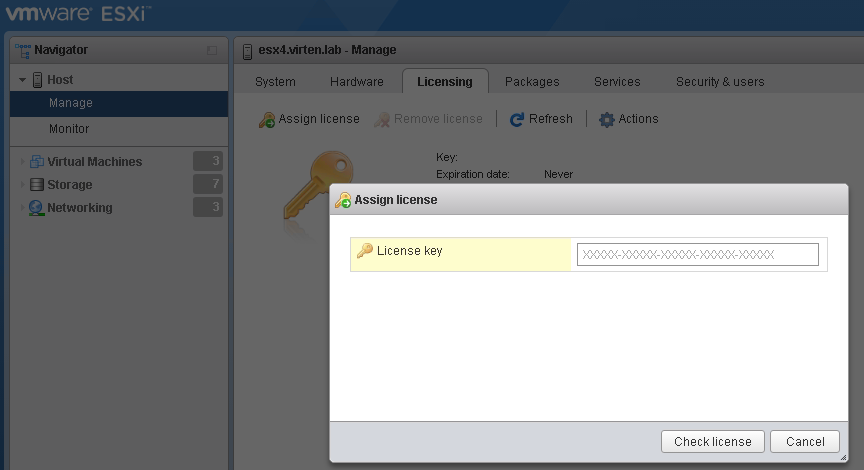
vSphere 7.0 has been released and as known from previous versions, VMware provides a free version of their Hypervisor ESXi for everyone again. The license key can be created for free at VMware's website. It has no expiration date. The binaries you will receive as "Free Hypervisor" are 100% identical to the paid version but with some software limitations.
Tech Specs and Limitations
- No commercial support (Community support)
- Free ESXi cannot be added to a vCenter Server
- Some API functionality is missing (API is read-only)
- No physical CPU limitation
- Number of logical CPUs per host: 480
- Maximum vCPUs per virtual machine: 8
- The Key is restricted to 100 Physical Servers deployments.
Other limitations like the 32GB Memory or 2 CPU Socket limit are no longer in place.
If you already obtained a free key for previous versions for ESXi, this key is not valid for vSphere 7.0, but you can use the same MyVMware Account to generate a new key.
Warning: There is an issue with the license assignment for ESXi 7.0 keys at the moment. When the registration process is finished, the following error message is displayed:
Unable to process your request. Please try again later.
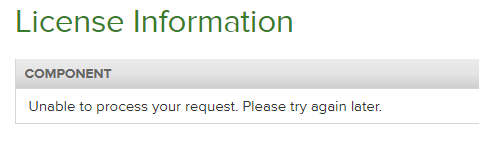
You can still go on and download and Install ESXi 7.0. It will automatically start in 60-day evaluation mode. You can add a free license later.
- Go to VMware vSphere Hypervisor (ESXi) 7.0 Download Center
- Login or create an account

- Click Register
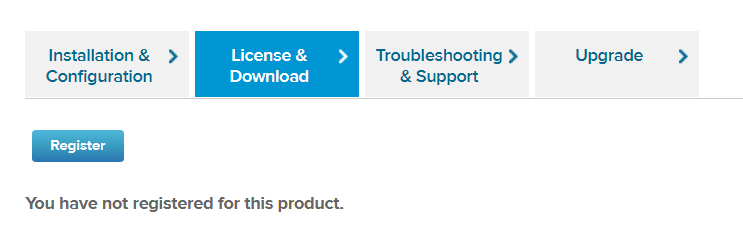
- Register for ESXi (Enter some personal information)
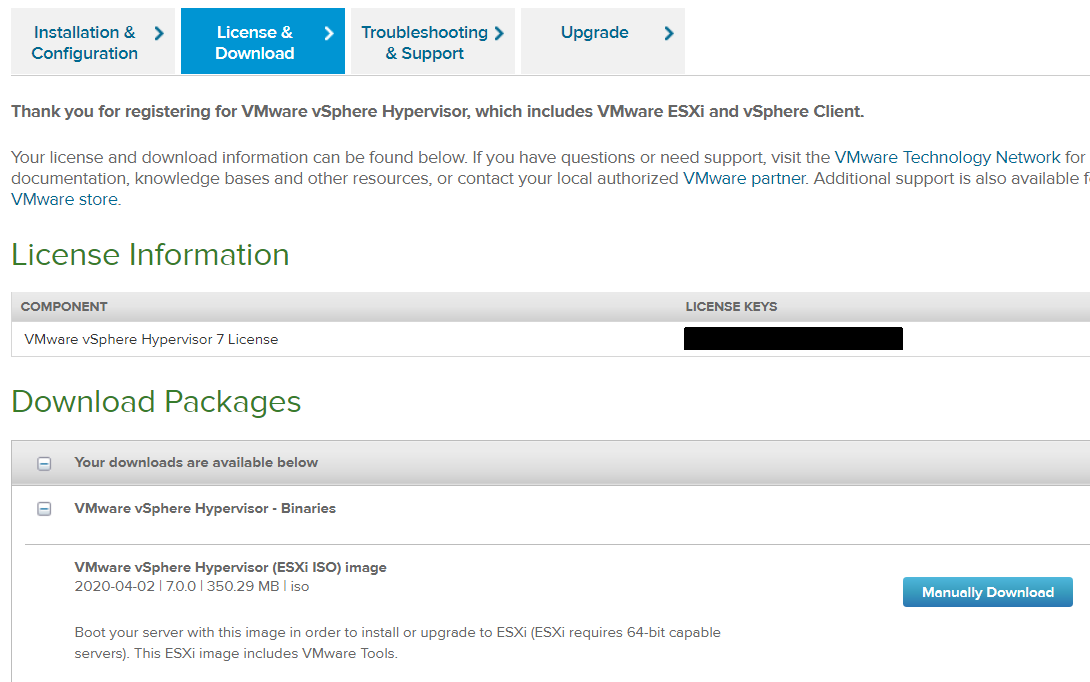
After registration, you will receive a unique license key and access to the binaries. - Download VMware vSphere Hypervisor 7.0 - Binaries
- Install ESXi to your Hardware (Create a Bootable ESXi Installer USB Flash Drive)
- Login as root with the Embedded Host Client (https://<ESX>/ui/)
- Navigate to Manage -> Licensing
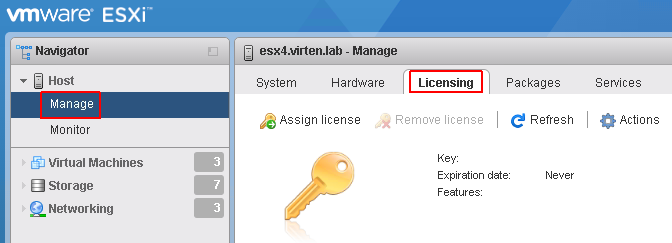
- Click Assign license and enter your license key
Installation and Configuration Guide for Cisco Services Ready Engine Virtualization Release 2.0
Managing the VMware vSphere Hypervisor License
Last Updated: September 17, 2012
Cisco SRE-V uses the VMware vSphere Hypervisor software for virtualization. This chapter provides information about how to manage the VMware vSphere Hypervisor license.
•![]() VMware vSphere Hypervisor License Overview
VMware vSphere Hypervisor License Overview
•![]() Registering the VMware vSphere Hypervisor License
Registering the VMware vSphere Hypervisor License
•![]() Activating the VMware License Key
Activating the VMware License Key
•![]() Accessing the VMware License Key Information
Accessing the VMware License Key Information
VMware vSphere Hypervisor License Overview
The following two types of VMware vSphere Hypervisor licenses are available:
•![]() VMware vSphere Hypervisor Evaluation License—60-day evaluation license that is bundled with the Cisco SRE-V software image, which you can use to evaluate the hosting environment.
VMware vSphere Hypervisor Evaluation License—60-day evaluation license that is bundled with the Cisco SRE-V software image, which you can use to evaluate the hosting environment.
•![]() Permanent VMware vSphere Hypervisor Host License—Perpetual license that can be obtained along with the Cisco SRE-V software image, or can be purchased separately, after the built-in evaluation license expires. After a permanent license is installed, it provides all the permissions necessary, to access the features in the software image. You do not need to upgrade a permanent licence for subsequent releases.
Permanent VMware vSphere Hypervisor Host License—Perpetual license that can be obtained along with the Cisco SRE-V software image, or can be purchased separately, after the built-in evaluation license expires. After a permanent license is installed, it provides all the permissions necessary, to access the features in the software image. You do not need to upgrade a permanent licence for subsequent releases.
The following types of permanent licenses are available:
–![]() VMware vSphere Hypervisor Host License—Does not provide the ability to manage the VMware vSphere Hypervisor host through the VMware vCenter Server.
VMware vSphere Hypervisor Host License—Does not provide the ability to manage the VMware vSphere Hypervisor host through the VMware vCenter Server.
–![]() VMware vSphere Hypervisor Host with VMware vCenter Server Agent License—Provides the ability to manage the VMware vSphere Hypervisor host through the VMware vCenter Server.
VMware vSphere Hypervisor Host with VMware vCenter Server Agent License—Provides the ability to manage the VMware vSphere Hypervisor host through the VMware vCenter Server.
For feature license SKUs that are available for Cisco SRE-V, see Table 5-1.

Note ![]() You can convert the VMware vSphere Hypervisor Host license to a VMware vSphere Hypervisor Host with VMware vCenter Server Agent license by purchasing an upgrade license.
You can convert the VMware vSphere Hypervisor Host license to a VMware vSphere Hypervisor Host with VMware vCenter Server Agent license by purchasing an upgrade license.
Table 5-1 shows the feature license SKUs that are available for Cisco SRE-V.
| License SKUs | Description |
| Licenses Without VMware vCenter Server Support | |
FL-SRE-V-HOST | VMware vSphere Hypervisor Host paper license purchased with the software. |
FL-SRE-V-HOST= | VMware vSphere Hypervisor Host paper license purchased without the software (spare). |
L-FL-SRE-V-HOST= | VMware vSphere Hypervisor Host electronic license purchased without the software (spare). |
| Licenses With VMware vCenter Server Support | |
FL-SRE-V-HOSTVC | Feature license for the VMware vSphere Hypervisor software on the Cisco SRE Service Module, which includes VMware vCenter Server management support. This license can be purchased with the software. |
FL-SRE-V-HOSTVC= | Feature license for the VMware vSphere Hypervisor software on the Cisco SRE Service Module, which includes VMware vCenter Server management support (spare). |
L-FL-SRE-V-HOSTVC= | E-delivery feature license for the VMware vSphere Hypervisor software on the Cisco SRE Service Module, which includes VMware vCenter Server management support (spare). |
| Upgrade Licenses to Add VMware vCenter Server Support | |
FL-SRE-V-VC-UPG= | Feature license to upgrade the VMware vSphere Hypervisor software on the Cisco SRE Service Module to enable VMware vCenter Server management support (spare). |
L-FL-SRE-V-VC-UPG= | E-delivery feature license to upgrade the VMware vSphere Hypervisor software on the Cisco SRE Service Module to enable VMware vCenter Server management support (spare). |
Related Topics
•![]() Cisco SRE-V Options
Cisco SRE-V Options
Registering the VMware vSphere Hypervisor License
Use this procedure if you purchased Cisco SRE-V option 1 (hardware only) and a spare VMware vSphere Hypervisor license from Cisco.com.
When you purchase the spare VMware vSphere Hypervisor license, you receive a letter from Cisco Systems, which contains the activation code, which you must register with VMware. After, you register the activation code, you receive a VMware license key, which you must activate using the vSphere Client GUI.
Note ![]() You must register the activation code with VMware within 30 days of receipt.
You must register the activation code with VMware within 30 days of receipt.
To register the activation code and receive the VMware license key, complete the following steps.
Procedure
Step 1 ![]() To register the activation code with VMware, go to https://www.vmware.com/oem/code.do?Name=CISCOISR-AC.
To register the activation code with VMware, go to https://www.vmware.com/oem/code.do?Name=CISCOISR-AC.
The VMware Product Registration page opens.
Step 2 ![]() Do one of the following:
Do one of the following:
•![]() If you are a registered VMware user, enter your credentials, and then click Sign In. The VMware Partner Activation Code Registration page opens.
If you are a registered VMware user, enter your credentials, and then click Sign In. The VMware Partner Activation Code Registration page opens.
•![]() If you are new to VMware, click Register. The Register For Your VMware Product page opens. Enter the required information in the fields provided, and then click Continue. You receive an e-mail from VMware to activate your account. Click Activate Now provided in your e-mail, and then enter your password in the field provided. The VMware Partner Activation Code Registration page opens.
If you are new to VMware, click Register. The Register For Your VMware Product page opens. Enter the required information in the fields provided, and then click Continue. You receive an e-mail from VMware to activate your account. Click Activate Now provided in your e-mail, and then enter your password in the field provided. The VMware Partner Activation Code Registration page opens.
Step 3 ![]() Enter the activation code that you received from Cisco Systems in the Partner Activation Code(s) text box, and then click Continue. The Add License Administrator page opens. By default, your name is added as the License Administrator.
Enter the activation code that you received from Cisco Systems in the Partner Activation Code(s) text box, and then click Continue. The Add License Administrator page opens. By default, your name is added as the License Administrator.
Step 4 ![]() To allow additional people to receive information about future updates and serial number upgrades, enter their e-mail address in the space provided in the Add License Administrator page, and then click Continue.
To allow additional people to receive information about future updates and serial number upgrades, enter their e-mail address in the space provided in the Add License Administrator page, and then click Continue.
The VMware Confirmation Page opens with the license key redemption information for the activation codes that you registered.
Step 5 ![]() Save the product redemption information for your records, and then click Continue. The Link to Downloads and VMware's License Portal page opens thanking you for your registration.
Save the product redemption information for your records, and then click Continue. The Link to Downloads and VMware's License Portal page opens thanking you for your registration.
After you finish the registration process, you receive an e-mail from VMware with information about the VMware license key or serial number.
Note ![]() We highly recommend that you write down the VMware license key and store it in a secure, easily accessible location.
We highly recommend that you write down the VMware license key and store it in a secure, easily accessible location.
Step 6 ![]() To use Cisco SRE-V software, you must assign the VMware license key to the VMware vSphere Hypervisor host using the vSphere Client GUI as appropriate. See "Activating the VMware License Key" section.
To use Cisco SRE-V software, you must assign the VMware license key to the VMware vSphere Hypervisor host using the vSphere Client GUI as appropriate. See "Activating the VMware License Key" section.
Related Topics
•![]() Cisco SRE-V Options
Cisco SRE-V Options
Activating the VMware License Key
Before You Begin
•![]() Download and install the vSphere Client. See the "Downloading and Installing the vSphere Client" section.
Download and install the vSphere Client. See the "Downloading and Installing the vSphere Client" section.
Procedure
Step 1 ![]() From the vSphere Client GUI, click the Configuration tab.
From the vSphere Client GUI, click the Configuration tab.
Step 2 ![]() From the left pane, under Software, choose Licensed Features
From the left pane, under Software, choose Licensed Features
Step 3 ![]() Click Edit..., which is located on the top right corner of the Licensed Features page.
Click Edit..., which is located on the top right corner of the Licensed Features page.
The Assign License page opens.
Step 4 ![]() Choose Assign a New License to this Host radio button, and then click Enter Key.
Choose Assign a New License to this Host radio button, and then click Enter Key.
The Add License Key window opens.
Step 5 ![]() Enter the license key in the New License Key field, and then click OK.
Enter the license key in the New License Key field, and then click OK.
Related Topics
•![]() Cisco SRE-V Options
Cisco SRE-V Options
Accessing the VMware License Key Information
You can access the license key information from the vSphere Client GUI or the console interface.
Note ![]() We highly recommend that you write down the VMware license key and store it in a secure, easily accessible location.
We highly recommend that you write down the VMware license key and store it in a secure, easily accessible location.
•![]() Accessing the VMware License Key Information from the vSphere Client GUI
Accessing the VMware License Key Information from the vSphere Client GUI
•![]() Accessing the VMware License Key Information from the Console Interface
Accessing the VMware License Key Information from the Console Interface
Accessing the VMware License Key Information from the vSphere Client GUI
Procedure
Step 1 ![]() From the vSphere Client GUI, choose a host.
From the vSphere Client GUI, choose a host.
Step 2 ![]() Click the Configuration tab, and then choose Licensed Features.
Click the Configuration tab, and then choose Licensed Features.
The license key information displays in the following format: XXXX-XXXX-XXXX-XXXX.
Accessing the VMware License Key Information from the Console Interface
The console interface allows you to access the VMware vSphere Hypervisor DCUI. To obtain the license key information from the console interface, choose View Support Information.
The license key information displays in the following format: XXXX-XXXX-XXXX-XXXX.
The physical machine serial number is also displayed. Make sure that you do not confuse the license key information with the physical machine serial number.
What’s New in the VMWare Esx Server v2.x serial key or number?
Screen Shot

System Requirements for VMWare Esx Server v2.x serial key or number
- First, download the VMWare Esx Server v2.x serial key or number
-
You can download its setup from given links:

VMWare Esx Server v2.x serial key or number & PC Free Download

VMWare Esx Server v2.x serial key or number& Apps for Laptop & PC Free Download
