
SOUND CUE SYSTEM keygen

SOUND CUE SYSTEM keygen
Show Cue System (formerly Sound Cue System) 11.1.6 Crack With Serial Number
शो क्यू प्रणाली एक पेशेवर सॉफ्टवेयर एप्लीकेशन इस्तेमाल किया जा डिजाइन में मुख्य रूप से रहते हैं सिनेमाघरों में मदद करने के लिए आप सभी इकट्ठा ऑडियो, वीडियो और छवि cues एक विशिष्ट क्रम में.
जीयूआई लग सकता है एक भारी सा एक पहली नज़र में, लेकिन यह है क्योंकि केवल उपकरण के साथ आता है सुविधाओं के बहुत सारे के साथ प्रयोग करने के लिए है ।
इसे पढ़ता है की एक सूची cues और उप-संकेतों से, एक उपयोगकर्ता परिभाषित अनुसूचित जातियों क्यू फ़ाइल और पता चलता है के बारे में विस्तृत जानकारी क्यू, पेज, विवरण, क्यू प्रकार, राज्य, सक्रियण के बाद, फ़ाइल का प्रकार, लंबाई और डिवाइस है । इसके अलावा, आप शुरू कर सकते हैं, फिर से शुरू या बंद सभी cues.
शो क्यू प्रणाली की मदद से आप के साथ काम के विभिन्न प्रकार के संकेत, जैसे ऑडियो (सेट के शुरू और अंत अंक, पाश अंक, मात्रा और पैन, फीका में और फीका बाहर गुना, और आउटपुट डिवाइस का चयन), वीडियो/छवि (सेट के शुरू और अंत अंक, पाश अंक, मात्रा और पैन, फीका में और फीका बाहर गुना, और आउटपुट डिवाइस के लिए चयन, के रूप में अच्छी तरह के रूप में लागू पार fades छवियों के बीच), और प्लेलिस्ट (खेल की एक सूची ऑडियो फ़ाइलें या तो लगातार या बेतरतीब ढंग से)है ।
इसके अलावा, आप काम कर सकते हैं स्तर के साथ बदल cues (मात्रा बदलने के लिए और/या पैन के पहले के एक क्यू पर एक निर्दिष्ट अवधि के समय) या अन्य लोगों से संबंधित करने के लिए SFR (बंद करो, बाहर हो पाती है और रोकने के लिए या पाश रिलीज के पहले के एक क्यू या एकाधिक संकेतों), नोट (मार्करों जोड़ने या अनुस्मारक पर चयनित अंक में अपने क्यू सूची), ज्ञापन (के बारे में जानकारी प्रदर्शित गैर-क्यू गतिविधि), 'जाने के लिए' (कूद करने के लिए एक नई स्थिति में एक के भीतर वर्तमान में खेल क्यू), सेट करें 'स्थिति' (सेट अप के छोरों cues), और नियंत्रण भेजें (मिडी भेजने, RS232 या Telnet के संदेश अन्य उपकरणों के लिए).
पिछले नहीं बल्कि कम से कम, आप सक्षम कर सकते हैं MTC (मिडी बार कोड) भेजने के लिए एमटीसी संदेश, और सक्षम रहते हैं इनपुट संकेतों (स्वीकार लाइव इनपुट से mics और उपकरणों), और 'चलाने के लिए बाहरी कार्यक्रम' cues (शुरू में एक बाहरी कार्यक्रम के रूप में इस तरह PowerPoint).
शो क्यू प्रणाली सुविधाओं एक निर्मित में क्यू संपादक की अनुमति देता है कि आप खेलने के लिए पटरियों की एक सूची एक विशिष्ट क्रम में या बेतरतीब ढंग से लागू होते हैं, पार लुप्त होती और विभिन्न संक्रमण को रोकने, या फीका बाहर पूरे प्लेलिस्ट, के रूप में अच्छी तरह से सेट के रूप में वांछित मात्रा, पैन, लंबाई, और वक्ता के चयन के लिए प्रत्येक क्यू.
इसके अलावा, आप गर्म कुंजी का उपयोग करने के लिए खेलते हैं, उन्हें किसी भी समय गतिशील रूप से समायोजित क्यू के स्तर भेजने के लिए, मिडी नियंत्रण संदेश, और वीडियो फ़ाइलों को खेलने के माध्यम से एक वीडियो प्रोजेक्टर या अलग मॉनिटर (आप उपयोग कर सकते हैं अप करने के लिए चार प्रोजेक्टर) है ।
तुलना करने के लिए मुख्य इंटरफेस के साथ, अनुसूचित जातियों संपादक नहीं है, काफी सहज ज्ञान युक्त है, तो आप की जरूरत हो सकती है कुछ करने के लिए अतिरिक्त समय प्राप्त करने के लिए इस्तेमाल किया के साथ काम कर रहे संपादन मापदंडों.
बनाने के एक नए क्यू सूची के द्वारा किया जा सकता उपलब्ध कराने के बारे में सामान्य जानकारी के नाम उत्पादन, क्यू लेबल वेतन वृद्धि, default फीका में और बाहर समय के लिए नए ऑडियो फ़ाइल cues, और डिफ़ॉल्ट पाश पार फीका समय के लिए नए ऑडियो फाइल क्यू छोरों ।
इसके अलावा, आप की अनुमति है सेट करने के लिए ऑडियो आउटपुट डिवाइस, नियंत्रण भेज उपकरणों सक्षम क्यू नियंत्रण से बाहरी उपकरण, के साथ काम करते समय प्रोफाइल के लिए समय-आधारित cues, और बदलने के लिए चलाने के लिए समय सेटिंग्स (जैसे चलाने मोड, दृश्य चेतावनी, अधिकतम ऑडियो स्तर के साथ, मास्टर fader के स्तर).
आदेश में इस प्रक्रिया को पूरा करने, आप की जरूरत है जोड़ने के लिए संकेत हो सकता है, वे ऑडियो फ़ाइलें (जैसे. WAV, एमपी 3, अर्थोपाय अग्रिम, AAC, OGG) या वीडियो (जैसे AVI, WMF, ASF, MP4), सम्मिलित SFR cues, और आयात cues एक सीएसवी फ़ाइल से. पूर्ववत करें/फिर से करें अपने कार्यों के लिए एक सुविधा पैकेज में शामिल है.
पावर उपयोगकर्ताओं को हो सकता है कूद करने के लिए विन्यास पैनल, जहां से वे बदल सकते हैं प्रदर्शन मोड, क्यू सूची कॉलम, ऑडियो और वीडियो ड्राइवर सेटिंग्स है, और शॉर्टकट है ।
यह योग करने के लिए, दिखाने के लिए, क्यू सिस्टम के साथ आता है एक प्रभावशाली सुइट की सुविधाओं में मदद करने के लिए आप tweak, ध्वनि प्रभाव और ट्रैक प्लेबैक के लिए लाइव संगीत के उत्पादन के स्वचालन. हालांकि, जीयूआई नहीं है काफी सहज ज्ञान युक्त है, तो इस उपकरण विशेष रूप से है की ओर गियर व्यावसायिक उपयोगकर्ताओं के लिए ।
Sound Cue System 10 Keygen Torrent
Serato DJ Pro 2.0.4 Crack Full Version Is Here Serato DJ Pro 2 Crack is a very powerful and great application, especially for many who work with electronic digital music. Inside our checks, this program demonstrated high quality and good operation. Among the countless mixing features, take note the existence of any CUE point supervisor and music loops. You’ll be able to visualize the spectral range of the sound data thus facilitating their blending. Furthermore, the BPM, for Defeat each and every minute, is easily searchable. Visualize your monitors with this unique EQ shaded waveforms. Red for bass, blue for treble and inexperienced for mid-range.
IO ports and to communicate between two microcontrollers with the SPI peripheral where one microcontroller is configured as a master and other as a slave. Engine/Audio/Overview/soundCueEditor.jpg' alt='Sound Cue System 10 Keygen For Mac' title. Sound cue system CrackDB.com - lagest cracks database. Search results for 'sound cue system sound cue system! No Torrents!' World Download provider results.
Never miss an inbound vocal or bass drop. Maintain your tracks with time with a straightforward beat matching screen next to your waveforms. Its a great tool for edit all type of music. Many of the film industries use this tool for the professional purpose. Serato DJ Pro is an exclusive mixing console which allows someone to animate celebrations and create professional-quality mixes. The program is dependant on compatibility with controllers and hardware of several brands. Another novelty is the fact now the application form is finally to 64 pieces, which in line with the developer influences to make playlists much bigger, and better performance and stableness.
All of the important trail information you will need is exhibited on our famous electronic decks. Get live BPM and trail time information as well as visible representation of upcoming cue things and played position while scratching. The thing that places it in addition to the most similar resources is the actual fact that it’ll only work together with a reinforced hardware device. Serato DJ Pro Full Crack Version Torrent Free Download Serato DJ Pro Crack software that ensures fantastic mixes by using the Pioneer DDJ SX controller. More changes at the hardware level include support for retina and 4K monitors, with a user interface that adapts correctly to all or any types of resolutions. Also, another interesting reality relating to this tool is the support for iTunes collection it provides its users. In the DJ needs of Filter systems, Echoes, and Delays to complex and creative sound synths, dubbed out tape echoes and vintage 8-bit sound twisting FX. Such applications are being used by DJs to displace real turntables with digital ones, plus they may use digital music without resorting to vinyl fabric or CDs. Track record your full collections in customizable high-quality forms, ready to tell your supporters online. Result in DJ stings, loops, drops and entire monitors from the SP-6 test player.
The Impossible Quiz Answers” – Here you can find the most accurate answers, which will help you in the passing game The Impossible Quiz. Impossible Quiz Answers 1-20 Question 1: Four Question 2: No, but a tin can Question 3: K.O Question 4: THE ANSWER Question 5: Right click then move over then click, or move off the screen. Question 6: Shallots Question 7: An elephant Question 8: Yes! You can choose to take either our Online Course or our Video Course when selecting a Basic Driver Safety Program. You must get at least 80% on each quiz (4 out of 5 questions correct) to Indiana Online Driver Safety will electronically transmit your course completion information to the BMV within. Indiana driver safety program answers to impossible quiz. The Impossible Quiz answers and cheats for every level of the game. Looking for a creatively challenging game? Try your luck at Splapp-Me-Do and inXile Entertainment’s The Impossible Quiz.
Recall that whenever Serato DJ premiered, it helped bring changes not only in the program but also in the procedures and eye-sight of Serato. The first interfaces and mixers were unsubscribed then one of this you can do with this new version. Especially with the oldest products or computer systems with fewer requirements. Pushbavana kubusami mp3songs tamil god songs. Full and Final Conclusion About Serato DJ Pro 2.0.4 The thought of the application form is to provide only professionals so that it will not fit all and it could be aggravating to download a credit card application that will not provide basic mixing up features. Smart Sync with Beatgrids provides you even additional time to get creative.
Overall, Serato DJ Pro assures much and shows to be ready for the jobs it should manage. Nonetheless, the limited support for hardware devices helps it be somewhat exclusive and befitted for simply a few go for users. The Serato DJ Torrent isn’t that different, especially for many who can use the application form with a specialist controller. Now the programmer of this software launches a novelty that seeks to help DJs who use professional equipment. Further Benefits You Take It • Professional quality software. • The user interface design.
Soundplant 47
User Manual
Soundplant home page: http://soundplant.org
Introduction:
• Main Features
• System Requirements
• Licensing
Usage Instructions:
• Quick Start
• Onscreen Keyboard
• Key Configuration Panel
• Key Function Toolbar
• Detailed Channels Meter
• Global Function Toolbar
• Key Combo Shortcuts
• Preferences
• Other Usage Miscellany, Computer Keyboard Quirks, & Known Issues
Contact
Usage Hints
Manually Editing .keymap Files
About / Version History
Soundplant Customization & Feature Sponsorship
Planned for Future Versions
Credits
Introduction
Soundplant is live performance audio software that turns your computer keyboard (yes, your QWERTY keyboard) into a versatile, low latency, multitrack sample trigger and playable musical instrument. It allows the assignment of sound files of any format and length onto virtually all keyboard keys, giving you hours of instantly-playing random access audio at your fingertips with no extra hardware needed. Use Soundplant as a performance, presentation, or installation tool, as a drum pad, as an educational aid, to mix together tracks in realtime, trigger sound effects or background tracks during a show, create music or loops, sketch sound designs, make beats, and give new life to old sounds - all via an input device you've been practicing on for as long as you've been typing. Because it's a standalone software sampler that uses your own samples to create custom soundboards, Soundplant is an infinitely flexible electronic instrument limited only by the variety of sounds that you feed it. An easy to use interface provides drag & drop configuration of each key, including options which control the way each sound is triggered along with several lightweight non-destructive realtime effects. Playing sounds are displayed with a progress bar and track time, and you can even trigger sounds with Soundplant hidden while using any other program.
Soundplant is not a synthesizer, plugin, editor, or sequencer, but it is way more than a media player. Soundplant was designed to do one thing and do it well: to trigger sounds from the computer keyboard with maximum speed, efficiency, and ease of use. Users love its rock-solid stability for live event use, its simple one sound per one key metaphor which eliminates the usage complications of many other software samplers, its versatility for handling sounds of all types from short effects to full length songs to hours-long mixes, and its ultra-optimized use of the computer keyboard with lowest-possible latency requiring no extra hardware or MIDI.
Main Features
- 72 keyboard keys can be used to trigger sounds, with very low latency
- drag & drop sound files onto keyboard keys for quick and easy key assignment; click & drag to move or copy sounds from key to key
- plays virtually all sound file formats in existence, including .wav, .aif, .mp3, .mp4, .m4a, .aac, .flac, .wma, .alac, .wv, .ogg, .snd, .ape, and many many more, even audio from video files like .wmv, .mov, .avi, .divx, .mpg, .flv, .3gp, etc.
- 'background key input' allows Soundplant to receive key hits while minimized or hidden — trigger sounds with global hotkeys while using other audio software, typing a document, playing a game, or doing anything else in any other program, with optional use of Ctrl & Alt/Option combos
- 32-bit floating point mixing and up to 96 kHz output for ultra high fidelity
- 256 sound channel polyphony, allowing for dense soundscapes and complex virtual instruments — mix tons of sounds at once
- unlimited sound length — fire off short effects or play huge hours-long tracks with equal ease
- direct internal recording of Soundplant's output in 32-bit quality
- waveform display, with *new* zooming in a detailed fullscreen view for precise sound start and end point setting
- playlist queuing for flexibly triggering multiple sounds with a single key, allowing playing in sequence or shuffled, or all starting simultaneously in sync, or building playlists in a realtime 'wait-in-line' mode by pressing keys to queue sounds on the fly, or *new* stepping through a pause-at-the-end-of-each-track playlist with a single key, or triggering a single random sound from a group of sounds
- *new* many optimizations including vastly improved caching & memory management for faster loading of sounds and keymaps
- *new* autofade mode for easier fade outs and cross fades
- sound output device selection, with support for multichannel devices, including ASIO support on Windows
- sounds play entirely from RAM by default to avoid disk use during playback, for best sound quality and lowest latency - but can also fall back to playing from disk for maximum flexibility
- launch an unlimited number of Soundplant instances for even more flexibility to output to multiple audio devices, gain more 'banks' of sounds and greater polyphony, and record multiple tracks simultaneously
- realtime volume, panning, pitch, reverb, lowpass, resonance, and LFO effects for each key
- randomization settings on effects for richly varying sound playback
- playback activity logging for time-stamped documenting of tracks played
- customizable sound triggering, allowing for looping, overlapping, restarting, muting, pausing, and fading, controlled by secondary key press or by key release
- displays full playback progress info for up to 12 tracks at once
- 'simple' view mode for larger keys that you can click or tap to play like a virtual cart machine, perfect for touchscreen devices or less advanced users
- onscreen keyboard keys are highlighted as they play and can be custom-labeled & color-coded
- pitch adjust allows microtuning to the 100th of a semitone and a 10 octave range — plus, easily auto-assign the same sound to multiple keys at varying pitches to create playable instrument scales using 'multi-key pitch assign'
- trim sounds to start and end offset points with precision to the 100,000th of a second — plus, easily auto-splice pieces of a sound across multiple keys (for example, to extract individual drum sounds from a breakbeat) using 'multi-key offset assign'
- support for cue points in .wav and .swa files — easily set playback offsets to cue points defined in most audio editors
- compressed sounds decompress on loading rather than during playback, unlike most players, for lowest latency and minimizing disk & CPU usage during playback for best sound quality
- a true live performance program that continues playing even while changing settings, loading and unloading sounds on the fly, and configuring multiple keys simultaneously in realtime
- works identically on Windows or Mac
- saves and loads keyboard configurations as .keymap files, which are fully cross-platform compatible and can be easily transferred between different computers with the handy 'save keymap with sounds'
- includes several options for minimizing CPU and RAM usage for performance tuning so that it can run well even on older computers — Soundplant can give new life to that dusty old laptop you thought you'd never use again
System Requirements
Soundplant is not very demanding for basic use and can run on virtually any Windows or Mac computer made in the last 8+ years; a multicore processor and 4GB of RAM are recommended. Your built-in cheapo soundcard will work fine, and so will any add-on professional quality audio interface. For optimal display, minimum 1280x720 screen resolution is recommended.
The Windows version runs on Windows 10, 8, & 7; 64-bit is recommended but not required
The Macintosh version runs on latest macOS 10.14 Mojave down to minimum OS X 10.9 Mavericks
Licensing
Soundplant is independently produced software distributed as free for non-commercial use, with a 25-launch trial of the registered version features. The registered (paid licensed) version permits unlimited use of the following features: expanded sound file format support for sounds above 16-bit, compressed files (.mp3, .mp4, .flac, etc.), and audio from video files; recording; background key input; sound output device selection; ASIO support; and output sample rates above 44 kHz. If you use Soundplant commercially (defined as: if you make money while using Soundplant), and/or require the professional features of the registered version, please purchase a license at the Soundplant web site. Your support will help improve this program in the future (see planned improvements section) and provide income to the author. The 25-launch trial of the registered features allows you to try all features before you buy so that you can be sure it completely meets your needs before purchasing. Soundplant's flexible license permits a single user to run Soundplant on an unlimited number of Windows and Mac computers.
Usage Instructions
Quick Start
Aside from a few items, Soundplant is designed to be largely self-explanatory. For the most basic usage, simply drag and drop sound files onto onscreen computer keyboard keys. Pressing any keyboard key will cause its assigned sound to play, and so will double-clicking the onscreen key. In the default configuration, hitting the same key with Shift held down stops the sound, and hitting Escape stops all playing sounds. Click any key to select it and configure its settings in the Key Configuration Panel on the bottom of the screen to have finer control over how sounds are triggered. Save and load .keymap files using the buttons along the top of the screen.
A more detailed explanation of the usage of Soundplant follows. The least self-evident items will be marked with a red flag ▰ for those who want to just skim these instructions.
In 'detailed' view mode, the default view, the Soundplant program window is divided into 5 main sections:
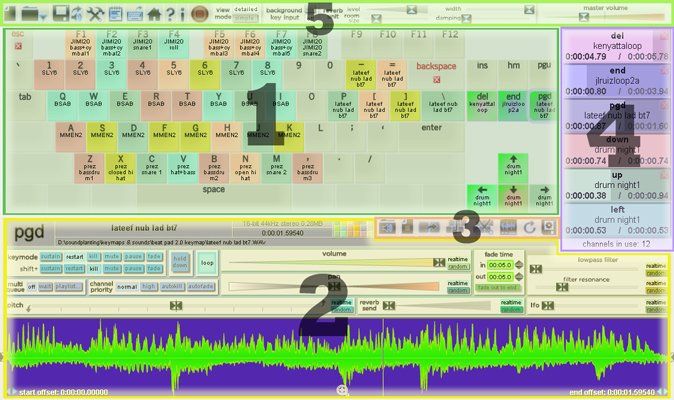
- the Onscreen Keyboard in the center
- the Key Configuration Panel on the bottom, containing controls for editing the behavior of each key, the sound waveform, and sound properties information; all of these controls pertain to individual keys
- the Key Function Toolbar within the Key Configuration Panel
- the Detailed Channels Meter on the right, displaying realtime sound channel use and playback progress
- the Global Function Toolbar along the top, containing buttons for global program functions such as keymap file operations and preferences; all of these buttons pertain to general program functionality and not to specific keys
Onscreen Keyboard
The keyboard display provides an overview of all of the usable keyboard keys and their assigned sound filenames. Each key can be colored and custom-labeled (in the Key Configuration Panel) for ease of reference. Keys show an animated green glow while their assigned sound plays, which gradually lessens in relation to sound playback progress, moving out toward the edges of the key as the sound reaches its end. This glow animation can be turned off in the Preferences to force it to display a fixed green highlight while playing instead of an animated one. Keys that are queued or paused have a yellow instead of green glow.
Sound files can be dragged from any folder window in Explorer (Windows) or Finder (Mac) and dropped over any unassigned key. If multiple files are dropped, then all dropped files will be assigned to successive keys on the keyboard, starting from the key under the mouse and moving from left to right and top row to bottom row.
Key configurations (including assigned sound and settings) can be moved from one key to another by clicking and dragging a key and dropping it onto another key; if done while holding Ctrl (Windows) or Option (Mac), the key assignment is copied rather than moved.
While in 'detailed' view, a single click to any key brings up its settings in the key configuration panel, and you can also scroll the mouse wheel or touchpad to cycle between keys. A double click to a key plays its assigned sound (in 'simple' view, a single click plays its sound).
The Escape key is a universal silence key which kills (stops) all currently playing sounds, and the onscreen Escape key can be single clicked to achieve the same function. ▰ The Windows Backspace/Mac Delete key has a similar silence function but won't stop sounds that have a 'channel priority' set to 'high' (see the channel priority setting), and it won't kill sounds that are queued. Ctrl+Shift+Backspace (Windows)/Ctrl+Shift+Delete (Mac) is a universal fade out all command that fades out all currently playing sounds using the fade out length set in each key's fade time.
Key Configuration Panel
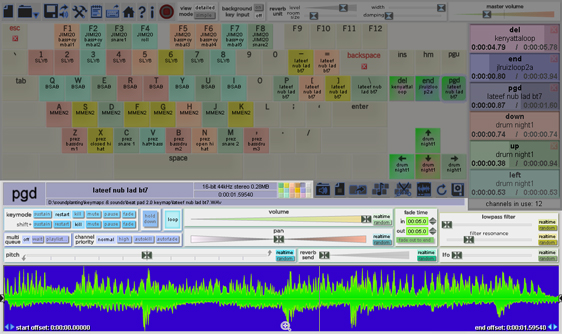
In the lower portion of the screen, key configuration options control how a key starts and kills sounds, realtime effects can be set, and information about the sound is displayed, including a visualization of its waveform. Each of the 72 assignable keyboard keys can have its own unique configuration. To select a key for configuration, do any of the following:
- in 'detailed' view, click any key on the onscreen keyboard
- in 'detailed' view, click any playing sound channel
- ▰ in 'detailed' view, press Ctrl + any keyboard key
- key configurations can be cycled through by scrolling the mouse wheel/touchpad
- key configurations can be set to display in response to key hits via the Preferences➔select key on key press setting (off by default)
- if in 'simple' view and the Preferences➔click key to play sound setting is off, click any key to select it and automatically go into 'detailed' view
After selecting a key to configure, the key is highlighted in the onscreen keyboard, and the name of the key is displayed in the upper left corner of the Key Configuration Panel.
If the key has a sound file assigned, a visualization of its waveform is displayed on the bottom. On the top, the file's name, path, and sound properties are shown including the bit depth, sampling rate in kHz, number of channels, length in h:m:s:ms, and file size in MB (note that in the case of compressed files like .mp3, .mp4, .flac, etc., the displayed file size is the uncompressed size, e.g. the actual size of the decompressed audio loaded in RAM). ▰ An alternative way to play the selected key's sound (e.g. simulate a key press) via single mouse click is to click the large letter of the key in the upper left corner of the Key Configuration Panel; this can be especially helpful for use with touchscreens.
Multiple keys can be selected by holding down Ctrl (Windows) or Command ⌘ (Mac) and single-clicking the desired keys, or Ctrl/⌘+clicking and dragging to select a range of keys, or shift+clicking to select all keys between the clicked key and the last selected key. This allows for settings to be adjusted in bulk for many keys simultaneously in realtime. Multi-key selection mode can be exited by single clicking any key, or by double clicking anywhere in the Soundplant interface that is not an interactive button/hotspot, or by hitting the Escape key (note: hitting Escape while in multi-key selection mode will not stop any sounds). When in multi-key selection mode, settings that differ between keys will appear blurred out until they are adjusted to make the settings identical, and differing slider knob positions will cause the knob to be invisible until any point along the slider is clicked to make the settings identical. If the keys selected all have the same sound file assigned then the waveform will display and start and end offsets are bulk-settable; if offset settings differ between keys with the same sound then the differing offset slider will appear red in color until clicked to make the settings identical.
A description of all key configuration options follows.
Click on the large filename text to set a custom key label. A prompt will appear allowing typing in a new label; Soundplant will ignore sound triggers while typing into this prompt. By default Soundplant will automatically label the key with the name of the sound file minus the file extension, but you can use this function to set it to any text you like. Or, for playlist-triggering keys that have no assigned sound, the default playlist key label "[playlist]" can be changed to a custom name.
Select a key color to define how the onscreen key appears by using the mini palette to the right of the displayed key name. There are 18 color choices available here. Soundplant will automatically give a random color to each newly assigned key unless it had a previous color set. ▰ For those who really want even more colors to create custom keyboard skins, advanced users can define any RGB color for any key by manually editing .keymap files.
keymode and shift+ mostly affect how Soundplant will respond if the key is pressed or released after the assigned sound has already been triggered and is still playing. It's important to understand that if the key's sound is not yet playing, then pressing the key will always start its sound regardless of which keymode is set. 'shift+' controls the behavior of the key if pressed in combination with the Shift key, allowing the flexibility of an additional keymode function on the same key. ▰ The hold down toggle (off by default) further adjusts key behavior by allowing control over what happens when the key is released and can be used to simulate a more traditional musical keyboard-like response. Not all keyboards are mechanically capable of supporting 100% accurate detection of holding down multiple keys simultaneously.
- In sustain mode (default), if the sound is playing, Soundplant will simply trigger another overlapping instance of the sound in the mix. With hold down toggled on this behavior is no different, however it will prevent the key hit from automatically repeating if the key is kept depressed.
- In restart mode, if the sound is playing, Soundplant will stop the sound and restart it from the beginning. With hold down on this behavior is no different, however it will prevent the key hit from automatically repeating if the key is kept depressed.
- In kill mode, if the sound is playing, Soundplant will stop the sound instantaneously. If multiple instances of the sound are playing (triggered by sustain mode), then 'kill' will successively stop the most recently triggered instance as it is pressed multiple times. 'kill' is the default 'shift+' mode, meaning that holding down the Shift key and pressing any key will kill sounds triggered by that key. With hold down on, the sound is killed on release of the key.
- In mute mode, if the sound is playing, it's muted, continuing to occupy a sound channel and playing at zero volume; pressing the key again will un-mute the sound if it has not already finished playing. When a key is set to 'mute', it essentially becomes a mute/un-mute toggle switch. With hold down on, the sound is muted on release of the key, such that the sound is only audible while the key is being pressed.
- In pause mode, the key becomes a pause/unpause toggle. As with 'mute', sounds that are paused continue to occupy a sound channel until killed. With hold down on, the sound is paused on release of the key, such that playback only progresses while the key is being pressed. A paused sound in the Channels Meter appears with a yellow highlight around its border, as does its key.
- The fade mode enables triggering fade ins and fade outs of the sound. If the sound is not playing, then pressing the key in 'fade' mode causes the sound to start playing from 0 volume and fade in to the currently set key volume over the fade in duration set in the fade time controls; if the sound is already playing, then hitting the key fades out the sound from its current volume to 0 using the fade out duration set under fade time. When a sound is in the process of fading, a fade progress indicator line displays over the sound's representation in the Channels Meter, moving up from bottom to top along with the sound's volume level as the sound fades in, and down from top to bottom as it fades out. 'fade' can be used in conjunction with other keymodes via 'shift+' to start and stop sounds with and without fades as needed for maximum flexibility. For example, with Tab set to 'keymode':'kill' and 'shift+':'fade', hitting Tab will start its sound at full volume, and then Shift+Tab will fade it out. Or, starting the sound with a Shift+Tab will fade it in, and then pressing Tab without Shift will stop the sound immediately. You can also set the fade in or out time to 0 if, for example, you only want a fade out but no fade in, or vice-versa, without needing to use Shift. Turning on fade out to end gives the sound a dynamic fade out time based on its playback progress at the time that the fade out is triggered. If a fade out is triggered on a sound that has less time remaining than the set fade out time, then even if 'fade out to end' is off the sound will automatically fade out to end. If the sound is already playing and in the middle of a fade out, pressing the key again will trigger an overlapping new instance of the sound fading in. With hold down on, pressing and holding the key initiates the fade in, and releasing the key initiates the fade out; this can be used to mimic traditional synthesizer attack/release behavior. ▰ To fade out all currently playing sounds, the key combo Ctrl+Shift+Backspace (Windows)/Ctrl+Shift+Delete (Mac) serves as a global 'fade out all' function and will use the fade out time set under fade time for each individual sound. Also note that sounds can be set to automatically fade out on the next start of any sound using 'autofade' channel priority.
Sounds set to loop will do so ad infinitum until they are killed. If the sound has start and/or end offsets defined, then the loop will only occur between the two defined offset points. The loop setting is realtime and will apply to all currently playing instances of the key's sound. If you want a sound to repeat only a fixed number of times, instead of using this infinite loop function create a playlist via multi queue.
multi queue provides several methods for flexibly triggering multiple sounds, whether in sequence as in a playlist, or synchronizing the simultaneous start of multiple tracks. Queued sounds - that is, sounds which have been sequenced but are inactive and waiting to start playing - appear in the Channels Meter with a yellow border highlight, displaying in the order that they will play from top to bottom, and keys of queued sounds have a yellow highlight as well, similar to paused sounds (think of a queued sound as a sound paused at 00:00). Each queued sound occupies one of Soundplant's 256 available sound channels. Soundplant enables queuing to be as simple or as complex as you need, with playlist length limited only by Soundplant's maximum 72 loaded sounds and 256 channels per instance. Soundplant even allows multiple playlists to play simultaneously. Playlists can be a daylong sequence of album-length tracks, or 5 different snare sounds triggered simultaneously with a single key, or a brief melody made out of a composed series of tones, or stem tracks of a single song all starting in sync, or endlessly shuffled breakbeat slices. Any and all of these kinds of playlists can be active while you continue to manually trigger other sounds in realtime. Playlists can either be queued up on demand by pressing keys in a desired sequence, or set in advance by dragging and dropping, via the 2 primary 'multi queue' modes:
- wait mode enables setting up a play queue in realtime by pressing assigned keys in the order you want them to play, acting as a "wait in line" function. Set multiple keys to 'wait' and then press them in the desired order to create an instant playlist. When pressed, a key set to 'wait' will immediately start playing as normal only if no other sounds set to 'wait' have already been pressed; but if a sound in 'wait' mode is already playing, then pressing another 'wait' mode key adds it to the play queue. When a sound in the queue ends, the next queued sound beings playing immediately. 'wait' mode is the easiest way to quickly make a playlist and is perfect for live performance use cases where you won't know the exact order that you need tracks to play in until the moment you need to trigger them on the fly. As Soundplant plays through the queued sequence, you can continue to append sounds to the queue at any time as needed. Think of pressing a 'wait' mode key as starting up a conveyor belt that then allows you to continue placing a bunch of other sounds behind it, further and further down the belt as it moves in realtime. Here is a step-by-step example for setting up and triggering a simple "wait in line" play queue:
- Assign the desired sounds to a series of keys in Soundplant. For example, drop "Soundfile1.wav" onto the Q key, "Soundfile2.wav" onto W, and "Soundfile3.wav" onto E.
- Select the 3 assigned keys for simultaneous configuring by holding down Ctrl (Windows)/Command (Mac) while clicking on the onscreen Q, W, and E keys.
- In the Key Configuration Panel, click the 'multi queue'➔'wait' button to set all 3 keys to 'wait' mode. Then hit the Escape key to exit multi-key selection mode.
- Press the Q keyboard key which will start playing Soundfile1 immediately and display it as an active sound in the Channels Meter as normal, while also making Soundplant aware to catch subsequent key presses of any additional 'wait' mode sounds for building a potential queue list.
- Then, at any time while Soundfile1 is playing, press the W key followed by the E key to add them to the "wait in line" queue in the order that they are pressed. Soundfile2 and Soundfile3 will not play at the moment that their keys are pressed; rather, they will appear in the Channels Meter below the currently playing Soundfile1, inactive and with a yellow border indicating that they are queued. Soundplant will play the sounds back to back in the order that they were pressed: Soundfile1 (Q) followed by Soundfile2 (W) followed by Soundfile3 (E), with their respective display in the Channels Meter updating in realtime.
- playlist... mode allows triggering a preset list of sounds that is stored within the .keymap. Clicking the 'playlist...' button enters a playlist editing interface in which the Channels Meter transforms into a playlist editor:
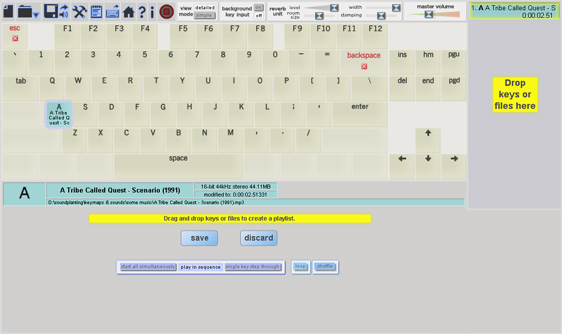
Click and drag already-loaded sounds from onscreen keyboard keys in the into the desired position in the playlist, or drop in sound files from an Explorer or Finder window. To reorder the list, click and drag sounds in the playlist to new positions; to remove an item from the list, drag the sound outside of the playlist area, or click the "X" button on the right edge of the list entry. You can load new sound files while in playlist editing mode by dropping files either onto specific keys or onto the playlist itself (in which case the dropped sound file(s) will be automatically appended to the current playlist and assigned to the first available keyboard key(s) starting from F1). As you edit the list, the total length of the list is displayed. You may assign a playlist to either an unassigned/empty keyboard key, or to a key that already has an existing sound assignment. When making an already-assigned key a playlist key, the sound assigned to the playlist-triggering key is always fixed as the first item in the playlist. For playlists larger than the Channels Meter space can display (more than 12 items), clickable arrow buttons allow scrolling up and down through the list; the mouse scroll wheel can also be used. While in playlist editing mode, you can still press keys to trigger sounds as normal, however they will not appear in the Channels Meter until you finish editing the playlist. When a key has a playlist assigned to it, a playlist icon appears in the upper left corner of the onscreen key; this icon can be clicked to conveniently jump directly into the key's playlist editing interface. In playlist editing mode, several playlist options are displayed below the onscreen keyboard:- save stores the playlist, associating it with the selected key, and exits the playlist editing interface. Once 'save' is clicked, hitting the key at any time starts the playlist. You can go back at any time and edit the playlist by clicking 'playlist...' again, and if the playlist was already playing while configuring its properties, then 'save' applies the changes in realtime.
- discard cancels the playlist, turning off 'multi queue' mode for the selected key and exiting the playlist editing interface. If the playlist was playing then it is killed.
- start all simultaneously sets the sounds in the list to all play at once in sync rather than in a playlist sequence, useful when wanting to trigger synchronized loops or multiple stem tracks of a single song, or when you want to trigger multiple sound effects simultaneously. 'start all simultaneously' playlists can't be set to loop as a whole since the sounds in the list can have varying lengths, however if you want individual sounds to loop you can set them to loop on their respective keys and they will loop when triggered as a playlist.
- play in sequence, the default option, behaves as a conventional playlist, with sounds playing in their preset order, and the next sound in the list automatically starting immediately after the previous sound ends. The loop option toggles playlist repeating, and shuffle randomizes the playlist order. 'play in sequence' playlists that are set to both loop and shuffle will automatically reshuffle their order on every loop iteration to create infinitely varied sequences.
- single key step through sets an automatic pause at the end of each track, and on pressing the playlist-triggering key again, the next track in the list begins playing. This provides a convenient way to create a sequence of sounds allowing each individual sound to be triggered exactly when needed from the same key. With shuffle on, the playlist order is randomized, which also enables 'single key step through' to serve the function of triggering one randomly selected sound from a larger list of sounds. When shuffled, a 'single key step through' playlist will play through each sound in the list in a random order until all sounds have been played once, after which a new iteration in a different randomized order will begin. By default, if the playlist-triggering key is repressed before the previous track in the list has stopped playing, the next track begins playing in a new channel while the previous track continues to play, overlapping in the mix. If you want a hit to the playlist-triggering key to kill the previous sound if it has not yet finished playing on its own, set the channel priority of all of the individual keys in the playlist to 'autokill' (or 'autofade' if you prefer a fade out instead of a hard stop). ▰ An exception in Soundplant behavior with step through queues is that if Soundplant is running in the background with 'background key input' on, a hit to Escape will not kill any inactive queued step through sounds. This can be helpful if you want to kill all actively playing sounds but don't want to reset the position of the step through playlist. If in this situation you do need to kill queued sounds (and reset the playlist order), use the 'kill all queues' combo Ctrl+Shift+Q.
- Click an unused key on the onscreen keyboard to configure as the playlist-triggering key, for example the Q key.
- With the Q key selected, in the Key Configuration Panel click the 'multi queue'➔'playlist...' button. This will bring up the playlist editing interface showing an empty playlist, with the default 'play in sequence' mode set, prompting you to drop sounds into the list.
- Drop your first sound, Soundfile1.wav, into the playlist area at the right edge of the program window where the Channels Meter would normally be. This loads Soundfile1 into Soundplant (automatically assigning it to the 1st available key) and sets it as the 1st sound in the playlist.
- Drop Soundfile2.wav into the playlist underneath Soundfile1. This loads Soundfile2 and makes it occupy the 2nd position in the playlist.
- Do the same for Soundfile3.wav, dropping it below Soundfile2 in the playlist and making it occupy the 3rd position in the list.
- Click the 'save' button in the Key Configuration Panel to save the playlist and exit the playlist editing interface. The Q key is now a playlist-triggering key and shows a playlist icon.
- Press the Q keyboard key. Soundfile1 will immediately start playing and display in the Channels Meter with its progress actively updating. Beneath Soundfile1 in the meter, Soundfile2 and Soundfile3 will also appear but will be inactive and have a yellow border indicating that they are queued. Soundplant will play the sounds back to back in the order that they were set in the playlist: Soundfile1 (Q) followed by Soundfile2 followed by Soundfile3, with their respective display in the Channels Meter updating in realtime.
Some general things to note about the behavior of playlists in Soundplant and how they work in conjunction with Soundplant's other functions:
- Queued sounds will respond to the keymode of their originating keys when pressed. For example, if you want to pause a playing sound that is part of a queue (and thereby pause the playlist), simply have that sound's key set to have a 'keymode' of pause and press the corresponding key while it is playing as part of the playlist. If you want a queued sound to fade in when it starts, have it's 'keymode' set to 'fade'. When a playlist sound starts playing, it is essentially the equivalent of a simulated key hit. It will play with all of the settings of its key applied, including any changes made to its realtime settings after the playlist has already been queued such as volume, pitch, etc., and it can be killed (and thus the playlist advanced) using all standard methods by way of its keymode and channel priority settings.
- Queued sounds can be deleted from an active queue before they start playing just like any other sound can be killed: either click on the red 'X' corresponding to the sound's position in the Channels Meter; or, press a queued key that is set to 'kill' keymode to kill the last queued instance of that sound; or, press the Escape key to kill all sounds including any queued ones. Note that individually killing an actively playing sound that is part of a queue sequence has the effect of advancing to the next sound in the queue, forcing the start of the next sound. Note also that killing queued sounds that are part of a playlist does not permanently delete that sound from the stored playlist, rather it only deletes them from the current actively playing sequence; to delete a sound from a playlist permanently, you must edit the playlist and save the changes.
- ▰ Key combo Ctrl+Shift+Q acts as a 'kill all queues' command, having the special function of killing all queued sounds and all actively playing sounds which are part of playlists, without killing any other playing sounds that are not in a playlist.
- ▰ The Backspace/Mac Delete key has a notable special function when it comes to queues: it will not kill any queued sound but it will kill non-high channel priority playing sounds that may be part of a queue, essentially giving Backspace an 'advance to next in queue' function.
- Keep in mind that a 'play in sequence' queue won't advance to the next track in the playlist until the currently playing sound in the list ends - which means that a looping sound in a playlist effectively prevents the queue from advancing until it's manually killed, since a sound set to loop will loop forever. If you want a sound to loop within a playlist for a limited fixed number of loops, simply set the sound to have loop turned off, and insert the sound into the playlist back to back as many times as desired.
- The select key on key press option works with playlists such that when a queued sound starts playing, it is treated as a key press and its key is selected if the 'select key on key press' setting is on, whether in 'always' or 'only on sound trigger' mode. When queuing up sounds set to 'wait' mode - e.g. when a key press leads to a sound being added to the playlist rather than actually playing - then the key is only selected if 'select key on key press' is set to 'always'.
- Since queued sounds appear in the Channels Meter, if you are working with long playlists or planning to trigger many other sounds while a playlist is playing, it is recommended to configure the maximum 12 channels to display using the Preferences➔channels meter display mode setting to make the most amount of sounds visible.
- Playlists are made up of individual sounds that are each assigned to a different keyboard key, in keeping with Soundplant's one sound per one key metaphor. This can become inconvenient with long playlists if you need to trigger your playlists using background key input while running another program that has its own key functions which conflict with assigned keys in Soundplant. To work around this you can turn on the Preferences➔background key input➔only trigger playlists setting which makes Soundplant ignore hits to non-playlist-triggering keys while running in the background.
The channel priority setting enables fine tuning the manner in which sounds are killed automatically by Soundplant. This setting has no effect on the behavior of a key's individual 'kill' keymode for explicitly killing single sounds, but it does effect the behavior of the global silence key Backspace/Mac Delete. It has 4 options:
- normal priority sounds (the default setting) are killed when Escape or Backspace/Mac Delete is pressed, ▰ with one exception: if a normal priority sound is merely queued and not actively playing, then Backspace/Mac Delete won't kill it, only Escape will.
- high priority sounds will only be killed automatically when Escape is pressed, and are ignored by Backspace/Mac Delete. For example, you can set long background sounds to 'high' and short foreground sounds to 'norm' to ensure that you can use Backspace/Mac Delete to abruptly stop multiple foreground sounds as needed while avoiding eliminating the higher priority background track from the mix.
- ▰ autokill sounds are automatically killed on the next sound trigger by any key. If you want to limit Soundplant to playing 1 sound at a time, simply set all keys to have 'autokill' priority. 'autokill' can also be used to simulate monophonic or "single voice" instruments. Note: 'autokill' is the equivalent of what had been named 'low channel priority' in previous versions of Soundplant prior to v.47.
- ▰ autofade is similar to 'autokill' except that the sound will automatically fade out on the next sound trigger by any key, instead of stopping immediately as with 'autokill'. The fade out will have the duration set under fade time (unless the time remaining in the track is shorter than the set fade out time, in which case the fade out will occur over the remaining duration of the sound). 'autofade' makes it easy to automate crossfades between tracks when used in conjunction with the 'fade' keymode.
There are 7 realtime effects sliders which can be used in combination to tweak the sound or alter it beyond recognition, all non-destructively (not permanently saved in the source sound file). Soundplant is not meant for serious DSP use and is more concerned with low latency sound triggering, but offers several lightweight filters to modify sound without increasing latency. Each effect has realtime and random toggle buttons. If 'realtime' is on (default), the slider will affect all currently active instances of the key's sound. If 'realtime' is off, then the setting will only apply to the next time the key is pressed. Turning on 'random' allows setting a value range along the slider within which Soundplant will select a random value and assign it to each subsequent triggered instance of the sound; this can be used to create interesting variations in sounds. Set the random range boundaries by clicking and dragging either end of the slider. Adjust the left and right boundaries simultaneously while maintaining range size by clicking and dragging the middle portion of the slider. Turning on 'random' automatically turns off 'realtime'. ▰ Double-clicking the slider bar when 'random' is on sets the random value range to the maximum range.
volume sets the sound's amplitude level. This volume control does not use processed amplification; at the highest setting (100%) the sound plays at its normal volume (however, the Soundplant master volume control can modulate this at the global level and does use processed amplification at settings above 100%). ▰ Double-clicking the slider bar sets the volume to 100% when 'random' is off.
pan sets the sound's location in stereo space, implemented as a "true pan" whereby both left and right channels are mixed and shifted simultaneously and remain audible rather than one channel simply being faded out. For example, a pan of -100% means that both the left and right channels are audible entirely on the left channel. ▰ Double-clicking the slider bar resets the pan to 0% when 'random' is off.
pitch adjusts the pitch (speed) of the sound in semitones, with accuracy to the cent or 100th of a semitone. Soundplant uses a "resample" pitch shift which affects the duration of the sound in addition to its pitch, i.e., lowering pitch will stretch out the sound and raising pitch will shorten the sound; when adjusting pitch, the sound's duration display will adjust to reflect the modified length of the sound. Octave markers are provided along the slider bar (12 semitones = 1 octave). For example, a sound with a pitch setting of +24.00 will be two octaves higher than, and 1/4 the duration of the same sound set to 0.00. The up and down arrow buttons to the left and right of the slider bar allow fine tuning of the pitch setting more precisely than the slider; one click adjusts the pitch by one cent, enabling microtonal accuracy. ▰ Double-clicking the slider bar resets the pitch to 0 when 'random' is off.
reverb send adjusts the level at which the global reverb realtime effect is applied to the key. Because high quality reverb is a CPU-intensive effect, Soundplant keeps latency low by using a single reverb unit through which all keys can be individually processed via the 'reverb send' slider. The reverb unit settings in the Global Function Toolbar adjust the properties of the global reverb effect. Note that adding reverb to a sound can mean that its generated reverberations continue to be audible even after the sound itself is killed, depending on the settings. ▰ Double-clicking the slider bar resets the reverb send to 0% when 'random' is off.
The lowpass filter has 2 settings. The main lowpass slider sets the cutoff and resonant frequency of the filter in hertz. filter resonance sets the height above DC gain in decibels which the filter resonance exhibits at the cutoff frequency, and will only affect the sound if the lowpass filter is on. ▰ Double-clicking these sliders when 'random' is off resets the filter to off or the resonance to 0.
lfo applies low frequency oscillation to the lowpass filter, volume, and pitch effects. ▰ Double-clicking the slider bar resets lfo to 0% when 'random' is off.
The waveform display shows an overview of the sound's waveform. While the sound is playing, a moving white playhead indicates the playback position of the most recent trigger instance of the key, and you can click anywhere along the highlighted part of the waveform to seek the playhead to that point in the sound. For stereo sounds, the top half of the waveform represents the left channel, and the bottom half represents the right. The waveform display includes controls for setting the sound's start offset and end offset. This allows limiting the portion of the sound that is played when the key is pressed; use offsets to, for example, trim silence, remove an unwanted song introduction, refine a loop, or extract individual sounds out of a larger track (see the offset assign function below for a quick automatic way to splice portions of a sound across multiple keys). Define start and end points using the left and right sliders, or more precisely by entering zoom view to edit offset points in a full screen zoomable version of the waveform, or by using the clickable arrow buttons along the bottom which allow adjusting to the 100,000th of a second. Offset changes are applied in realtime allowing start and end points to be adjusted while playing the sound, especially handy when adjusting loop points (note: when multiple keys are selected, offset changes are not realtime updated). ▰ Double-click the waveform to reset the offset selection back to the entire length of the sound. While the sound is not playing, click and drag anywhere in the highlighted part of the waveform to move both the start and end points simultaneously. While the sound is playing, if desired you can still drag the start and end points simultaneously by holding down shift while clicking the highlighted part of the waveform to allow selection dragging instead of playback position seeking. Normally the waveform playhead shows the playback progress of the most recently triggered instance of the sound, but if multiple overlapping instances of the key's sound have been triggered, and you want the playhead to reflect a particular instance other than the last one pressed, click on that instance in the Channels Meter to set the playhead to reflect that instance.
If the sound contains cue points saved with an audio editor, start cue and end cue controls appear within the waveform display which allow cycling through the cue points to set the start and end offsets. Soundplant can read cue points in 8-bit, 16-bit, and 24-bit .wav files, and in compressed Shockwave Audio .swa files (a little-known but convenient format which is essentially an mp3 with cue points). Though Soundplant enables finer control over offset points than many editors, using cue points saved from a dedicated external audio editing program can provide an easier way to set a complex array of precise offset points.
zoom view displays the waveform in a detailed full screen mode, hiding all other controls and enabling more precise setting of start and end offsets and examining of sound properties:
In 'zoom view', the small waveform along the bottom of the screen becomes a thumbnail for viewing the larger version of the waveform above. To bring any portion of the waveform into view, click and drag the large black magnifying glass icon to the desired position over the small waveform, and adjust the size of the grey highlight rectangle (representing the size of the zoom view) by clicking and dragging its edges. You can also zoom in and out by using the mouse scroll wheel or by clicking the zoom in and out buttons detailed below. Offset start and end points are represented by draggable yellow arrows positioned over the large waveform. ▰ When either offset point is not within the currently selected zoom view, its arrow icon will still appear, greyed out, in the left or right margin, for convenient access even though the actual point is offscreen; at any time, a greyed out offset arrow can be clicked and dragged from the side margin into view in order to set an offset point within the current view. Click anywhere along the large waveform to start the sound playing from the clicked point, or, if the sound was already playing, to seek to that point; you can also play by hitting the selected key, or clicking the play buttons detailed below, and you can continue to trigger other sounds via the keyboard as normal while in 'zoom view'. When entering 'zoom view' on a sound for the first time, the sound file must be reanalyzed in a more computationally intensive manner in order to retrieve the detailed waveform data; this can take some time on very long sounds depending on computer speed, however once complete the data is cached allowing zoom view to be opened instantaneously on subsequent occasions. The following function buttons are available in zoom view:
- play starts the sound playing according to its existing key configuration settings, including the defined start and end offsets, loop setting, etc., essentially simulating a key hit in 'restart' keymode.
- play from view start starts the sound playing from the point represented by the left edge of the current zoom view, regardless of the start offset setting. This is convenient for fine tuning an end offset point without having to play the sound from the beginning. If the end offset point is after the view start point, then play will end at the end offset; if the end offset is before the view start, then it will play to the end of the sound. ▰ If the Preferences➔use space key as global pause/unpause setting is on, then hitting space while in zoom view executes a 'play from view start'.
- stop kills the sound if it was playing.
- zoom in increases the magnification by 20%, maintaining the current center point of the sound in the view. For very long sounds, this allows zooming in deeper than resizing the thumbnail magnifying area when your desired view area is smaller than 1 pixel as represented on the thumbnail waveform. Scrolling the mouse wheel (or touch pad) up will also zoom in; if the mouse wheel is scrolled while the mouse is hovered over the large waveform, the zoom position is oriented based on cursor location. Eventually a maximum zoom level will be reached, which differs depending on the length and quality of the sound as well as system resources, after which further zooming in is disabled.
- zoom out decreases the magnification by 20%, maintaining the current center point of the sound in the view. Scrolling the mouse wheel (or touch pad) down will also zoom out. ▰ Double clicking the small waveform thumbnail zooms out fully to view the entire sound.
- zoom to full offset selection sets the start view point equal to the sound start offset, and the end view point equal to the sound end offset. Depending on the view set prior to clicking this button it can function as either a zoom in or out. If the sound has no offsets defined then this zooms out to show the entire waveform.
- exit zoom closes the zoom view, restoring the standard Soundplant interface. Hitting the Escape key will also close the zoom view, unless any sounds are playing in which case Escape will first have its standard function of killing all sounds (and then a secondary hit to Escape would exit zoom).
Key Function Toolbar
In the upper right corner of the Key Configuration Panel are a row of key-specific function buttons.
open sound brings up a dialog box for browsing for sound files to assign to keys (providing an alternative method for loading sounds other than dragging and dropping them). Soundplant supports virtually all digital audio file formats in existence as well as audio from video files, of any bitrate and up to 192 kHz sampling rate, both compressed and uncompressed. Here is a non-exhaustive list of supported formats: wav, aif, mp3, mp4, flac, m4a, aac, ape, alac, ogg, snd, bwf, au, swa, wma, m4b, m4r, m4p, oga, mp2, mp1, ra, rm, rv, rmvb, wv, amr, ogv, 3gp, 3g2, m4v, wmv, mov, avi, divx, mpg, flv, f4v, asf. The free version only loads .wav & .aif, 16-bit, uncompressed. You can select multiple sound files in the open sound dialog; if more than 1 file is selected, then the files will be assigned to successive unassigned keys on the keyboard, starting from the currently selected key and moving from left to right and top to bottom. If the currently selected key already has an assigned sound, you can use 'open sound' to to select a single file to replace the current key's sound file but retain its configuration settings. If you select multiple files in the 'open sound' dialog and the current key already has a sound assigned, the current key's sound will not be replaced, rather the new assignments will be bumped to the next available keys. If you open a particularly long sound that is too large to fit in RAM, it will be automatically streamed from disk instead. Generally, Soundplant will be able to play sounds of unlimited length unless in very low memory situations; RAM use optimization settings can be adjusted under Preferences➔memory usage. ▰ When a large sound has to be streamed from disk instead of loaded to RAM, realtime pitch shift, realtime offsets, and sustain keymode are disabled due to performance limitations.
reset key reverts the key's settings back to its initial unassigned state with the default empty key configuration. If a sound had been assigned to the key, this will unload the sound from memory (unless the same sound file is still being used by another key).
copy key... duplicates the key's settings onto another key. If the key has a sound assigned, the copy is done in a memory efficient manner whereby the target key will refer to the same sound data in memory rather than reload the file. Activating the 'copy' function will temporarily hide all other buttons, change the cursor, and prompt to select a target key on the onscreen keyboard. Only an unassigned key can be selected as a target. ▰ Alternatively to using this function button, a key can be copied by simply clicking and dragging the key while holding down Ctrl (Windows) or Option (Mac) and dropping it onto the desired target key. Keys can also be moved by clicking and dragging the key without holding down Ctrl or Option and dropping it onto the target key, bringing about a reset of the source key rather than duplicating it.
multi-key pitch assign... enables the memory efficient batch assignment of the sound at varying pitches onto multiple keys in 2 easy steps. This is a convenient way to simulate a polyphonic instrument using just a single sample, but can also alter the sound's speed to extremities that can make it into a totally different sound. Clicking this button will temporarily hide all other buttons aside from the pitch slider, change the cursor, and prompt to select a group of unassigned keys next to the current key. Mousing over the onscreen keyboard will highlight sets of keys next to the current key to enable making a selection. The start pitch for the multi-key assignment can also be adjusted using the pitch slider before selecting the key group. Clicking on the keyboard to select the key group will prompt to set the end pitch for the batch. An unmovable marker on the pitch slider bar shows the start pitch for the batch, and you can drag the pitch slider to set the end pitch for the batch. A dynamic display of the semitonal distance between the keys in your selection will appear and adjust as you slide the controller. Clicking 'apply' will complete the process and assign the start key's configuration to all selected keys with the specified pitch variation. Note that the traditional western chromatic scale places notes 1 semitone apart; distance in semitones away from the base "A" note in the standard diatonic scale are as follows: B-2, C-3, D-5, E-7, F-8, G-10 (with the whole semitone points in between constituting the "accidentals", or sharps and flats, of the chromatic scale). The pitch assign function can also be used to take advantage of the precise microtuning features of Soundplant to discard the bias of western compositional technique and create custom scales. ▰ Even if you do not set an end pitch, leaving the pitch unchanged, you can still hit 'apply' to copy the key onto all of the selected keys; in this manner, 'multi-key pitch assign' can also be used as a handy way to quickly duplicate a key onto multiple other keys.
multi-key offset assign... enables the easy dividing up of equal-sized slices of a sound across multiple keys by auto-setting offsets in a memory efficient manner. It can be used, for example, to extract individual drum sounds from a drum loop by taking a 4/4 beat and splicing it across 4 keys (or 8 or 16 keys to achieve smaller splices). Clicking the 'offset assign' button will temporarily hide all other buttons, change the cursor, and prompt to select a group of unassigned keys in a manner similar to 'pitch assign'. Mousing over the onscreen keyboard will highlight keys indicating the size of the selection as text displayed below will dynamically show the potential length of each key's slice of the sound (depending on the amount of keys selected and the length of the original sound), and the waveform display will graphically reflect the positioning of the resulting offsets. Clicking on the keyboard will designate the key group selection and assign the start key's configuration to all selected keys with the specified offset variation, auto-adjusting each key's offsets to precisely divide pieces of the sound across the selected keys. Note that the division points between slices are completely mathematically determined at equal-length points along the sound, which means that you may need to manually adjust the generated offset settings to match inexact timings of events in the sound that you want to extract in order to get a more perfect sound (keeping in mind that, for example, a human-played drum set rarely has rhythmic timing accurate to the 100,000th of a second).
launch editor is for the editing of audio files in an external editing program. Soundplant is non-destructive, and you may find that work will sometimes need to be done in an audio editor in order to fine tune and add permanent effects to your sound files. The 'launch editor' button will open the application set as the Preferences➔external audio editor and attempt to make it load the key's assigned sound file (works with most editors). The first time you return to Soundplant from the editing program, Soundplant will check if the file has been modified and prompt to ask if the newly edited file should be reloaded; if you choose not to reload an edited sound, Soundplant will continue playing the pre-edited copy of the sound currently loaded in memory. If you do reload the sound, all of the key's configuration settings will remain in place. When reloading a sound file, if the sound had been copied or multi-key-assigned to other keys, then those other keys will also refer to the newly edited sound data.
reload sound from disk manually forces reloading the sound file, for example if you have made multiple changes to it in an external editing program. After clicking launch editor, Soundplant only checks for sound file modification the first time you return to the Soundplant window from the audio program. If you modify the sound later, or if the sound file is modified by means other than 'launch editor', you can make Soundplant reload the sound file with 'reload sound from disk'. All key configuration settings will remain. When reloading a sound file, if the sound had been copied or multi-key-assigned to other keys, then those other keys will also refer to the newly edited sound data.
save key settings as default sets the selected key's configuration as the global default key configuration, meaning the key configuration that automatically applies to all currently empty keys, the 'reset key' button, and all keys in subsequent new keymaps, overriding Soundplant's built-in defaults. For example, Soundplant's factory default key configuration has 'shift+mode' set to 'kill'. But if the currently selected key's 'shift+mode' is set to 'fade', and you 'save key settings as default', then all currently unassigned keys and future keys in subsequently created new keymaps (i.e., the next time you click 'new keymap' or 'reset' an individual key, or restart Soundplant) will have their 'shift+mode' set to 'fade'. With this function, you can store all possible key configuration settings except for key color, sound start and end offsets, 'playlist...', and of course sound file. To set more complex empty keymap configurations with different sets of keys having different preset configurations, save an empty keymap template. ▰ Holding down Ctrl+Shift while clicking this button saves the selected key's configuration as default only for the duration of the current Soundplant session and avoids storing the settings permanently, making future launches of the program revert to using the previously saved defaults; this can be useful for temporarily changing default key settings while configuring complex keymaps. ▰ Holding down shift while clicking this button restores Soundplant's original factory default key settings.
Detailed Channels Meter

At the right edge of the screen is the detailed sound Channels Meter, which gives a realtime indication of which sounds are playing, paused, or queued including playback progress, total sound length, key name, and sound name. Soundplant is capable of playing or queueing up to 256 sounds simultaneously, however for practical reasons the amount of channels displayed onscreen is limited. Depending on the Preferences➔channels meter display mode setting, the meter will display either 6 (default) or 12 simultaneous channels; whenever there are more sounds playing than space permits to be displayed, a white bar indicator will appear on the bottom of the meter. Channels are displayed in a dynamic top-to-bottom, first come first shown order, such that if there are more sounds playing than the channel display limit, the earliest sounds triggered will be displayed, however as sounds end or are killed they are dynamically removed from the meter and previously hidden overflow channels will come into view as space permits. Sounds that are paused or queued display with a yellow border. Sounds that have a fade in progress show a realtime fade progress indicator in the form of an animated volume level line moving up (fade in) or down (fade out).
▰ Soundplant's 256 channels are allocated in a way that provides balance between maintaining low latency and maximizing polyphony. Each of the 72 usable keyboard keys have 3 permanently reserved dedicated channels. The remaining 40 channels are shared by all keys for use as needed, allocated dynamically. As such, the maximum amount of simultaneous instances of any single key's sound is 40 + 3 = 43 simultaneous instances. Once the single key 43 instance limit is reached Soundplant will ignore subsequent triggers of that key's sound until another channel becomes free. If you (are crazy enough to) want to play more than 43 simultaneous instances of a single sound, assign the sound to additional keys, since each key adds 3 more dedicated channels of polyphony.
The Channels Meter can be interacted with in the following ways:
- click on the X button to instantly stop a channel's sound
- click on the dynamic time display to toggle between a time elapsed count up (default) and time remaining count down (this can also be permanently set in the Preferences)
- click the sound name or key letter to select that key for configuring; if there are multiple instances of the same sound currently playing, then clicking the sound channel also forces the play head in the waveform display to correspond to the clicked channel's instance
Global Function Toolbar
Along the top of the screen are a row of buttons with general program functionality and sliders which affect the entire keymap as a whole.
new keymap empties all sound file assignments and clears them from memory, and resets all key configurations to the default key settings.
open keymap, save keymap, and save keymap as allow saving and loading of keyboard configurations, which Soundplant stores as '.keymap' files. These are small text files which contain references to the assigned sound files and their configurations; they do not contain audio data (though they do contain cached waveform data). Keymaps can also be loaded by dragging keymap files anywhere onto the program window, or onto the program icon (including the dock icon on Mac). When saving keymaps, absolute paths to sound files are stored in keymap files, but when opening keymaps, if Soundplant can't find them in the originally stored location, it will automatically attempt to search for files in best-guess paths relative to the keymap file's location as well as in the following additional locations: the same folder as the keymap; every folder in which it has already successfully loaded sounds for the current keymap; the default sound files folder set in the Preferences; the default keymaps folder set in the Preferences; the Soundplant program folder; the Desktop; and the Documents folder. If Soundplant can not find a file, it will prompt with an option to allow manually selecting the new location of the file (or a different file to load in its place). You can safely transport keymaps between different computers, even between Windows and Mac, and Soundplant will be able to load the keymaps as long as it can find the needed sound files in one of the above locations (it is usually easiest to keep the .keymap and sound files together in the same folder when transporting keymaps, especially using save keymap with sounds). You can also save empty keymap templates to load sounds onto in the future and preserve key settings. For example, if you want all of the arrow keys to be colored red and set to loop, you can set this on an empty keymap with no sounds loaded, and in the future when you load this empty keymap template and open sounds onto those keys, they will retain the previously set key configurations. ▰ Soundplant 47 can open older keymaps saved in all previous versions of Soundplant (even going back to the very first version of Soundplant released in 1999!), but it saves keymaps in a newer format that can be opened only in versions 40 or later, and features new to v.47 won't be available if opened in an earlier version.
The recent keymaps button in the lower right corner of 'open keymap' activates a pull-down menu giving one-click access to the 25 most recently saved and loaded keymaps, in the order that they were last accessed. If there are no recent keymaps, this button has the same effect as clicking 'open keymap'. ▰ Holding down 'Shift' and clicking 'recent keymaps' clears the history list.
save keymap with sounds creates a folder and saves a copy of the current keymap and all of its associated sound files in it. This is handy for creating unique copies of used sound files and putting them all into a single location. It is also helpful in packaging up keymaps for transport to other computers (because Soundplant will automatically find all of the keymap's associated sound files if they are kept in the same folder as the .keymap file). If you are working on a keymap that has already been saved with sounds once, doing a 'save keymap with sounds' again to the same folder will copy into that folder any sound files that may have been added since the last save.
preferences opens the Preferences panel.
list keymap creates a tab-delimited text file listing the contents of the current keymap (all loaded sound files and their assigned keys) and opens it in your computer's default text-editing program (normally Notepad on Windows or TextEdit on Mac). From here it can be printed, or saved or copied-and-pasted anywhere you wish and further manipulated in other programs such as a word processor or spreadsheet if desired. Note that the text file is written to a temporary location and will be deleted automatically, so if you want to save the file, do a manual 'save as' through the text editor and select a permanent location for the file.
launch another Soundplant provides an easy one-click way to open a new instance of the program. Soundplant can run in an unlimited number of simultaneous instances, enabling outputting to multiple audio devices simultaneously, preloading multiple banks of sounds, expanding sound channel polyphony, recording multiple tracks of Soundplant output at once (or recording only select sounds while excluding others from the mix), and other possibilities. Used creatively, this can be a powerful feature that adds more flexibility to your use of Soundplant. With multiple instances open, you can have multiple keymaps open and send key input to multiple instances by turning on background key input, and use modifier keys to selectively send input to different instances as set in the background key input Preferences.
Soundplant web site directs your browser to soundplant.org where you can purchase a registration and check for updates, news, free keymap and sound file downloads, FAQs, and links to recommended software and hardware for use with Soundplant.
help activates Soundplant's contextual help mode, allowing you to select any onscreen item to obtain instructions on using it. Clicking this button turns the cursor into a question mark with which you can highlight and select any of Soundplant's major interface elements. Click the button/slider/screen region you want to learn more about to open this Soundplant User Manual to the appropriate section heading. Clicking the 'help' button while already in contextual help mode - e.g., double clicking the button - opens this file at the beginning of the document.
about displays credits, copyright, and registration information.
The record Soundplant's output button activates and deactivates the record function, which captures Soundplant's mixed output into a single .wav file using a direct internal recording method for highest quality and lowest impact on latency. Click once to instantly start recording; an elapsed time display will appear. When finished with the recording session, click again to stop recording; a file dialog will prompt to select a destination for the the resulting .wav file. It will have the same sampling frequency as the current Preferences➔audio output➔sample rate setting. If on Mac, the .wav file will always be 32-bit; on Windows, Soundplant can only record to a 32-bit .wav if using an ASIO output device, otherwise the .wav will be 16-bit if using a non-ASIO sound driver. If you want to record multiple output tracks at once, or only record certain sounds while not recording others, use multiple instances of Soundplant. Record length is limited only by disk space. Recording must be stopped before opening another keymap or changing any audio output settings. ▰ Recording can be toggled on and off by the keyboard shortcut Ctrl+Shift+R. This can be especially useful when recording multiple tracks at once using multiple instances of Soundplant with background key input on, so that all record tracks have a synced start time. Recording is available in the registered version only.
Soundplant has 2 view modes to allow customizable window sizes. detailed is the default view and includes the entire Soundplant interface. simple shrinks the interface to show just the bare essentials, hiding the Key Configuration Panel and the Detailed Channels Meter (though note that you can still get a general idea of which sounds are in use and their playback progress by watching each playing key's glow animation). The view mode setting is saved in Soundplant's configuration and persists after quitting the program. While in 'simple' view mode, you can still assign sounds to keys by dragging and dropping audio files onto the desired key. You may notice a slight performance gain when in 'simple' view, especially on older computers and when playing many sounds simultaneously, because the Soundplant interface uses less system resources with a smaller window size and fewer animated elements; for absolute fastest possible triggering, 'simple' view can shave a few milliseconds off of latency. 'simple' view also expands key size allowing an extra line of key label text to display for sounds with long names, and making keys easier to click-to-trigger (this can be especially helpful for use with touchscreens). ▰ While in 'simple' view, you can send a simulated key hit to any key (i.e., play its sound) by clicking the key; in 'detailed' view, the same thing is accomplished by a double-click. This behavior can be turned off in the Preferences.
background key input enables Soundplant to respond to keys even while its window is not in focus. This powerful feature opens many possibilities as it allows triggering Soundplant sounds while using other audio software, or while typing a document, or while using another instance of Soundplant with a different keymap loaded, or while doing anything in any other program, even if Soundplant is minimized, hidden, or behind other program windows. Additionally, in the background key input Preferences, Soundplant can be set to only accept background key input if a modifier key combo such as Ctrl/Alt/Option is pressed. On Windows, when 'background key input' is on, a Soundplant icon appears in the system tray; it can be clicked to toggle the visibility of the Soundplant window and hide Soundplant entirely from the taskbar (yes, this can be used to play tricks on people by running Soundplant in the background without them noticing!). ▰ If 'background key input' is on, at any time you can hit the panic key combo Ctrl+Alt+Shift+tilde on Windows or Ctrl+Option+Shift+tilde on Mac (~) to immediately turn off 'background key input' and kill all sounds. Note that when triggering sounds while Soundplant is not in focus, there is a slight increase in latency, because of the way key events are passed through the operating system. For absolute fastest possible triggering, input keys directly into Soundplant while its window is in focus. Also note that when triggering sounds from within other programs, Soundplant can not detect the automatic "key repeat hits" that result when holding down keys (depending on system settings); it can only detect these while Soundplant's window is in front. On newer versions of macOS, depending on your permissions and security settings, you may have to explicitly grant Soundplant "Accessibility" permissions in order to allow Soundplant to detect the full range of keyboard hits while it's backgrounded; go to System Preferences➔Privacy tab➔Accessibility and make sure Soundplant is added as a permitted program. 'background key input' is available in the registered version only.
The reverb unit section allows configuration of the global realtime reverb effect. To keep latency low and reverb quality high, Soundplant uses a single powerful reverb processing unit through which all keys are fed at an adjustable per-key send level (which defaults at 0 for each key). Reverb unit settings are saved in keymaps. Finer control of reverb settings with wider sliders is available when Channels Meter display mode is limited to 6 channels. There are 4 reverb parameters:
- level is the volume level of the effect; the reverb unit's output level is independent of the master volume.
- room size is the simulated size of the room, where 0% is small and 100% is outer space.
- width is the spatial width of the reverb.
- damping is how much power is lost at each reverberation, where 0% is full reverberation and 100% is mostly lost.
master volume controls the master level of Soundplant's mixed output. When this setting is above 100%, realtime processed amplification occurs; this is useful for turning up quiet sounds, but can result in distortion when playing sounds which are loud to begin with or when playing many sounds at once. Double clicking the slider sets the volume to 100%. This setting is saved in keymaps. Finer control with a wider slider is available when Preferences➔channels meter display mode is limited to 6 channels.
Preferences
Clicking the preferences button on the Global Function Toolbar opens the Preferences panel for customizing Soundplant's behavior. You can still trigger sounds while the Preferences panel is open. The 1st time Soundplant is launched, it will search for existing preferences from older versions of Soundplant going back to version 41i and import them if found, otherwise it will use factory default preferences. ▰ Soundplant stores separate Preferences for every user on a multi-user computer, so if you log in as a different user and run Soundplant, you can have a different set of Preferences. If you ever need to reset the Preferences, hold Ctrl+Atl+Shift (Windows) or Ctrl+Option+Shift (Mac) while launching Soundplant; this is useful in the rare cases where an audio device's driver does not properly support a selected setting and causes crashes on startup, or if the Preferences get corrupted and cause errors.
The audio output section controls sound quality and output device selection and tunes performance.
The device dropdown menu allows setting a specific sound output device for computers with multiple sound devices connected, and channel for devices with multiple output channels. When this is set to 'default', Soundplant will output to the sound device set as the operating system's default device at the time of Soundplant's launch. If the output device saved in the Preferences is not connected at the time of Soundplant's launch, it will automatically switch to using the system default device. On Windows, Soundplant supports both standard system WDM devices as well as ASIO devices, and in this menu ASIO driver output choices are prefixed with "ASIO". Due to the quirks of audio on Windows, ASIO drivers tend to offer lower latency and higher sound quality, so if you are on Windows and have an ASIO device it is recommended to use its ASIO driver in Soundplant. Recording Soundplant's output on Windows is in 32-bit quality if using an ASIO output device, but limited to 16-bit if using a WDM device. If you don't have an ASIO device, you may still reap much of the benefits of ASIO in Soundplant (and other apps) by installing the free virtual ASIO driver ASIO4ALL which functions as a universal ASIO driver for any standard WDM soundcard. ▰ For rare cases when poorly implemented ASIO drivers cause problems, holding Shift while clicking to open this menu prevents Soundplant from scanning for ASIO devices which can avoid slowdowns or crashes during the device scan process. Output device selection is available in the registered version only; the free version always outputs to the system default device.
sample rate sets the sampling frequency of Soundplant's output mix. The higher the rate, the higher the sound quality, but also the higher the CPU load and latency. Not all audio hardware properly supports all sampling rates above the default 44.1 kHz. Sampling rates above 44.1 kHz are available in the registered version only.
buffer size sets the size of the audio buffer measured in number of samples, allowing fine tuning latency. Generally, the lower the buffer size, the lower the latency, and this should be set to the lowest possible setting at which audio does not glitch, which can vary depending on hardware quirks and the 'sample rate' setting. Buffer size may need to be increased when operating at a high sample rate. On Mac, this setting can usually be left at the lowest value of 64 unless using the highest sample rates. But it has more significance on Windows, where the sheer quantity and variety of available hardware means that the optimal buffer size setting can vary widely between different computers and different audio devices, and for best Soundplant performance tuning, some experimentation with this setting can be fruitful. ▰ The default Windows buffer size is 256, however this is more of a catch-all setting to ensure smooth playback on as many Windows computers as possible. On most newer Windows computers latency can be noticeably improved by lowering the buffer size to 128, or in some cases even lower. If an ASIO device is used you can usually set this to the lowest setting of 64. If the buffer size is set too low, you will hear obvious glitches during audio playback.
save and load audio output settings in keymaps allows the device, sample rate, and buffer size Preference settings to be overridden when opening a keymap by settings saved within the keymap. This is handy if, for example, you want to associate a keymap with a certain output device, especially when managing multiple running instances of Soundplant with each instance outputting to a separate device. When this is turned on, Soundplant will load output settings from a keymap if the following conditions are met: the keymap was saved on the same OS platform as the current running instance of Soundplant (i.e. if running Windows then the keymap must have been saved on any Windows computer); the saved audio output device is currently connected/available; the keymap contains saved output settings (i.e. it must have been saved with 'save and load audio output settings in keymaps' turned on). If any of these conditions are not met, Soundplant will ignore all saved output settings and default to the settings defined in the Preferences. This feature is available in the registered version only.
The interface section controls Soundplant's cosmetic appearance and tunes performance.
channels meter display mode sets the maximum amount of channel progress indicators that are visible in the Detailed Channels Meter, which can be either 6 large channels (default) or 12 small channels. Note that this setting has no effect on Soundplant's polyphony, as Soundplant can play up to 256 tracks of sound simultaneously regardless of how many channels are visible, but there are practical and performance limits on how many of these can fit on the screen at once. At the lower setting, channels are fatter, time elapsed and sound name text is enlarged by 2 point sizes, and the extra screen real estate permits the 'master volume' and 'reverb unit' controls to have wider and more precise sliders. Furthermore, with only 6 channels visible, Soundplant uses slightly less CPU due to there being fewer animated elements onscreen, and a performance boost may be noticed on older/slower computers. Adjust this setting depending on how you use Soundplant, how fast of a computer you are running it on, and how many sounds you typically play simultaneously or need to see displayed simultaneously.
refresh rate adjusts the frame rate at which the interface is updated (including playback progress animations and time elapsed displays). high allows for slightly smoother animations but can use more CPU than medium (default), especially on older/slower computers and when playing many sounds simultaneously.
animated key glow controls whether or not onscreen keyboard keys show a glowing green animated indication of playback progress. This animation can be a helpful visual indicator complementing the Detailed Channels Meter, or even more so when in 'simple' view mode and the Channels Meter is hidden, and aids hand-eye coordination when playing the keyboard while looking at the screen. However, turning it off can reduce CPU usage and increase performance, especially on older/slower computers and when playing many keys at once. When set to off, keys still light up with a green glow when playing, but are not animated. When on unless looping (default), looping sounds' keys won't animate, but non-looping sounds do; this can be a more visually intuitive way to observe looping keys since a looping sound never ends, especially when using short loops like single tones. When set to on both non-looping and looping keys animate their progress, and for looping keys the animation resets each time the loop restarts.
time display sets the behavior of the Channels Meter time display to be either a time elapsed count up (default) or a time remaining count down. ▰ This can also be toggled by clicking on any channel's time display in the Channels Meter.
key labels text size adjusts the display size of onscreen keyboard key label text; the larger the text size, the less text can fit overall. The default medium size allows for 3 lines of text per key in 'detailed' view or 4 lines in 'simple' view, while large shows text at 3 point sizes larger allowing 2 lines in 'detailed' view or 3 lines in 'simple' view.
key appearance offers an aesthetic/cosmetic choice over how onscreen keys are rendered. 3d (default) displays keys in a more realistically shaded, soft-edged, some would say (ugh) skeuomorphic manner, while flat is a more minimalist, gradient-less depiction. Select whichever is more appealing to your eye. 'flat' mode can use slightly less CPU especially on older/slower computers when many keys are playing due to less complex pixel rendering.
If select key on key press is turned on, hitting a key automatically selects it for editing in the Key Configuration Panel. This can be convenient in many situations, but keep in mind that if this is turned on you won't be able to configure one key while simultaneously pressing other keys, because the Key Configuration Panel changes with every key hit, displaying the most recently pressed key. Also, note that having this feature on can cause a slight performance hit when rapidly pressing many keys in succession, especially on older/slower computers; for absolute fastest possible triggering, keep this turned off. When set to always, hitting any key will select it, even if the key has no assigned sound. When set to only on sound trigger, hitting a key will only select it if it has a sound assigned and the hit triggers the sound. For example, with only on sound trigger, hitting a key set to kill whose sound has already been playing will not select the key, since the hit is killing the sound and not triggering it. This can be useful when managing multiple simultaneous instances of Soundplant, for example if you have some keys assigned in one instance but unassigned in another, to avoid unintentionally selecting keys.
memory usage adjusts how Soundplant manages RAM. Under the default and recommended setting, auto-manage, all sounds will automatically be loaded into RAM unless there is not enough available memory. Most computers today have enough RAM to load many hours of audio without issues and still have plenty left over for other programs and operating system functions. This is an important distinction between Soundplant and other audio players. Most players stream audio data from disk in realtime, which conserves RAM and allows for faster initial sound loading, but has 2 limitations: disks are slower than RAM which means higher latency (much higher if, for example, the disk has powered down because it hasn't been accessed in a while), and also disk-based playback requires the disk to constantly be accessed during playback, which can cause unwanted vibration and electrical interference leading to audio signal noise. In Soundplant, when you first load a sound onto a key, Soundplant loads it into RAM at that moment, making it available for instant low latency playback at any time on demand thereafter, with none of the risks or drawbacks of disk use. This means that even if you are loading sounds over a network, or from an external drive with a janky connection, once loaded into Soundplant they will play flawlessly, at the lowest possible latency and highest sound quality (even if the source disk is disconnected!), the only drawback being slightly longer initial sound load time. In low memory situations or when loading very large sounds that are impractical to fit in RAM, Soundplant will automatically fall back to streaming them from disk instead. Sounds streamed from disk play with slightly higher latency and rely on disk speed and availability for playback, and also have certain features disabled due to performance limitations (realtime pitch shift, realtime offsets, and sustain keymode), thus it is usually more desirable for best performance and reliability to load as many sounds as possible into RAM. But if more control over memory management is needed, for example if you need to load many long tracks at once and want to free up memory for other programs, or if you encounter frequent 'out of memory' error messages, activate the don't load to RAM sounds larger than... setting. Here you can fine tune an exact sound size threshold above which Soundplant will cease loading sounds to RAM and stream them from disk instead; set it to the lowest setting if you need to free up as much memory as possible. Most of the situations that require this setting are uncommon, such as if you are loading many huge audio files on an old computer with little RAM. ▰ Keep in mind that when loading compressed sounds such as mp3, m4a, flac, etc., Soundplant decompresses the entire sound into RAM, and the amount of memory required for such files is the full uncompressed size and not the size of the compressed file on disk. For example, a single 5MB mp3 file can equal 50MB when uncompressed, and if you have one of these loaded onto all 72 keys in Soundplant it can start to hit up against the limits of available memory (depending on system configuration, how much RAM is installed, and what other programs are running). The sound size indicated in the sound properties display of the Key Configuration Panel is the full uncompressed size.
low CPU mode forces Soundplant to use less CPU processing power at the expense of slower speed/higher latency; it is off by default. Turning it on can be useful to reduce battery drain if running on a mobile/unplugged device, or to prevent the CPU fan from turning on, or to manually allocate a larger percentage of processing power to other running programs when using an older/slower computer to help tune performance. On newer, faster, efficient computers with plenty of processing power to spare, this setting will have a less noticeable effect, but on old computers it can be a big help in certain situations. For example, if you are performing on a laptop running on battery and notice that your remaining charge is dangerously low, turn on this setting to minimize Soundplant's power usage.
keymap files default folder sets the starting location that opens when the 'open keymap' or 'save keymap' Global Function Toolbar
What’s New in the SOUND CUE SYSTEM keygen?
Screen Shot

System Requirements for SOUND CUE SYSTEM keygen
- First, download the SOUND CUE SYSTEM keygen
-
You can download its setup from given links:

SOUND CUE SYSTEM keygen & for Laptop

SOUND CUE SYSTEM keygen& PC Free Download
