
1st Email Address Verifier 1.10 serial key or number

1st Email Address Verifier 1.10 serial key or number
Previous topic
When upgrading from a previous release to Zend Framework 1.10 or higher you should note the following migration notes.
A wrong behaviour was fixed, when there was no module route and no route matched the given request. Previously, the router returned an unmodified request object, so the front controller just displayed the default controller and action. Since Zend Framework 1.10, the router will correctly as noted in the router interface, throw an exception if no route matches. The error plugin will then catch that exception and forward to the error controller. You can then test for that specific error with the constant :
- publicfunction errorAction()
- $errors = ->_getParam('error_handler');
- switch($errors->type){
- case Zend_Controller_Plugin_ErrorHandler::EXCEPTION_NO_CONTROLLER:
- case Zend_Controller_Plugin_ErrorHandler::EXCEPTION_NO_ACTION:
- publicfunction errorAction()
- $errors = ->_getParam('error_handler');
- switch($errors->type){
- case Zend_Controller_Plugin_ErrorHandler::EXCEPTION_NO_ROUTE:
- case Zend_Controller_Plugin_ErrorHandler::EXCEPTION_NO_CONTROLLER:
- case Zend_Controller_Plugin_ErrorHandler::EXCEPTION_NO_ACTION:
With the introduction of Zend Framework 1.10, Zend_Feed_Reader's handling of retrieving Authors and Contributors was changed, introducing a break in backwards compatibility. This change was an effort to harmonise the treatment of such data across the RSS and Atom classes of the component and enable the return of Author and Contributor data in more accessible, usable and detailed form. It also rectifies an error in that it was assumed any author element referred to a name. In RSS this is incorrect as an author element is actually only required to provide an email address. In addition, the original implementation applied its RSS limits to Atom feeds significantly reducing the usefulness of the parser with that format.
The change means that methods like getAuthors() and getContributors no longer return a simple array of strings parsed from the relevant RSS and Atom elements. Instead, the return value is an ArrayObject subclass called Zend_Feed_Reader_Collection_Author which simulates an iterable multidimensional array of Authors. Each member of this object will be a simple array with three potential keys (as the source data permits). These include: name, email and uri.
The original behaviour of such methods would have returned a simple array of strings, each string attempting to present a single name, but in reality this was unreliable since there is no rule governing the format of RSS Author strings.
The simplest method of simulating the original behaviour of these methods is to use the Zend_Feed_Reader_Collection_Author's getValues() which also returns a simple array of strings representing the "most relevant data", for authors presumed to be their name. Each value in the resulting array is derived from the "name" value attached to each Author (if present). In most cases this simple change is easy to apply as demonstrated below.
- $feed = Zend_Feed_Reader::import('http://example.com/feed');
- $authors = $feed->getAuthors();
- $feed = Zend_Feed_Reader::import('http://example.com/feed');
- $authors = $feed->getAuthors()->getValues();
For security reasons Zend_File_Transfer does no longer store the original mimetype and filesize which is given from the requesting client into its internal storage. Instead the real values will be detected at initiation.
Additionally the original values within will be overridden within the real values at initiation. This makes also secure.
When you are in need of the original values you can either store them before initiating Zend_File_Transfer or use the disableInfos option at initiation. Note that this option is useless when its given after initiation.
Before release 1.10 the MimeType validator used a wrong naming. For consistency the following constants have been changed:
| Old | New | Value |
|---|---|---|
| Too many files, maximum '%max%' are allowed but '%count%' are given | ||
| Too few files, minimum '%min%' are expected but '%count%' are given |
When you are translating these messages within your code then use the new constants. As benefit you don't need to translate the original string anymore to get a correct spelling.
In order to default to a more secure character encoding, Zend_Filter_HtmlEntities now defaults to instead of .
Additionally, because the actual mechanism is dealing with character encodings and not character sets, two new methods have been added, setEncoding() and getEncoding(). The previous methods setCharSet() and setCharSet() are now deprecated and proxy to the new methods. Finally, instead of using the protected members directly within the filter() method, these members are retrieved by their explicit accessors. If you were extending the filter in the past, please check your code and unit tests to ensure everything still continues to work.
In past the Xliff adapter used the source string as message Id. According to the Xliff standard the trans-unit Id should be used. This behaviour was corrected with Zend Framework 1.10. Now the trans-unit Id is used as message Id per default.
But you can still get the incorrect and old behaviour by setting the useId option to .
- $trans = new Zend_Translate(
- 'xliff', '/path/to/source', $locale, array('useId' => false)
When setting returning a error from within a self written validator you have to call the _error() method. Before Zend Framework 1.10 you were able to call this method without giving a parameter. It used then the first found message template.
This behaviour is problematic when you have validators with more than one different message to be returned. Also when you extend an existing validator you can get unexpected results. This could lead to the problem that your user get not the message you expected.
- My_Validator extends Zend_Validate_Abstract
- ->_error(); // unexpected results between different OS
To prevent this problem the _error() method is no longer allowed to be called without giving a parameter.
- My_Validator extends Zend_Validate_Abstract
- ->_error(self::MY_ERROR); // defined error, no unexpected results
Simplification in date validator
Before Zend Framework 1.10 2 identical messages were thrown within the date validator. These were and . As of Zend Framework 1.10 only the message will be returned when the given date does not match the set format.
Fixes in Alpha, Alnum and Barcode validator
Before Zend Framework 1.10 the messages within the 2 barcode adapters, the Alpha and the Alnum validator were identical. This introduced problems when using custom messages, translations or multiple instances of these validators.
As with Zend Framework 1.10 the values of the constants were changed to be unique. When you used the constants as proposed in the manual there is no change for you. But when you used the content of the constants in your code then you will have to change them. The following table shows you the changed values:
| Validator | Constant | Value |
|---|---|---|
| Alnum | alnumStringEmpty | |
| Alpha | alphaStringEmpty | |
| Barcode_Ean13 | ean13Invalid | |
| Barcode_Ean13 | ean13InvalidLength | |
| Barcode_UpcA | upcaInvalid | |
| Barcode_UpcA | upcaInvalidLength | |
| Digits | digitsStringEmpty |
Zend_Validate_Barcode allows you to check if a given value can be represented as barcode.
Zend_Validate_Barcode supports multiple barcode standards and can be extended with proprietary barcode implementations very easily. The following barcode standards are supported:
CODE25: Often called "two of five" or "Code25 Industrial".
This barcode has no length limitation. It supports only digits, and the last digit can be an optional checksum which is calculated with modulo 10. This standard is very old and nowadays not often used. Common usecases are within the industry.
CODE25INTERLEAVED: Often called "Code 2 of 5 Interleaved".
This standard is a variant of CODE25. It has no length limitation, but it must contain an even amount of characters. It supports only digits, and the last digit can be an optional checksum which is calculated with modulo 10. It is used worldwide and common on the market.
CODE39: CODE39 is one of the oldest available codes.
This barcode has a variable length. It supports digits, upper cased alphabetical characters and 7 special characters like whitespace, point and dollar sign. It can have an optional checksum which is calculated with modulo 43. This standard is used worldwide and common within the industry.
CODE39EXT: CODE39EXT is an extension of CODE39.
This barcode has the same properties as CODE39. Additionally it allows the usage of all 128 ASCII characters. This standard is used worldwide and common within the industry.
CODE93: CODE93 is the successor of CODE39.
This barcode has a variable length. It supports digits, alphabetical characters and 7 special characters. It has an optional checksum which is calculated with modulo 47 and contains 2 characters. This standard produces a denser code than CODE39 and is more secure.
CODE93EXT: CODE93EXT is an extension of CODE93.
This barcode has the same properties as CODE93. Additionally it allows the usage of all 128 ASCII characters. This standard is used worldwide and common within the industry.
EAN2: EAN is the shortcut for "European Article Number".
These barcode must have 2 characters. It supports only digits and does not have a checksum. This standard is mainly used as addition to EAN13 (ISBN) when printed on books.
EAN5: EAN is the shortcut for "European Article Number".
These barcode must have 5 characters. It supports only digits and does not have a checksum. This standard is mainly used as addition to EAN13 (ISBN) when printed on books.
EAN8: EAN is the shortcut for "European Article Number".
These barcode can have 7 or 8 characters. It supports only digits. When it has a length of 8 characters it includes a checksum. This standard is used worldwide but has a very limited range. It can be found on small articles where a longer barcode could not be printed.
EAN12: EAN is the shortcut for "European Article Number".
This barcode must have a length of 12 characters. It supports only digits, and the last digit is always a checksum which is calculated with modulo 10. This standard is used within the USA and common on the market. It has been superceded by EAN13.
EAN13: EAN is the shortcut for "European Article Number".
This barcode must have a length of 13 characters. It supports only digits, and the last digit is always a checksum which is calculated with modulo 10. This standard is used worldwide and common on the market.
EAN14: EAN is the shortcut for "European Article Number".
This barcode must have a length of 14 characters. It supports only digits, and the last digit is always a checksum which is calculated with modulo 10. This standard is used worldwide and common on the market. It is the successor for EAN13.
EAN18: EAN is the shortcut for "European Article Number".
This barcode must have a length of 18 characters. It support only digits. The last digit is always a checksum digit which is calculated with modulo 10. This code is often used for the identification of shipping containers.
GTIN12: GTIN is the shortcut for "Global Trade Item Number".
This barcode uses the same standard as EAN12 and is its successor. It's commonly used within the USA.
GTIN13: GTIN is the shortcut for "Global Trade Item Number".
This barcode uses the same standard as EAN13 and is its successor. It is used worldwide by industry.
GTIN14: GTIN is the shortcut for "Global Trade Item Number".
This barcode uses the same standard as EAN14 and is its successor. It is used worldwide and common on the market.
IDENTCODE: Identcode is used by Deutsche Post and DHL. It's an specialized implementation of Code25.
This barcode must have a length of 12 characters. It supports only digits, and the last digit is always a checksum which is calculated with modulo 10. This standard is mainly used by the companies DP and DHL.
INTELLIGENTMAIL: Intelligent Mail is a postal barcode.
This barcode can have a length of 20, 25, 29 or 31 characters. It supports only digits, and contains no checksum. This standard is the successor of and . It is mainly used by the United States Postal Services.
ISSN: is the abbreviation for International Standard Serial Number.
This barcode can have a length of 8 or 13 characters. It supports only digits, and the last digit must be a checksum digit which is calculated with modulo 11. It is used worldwide for printed publications.
ITF14: ITF14 is the GS1 implementation of an Interleaved Two of Five bar code.
This barcode is a special variant of Interleaved 2 of 5. It must have a length of 14 characters and is based on GTIN14. It supports only digits, and the last digit must be a checksum digit which is calculated with modulo 10. It is used worldwide and common within the market.
LEITCODE: Leitcode is used by Deutsche Post and DHL. It's an specialized implementation of Code25.
This barcode must have a length of 14 characters. It supports only digits, and the last digit is always a checksum which is calculated with modulo 10. This standard is mainly used by the companies DP and DHL.
PLANET: Planet is the abbreviation for Postal Alpha Numeric Encoding Technique.
This barcode can have a length of 12 or 14 characters. It supports only digits, and the last digit is always a checksum. This standard is mainly used by the United States Postal Services.
POSTNET: Postnet is used by the US Postal Service.
This barcode can have a length of 6, 7, 10 or 12 characters. It supports only digits, and the last digit is always a checksum. This standard is mainly used by the United States Postal Services.
ROYALMAIL: Royalmail is used by Royal Mail.
This barcode has no defined length. It supports digits, uppercased letters, and the last digit is always a checksum. This standard is mainly used by Royal Mail for their Cleanmail Service. It is also called .
SSCC: SSCC is the shortcut for "Serial Shipping Container Code".
This barcode is a variant of EAN barcode. It must have a length of 18 characters and supports only digits. The last digit must be a checksum digit which is calculated with modulo 10. It is commonly used by the transport industry.
UPCA: UPC is the shortcut for "Univeral Product Code".
This barcode preceeded EAN13. It must have a length of 12 characters and supports only digits. The last digit must be a checksum digit which is calculated with modulo 10. It is commonly used within the USA.
UPCE: UPCE is the short variant from UPCA.
This barcode is a smaller variant of UPCA. It can have a length of 6, 7 or 8 characters and supports only digits. When the barcode is 8 chars long it includes a checksum which is calculated with modulo 10. It is commonly used with small products where a UPCA barcode would not fit.
Fix email delivery issues for error code 550 5.1.10 in Exchange Online
Problems sending and receiving email messages can be frustrating. If you get a non-delivery report (NDR), also called a bounce message, for error code 550 5.1.10, this article can help you fix the problem and get your message sent.
 I got this bounce message. How do I fix it?
 I'm an email admin. How can I fix this?
Why did I get this bounce message?
You received this NDR with error code 5.1.10 for one of the following reasons:
Typically, if a message can't be delivered, the recipient's email system will use the sender's email address in the From field to notify the sender in an NDR like this one. But what if the message was sent by a spammer who falsified the From address so it appears the message came from your email address? The resulting NDR that you'll receive is useless because it creates the false impression that you did something wrong. This type of useless NDR is called backscatter. It's annoying, but if this NDR is backscatter, your account hasn't been compromised.
A spammer sent a message to a non-existent recipient, and they falsified the From address so it appears the message was sent by your email address. The resulting bounce message that you get is called backscatter, and you can safely ignore or delete the bounce message.
Backscatter itself is harmless, but if you're getting a lot of it, it's possible that your computer or device is infected with spam-sending malware. Consider running an anti-malware scan. Additionally, to help prevent spammers from impersonating you or others in your organization, ask your email admin to read this topic: Set up SPF to help prevent spoofing.
I got this bounce message. How do I fix it?
Here are some steps that you can try to fix the problem yourself.
If the steps in this section don't fix the problem for you, contact your email admin and refer them to the information in this topic so they can try to resolve the issue for you.
Verify recipient's email address and resend your message
Verify recipient's email address and resend your message in Outlook
Open the bounce message. In the Report tab, choose Send Again.

If your original message had an attachment larger than 10 MB, the Send Again option might not be available or might not work. Instead, resend the message from your Sent Items folder. For more information, see Resend an email message.
In the new copy of your message, select the recipient's email address in the To box and then press the Delete key.
Remove the recipient's email address from the Auto-Complete list (a bad or outdated entry could be causing the problem):
In the To box, start typing the recipient's email address until it appears in the Auto-Complete drop-down list as shown below.
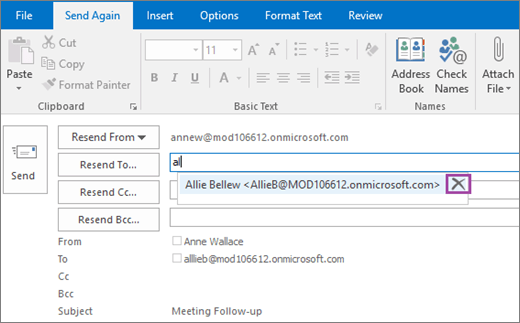
Use the Down Arrow key to select the recipient from the Auto-Complete drop-down list and then press the Delete key or choose the Delete icon
 to the right of the email address.
In the To box, continue typing the entire recipient email address. Be sure to spell the address correctly.

Click Send.
Verify recipient's email address and resend your message in Outlook on the web (formerly known as Outlook Web App)
Open the bounce message. In the reading pane, just below the message header information, choose To send this message again, click here.

If your original message had an attachment larger than 10 MB, the Send Again option might not be available or might not work. Instead, resend the message from your Sent Items folder.
On the To line of the new copy of your message, choose the Delete icon
delete the recipient's email address.
Remove the recipient's email address from the Auto-Complete list (a bad or outdated entry could be causing the problem):
On the empty To line, start typing the recipient's name or email address until it appears in the Auto-Complete drop-down list.

Use the Down Arrow key to select the recipient from the Auto-Complete list, and then press the Delete key. Or, hover over the recipient's name and click the Delete icon
.
On the To line, continue typing the recipient's entire email address. Be sure to spell the address correctly.
Click Send.
Ask the recipient to check for broken forwarding rules or settings
Does the recipient's email address in your original message exactly match the recipient's email address in the NDR? Compare the recipient's email address in the NDR with the recipient's email address in the message in your Sent Items folder.
If the addresses don't match, contact the recipient (by phone, in person, etc.) and ask them if they've configured an email rule that forwards incoming email messages from you to another destination. Their rule could have tried to send a copy of your message to a bad email address. If the recipient has such a rule, they'll need to correct the destination email address or remove the rule in order to prevent 5.1.x message delivery errors.
Microsoft 365 and Office 365 support multiple ways to forward messages automatically. If the intended recipient of your message is using Microsoft 365 or Office 365, ask them to review the Update, disable, or remove Inbox Rules forwarding and Disable account forwarding sections below.
If the problem persists after performing these steps, ask the recipient to refer their email admin to the I'm an email admin. How can I fix this? section below.
Update, disable, or remove Inbox Rules forwarding
In Microsoft 365 or Office 365, sign in to your user account.
Click the gear icon in the top right corner to show the Settings pane.
Select Your app settings > Mail.

From the Options navigation pane on the left, select Mail > Automatic processing > Inbox and sweep rules.

Update, turn off, or delete any rules that might be forwarding the sender's message to a non-existent or broken email address.
Disable account forwarding
Sign in to your Microsoft 365 or Office 365 account, and from the same Options navigation as shown above, select Mail > Accounts > Forwarding.

Select Stop forwarding and click Save to disable account forwarding.
I'm an email admin. How can I fix this?
If the sender can't fix the issue themselves, the problem might be that an email system on the receiving side isn't configured correctly. If you're the email admin for the recipient, try one or more of the following fixes and then ask the sender to resend the message.
Verify that the recipient exists and has an active license assigned
To verify that the recipient exists and has an active license assigned:
In the Microsoft 365 admin center, choose Users to go to the Active users page.
In the Active users > Filters search field, type part of the recipient's name, and then press Enter to locate the recipient. If the recipient doesn't exist, then you must create a new mailbox or contact for this user. (For more information, see Add users individually or in bulk.) If the recipient does exist, make sure the recipient's username matches the email address the sender used.

If the user's mailbox is hosted in Exchange Online, click the user's record to review their details and verify that they've been assigned a valid license for email (for example, an Office 365 Enterprise E5 license).

If the user's mailbox is hosted in Exchange Online, but no license has been assigned, choose Edit and assign the user a license.

Fix or remove broken forwarding rules or settings
Microsoft 365 or Office 365 provides the following features for users and email admins to forward messages to another email address:
Forwarding using Inbox rules (user)
Account forwarding (user and email admin)
Forwarding using mail flow rules (email admin)
Follow the steps below to fix the recipient's broken mail forwarding rule or settings.
Forwarding using Inbox rules (user)
The recipient might have an Inbox rule that is forwarding messages to a problematic email address. Inbox rules are available only to the user (or someone with delegated access to their account). See Update, disable, or remove Inbox Rules forwarding for how the user, or their delegate, can change or remove a broken forwarding Inbox rule.
Account forwarding (user and email admin)
In the Microsoft 365 admin center, choose Users.
In the Active users > Filters search field, type part of the recipient's name and then press Enter to locate the recipient. Click the user's record to view its details.
From the user's profile page, select Mail Settings > Email forwarding > Edit.

Turn off Email forwarding and select Save.

Forwarding using mail flow rules (email admin)
Unlike Inbox rules which are associated with a user's mailbox, mail flow rules (also known as transport rules) are organization-wide settings and can only be created and edited by email admins.
In the Microsoft 365 Admin center, select Admin centers > Exchange.

In the Exchange admin center (EAC), go to Mail flow > Rules.
Look for any redirect rules that might be forwarding the sender's message to another address. An example is shown below.

Update, turn off, or delete any suspect forwarding rules.
Update accepted domain settings
Notes:
Message routing (especially in hybrid configurations) can be complex. Even if changing the accepted domain setting fixes the bounce message problem, it might not be right solution for you. In some cases, changing the accepted domain type might cause other unanticipated problems. Review Manage accepted domains in Exchange Online and then proceed with caution.
If the accepted domain in Exchange Online is Authoritative: The service looks for the recipient in the Exchange Online organization, and if the recipient isn't found, message delivery stops and the sender will receive this bounce message. On-premises users must be represented in the Exchange Online organization by mail contacts or mail users (created manually or by directory synchronization).
If the accepted domain in Exchange Online is Internal Relay: The service looks for the recipient in the Exchange Online organization, and if the recipient isn't found, the service relays the message to your on-premises Exchange Organization (assuming you've correctly set up the required connector to do so).
When setting an accepted domain to Internal Relay, you must set up a corresponding Microsoft 365 or Office 365 connector to your on-premises environment. Failing to do so will break mail flow to your on-premises recipients. For more information about connectors, see Configure mail flow using connectors.
To change the Accepted Domain from Authoritative to Internal Relay
If you have a hybrid configuration with an Microsoft 365 or Office 365 connector configured to route messages to your on-premises environment, and you believe that Internal Relay is the correct setting for your domain, change the Accepted Domain from Authoritative to Internal Relay.
Open the Exchange admin center (EAC). For more information, see Exchange admin center in Exchange Online.
From the EAC, choose Mail flow > Accepted domains and select the recipient's domain.

Double-click the domain name.
In the Accepted Domain dialog box, set the domain to Internal Relay, and then select Save.

Manually synchronize on-premises and Microsoft 365 or Office 365 directories
If you have a hybrid configuration and the recipient is located in the on-premises Exchange organization, it's possible that the recipient's email address isn't properly synchronized with Microsoft 365 or Office 365. Follow these steps to synchronize directories manually:
Log into the on-premises server that's running the Directory Synchronization Tools.
Open Windows PowerShell on the server and run the following commands:
When synchronization completes, repeat the steps in the Verify that the recipient exists and has an active license assigned section to verify that the recipient address exists in Exchange Online.
Verify the custom domain's mail exchanger (MX) record
If you have a custom domain (for example, contoso.com instead of contoso.onmicrosoft.com), it's possible that your domain's MX record isn't configured correctly.
In the Microsoft 365 Admin center, go to Settings > Domains, and then select the recipient's domain.

In the pop-out Required DNS settings pane, select Check DNS.

Verify that there's only one MX record configured for the recipient's domain. Microsoft doesn't support using more than one MX record for a domain that's enrolled in Exchange Online.
If Microsoft 365 or Office 365 detects any issues with your Exchange Online DNS record settings, follow the recommended steps to fix them. You might be prompted to make the changes directly within the Microsoft 365 admin center. Otherwise, you must update the MX record from your DNS host provider's portal. For more information, see Create DNS records at any DNS hosting provider.
Note
Typically, your domain's MX record should point to the Microsoft 365 or Office 365 fully qualified domain name: <your domain>.mail.protection.outlook.com. DNS record updates usually propagate across the Internet in a few hours, but they can take up to 72 hours.
Still need help with a 5.1.10 bounce message?


See also
Email non-delivery reports in Exchange Online
Backscatter in EOP
Configure email forwarding for a mailbox
Synchronizing your directory with Microsoft 365 or Office 365 is easy
Create DNS records at any DNS hosting provider
Set up SPF to help prevent spoofing
What’s New in the 1st Email Address Verifier 1.10 serial key or number?
Screen Shot

System Requirements for 1st Email Address Verifier 1.10 serial key or number
- First, download the 1st Email Address Verifier 1.10 serial key or number
-
You can download its setup from given links:

1st Email Address Verifier 1.10 serial key or number & Apps for Laptop & PC Free Download

1st Email Address Verifier 1.10 serial key or number& Free Download
